Search the Community
Showing results for tags 'animated'.
-
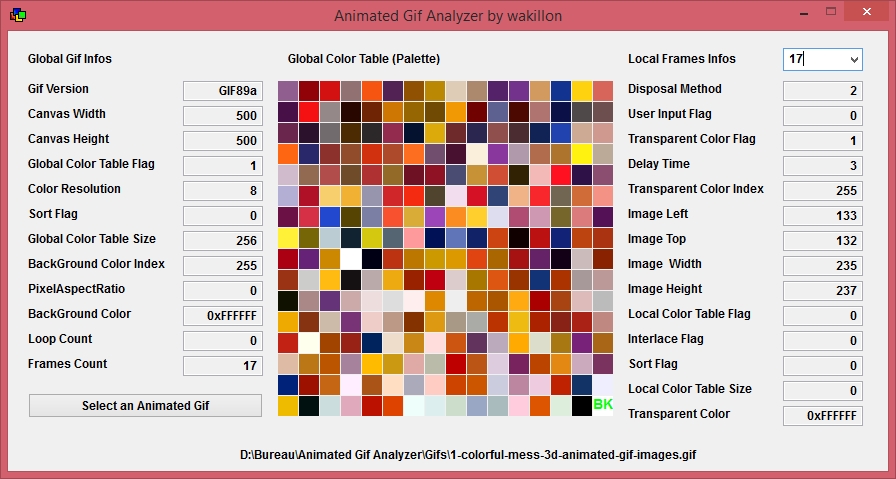
Animated Gif Analyzer Display internal infos from animated gifs Global and Local Palettes supported A value in red indicate that value is false or useless Flashing green text ( BK or TR) indicate background color and transparent color Download available in download section I created this script because I needed, for an other project, to know in detail the internal characteristics of animated gif I had searched a similar soft on internet but I didnt found anything ...
-
So, at first, I just wanted a transparent png splash screen and the idea came to me to simulate their movements just for fun and it gives this : 3 examples #include <GDIPlus.au3> #include <WindowsConstants.au3> #include <GuiConstantsEx.au3> Dim $_GuiDelete $sPngUrl = 'http://s21.postimg.org/4hofttn9z/20141102175221.png' $sPngPath = @TempDir & '\temp1.png' If Not FileExists ( $sPngPath ) Then InetGet ( $sPngUrl, $sPngPath, 1 ) _GDIPlus_Startup () $hImage = _GDIPlus_ImageLoadFromFile ( $sPngPath ) $iWidth = _GDIPlus_ImageGetWidth ( $hImage ) $iHeight = _GDIPlus_ImageGetHeight ( $hImage ) $fRatio = $iWidth / $iHeight ; example 1 For $iWidth = 200 To @DesktopWidth/2 Step 10 $_Gui = GUICreate ( 'gui', $iWidth , $iWidth / $fRatio, -1, -1, -1, BitOR ( $WS_EX_LAYERED, $WS_EX_TOPMOST, $WS_EX_TOOLWINDOW ) ) $hImage = _ImageResize ( $sPngPath, $iWidth, $iWidth / $fRatio ) _SetBitMap ( $_Gui, $hImage, 255, $iWidth, $iWidth / $fRatio ) GUISetState ( @SW_SHOW ) Next Sleep ( 2000 ) _GDIPlus_GraphicsDispose ( $hImage ) _GDIPlus_Shutdown () While Not $_GuiDelete $_GuiDelete= Not GUIDelete ( WinGetHandle ( 'gui' ) ) WEnd Sleep ( 3000 ) ; example 2 $sPngUrl = 'http://s17.postimg.org/v95y9tnvj/20141102180621.png' $sPngPath = @TempDir & '\temp2.png' If Not FileExists ( $sPngPath ) Then InetGet ( $sPngUrl, $sPngPath, 1 ) _GDIPlus_Startup () $hImage = _GDIPlus_ImageLoadFromFile ( $sPngPath ) $iWidth = _GDIPlus_ImageGetWidth ( $hImage ) $iHeight = _GDIPlus_ImageGetHeight ( $hImage ) $fRatio = $iWidth / $iHeight For $iWidth = 50 To @DesktopWidth/3 Step 10 $_Gui = GUICreate ( 'gui', $iWidth , $iWidth / $fRatio, -1, -1, -1, BitOR ( $WS_EX_LAYERED, $WS_EX_TOPMOST, $WS_EX_TOOLWINDOW ) ) $hImage = _ImageResize ( $sPngPath, $iWidth, $iHeight ) _SetBitMap ( $_Gui, $hImage, 255, $iWidth, $iHeight ) GUISetState ( @SW_SHOW ) Next Sleep ( 3000 ) _GDIPlus_GraphicsDispose ( $hImage ) _GDIPlus_Shutdown () $_GuiDelete= Not $_GuiDelete While Not $_GuiDelete $_GuiDelete= Not GUIDelete ( WinGetHandle ( 'gui' ) ) WEnd Sleep ( 2000 ) ; example 3 $sPngUrl = 'http://s11.postimg.org/5xco0uw77/20141102174904.png' $sPngPath = @TempDir & '\temp3.png' If Not FileExists ( $sPngPath ) Then InetGet ( $sPngUrl, $sPngPath, 1 ) _GDIPlus_Startup () $hImage = _GDIPlus_ImageLoadFromFile ( $sPngPath ) $iWidth = _GDIPlus_ImageGetWidth ( $hImage ) $iHeight = _GDIPlus_ImageGetHeight ( $hImage ) $fRatio = $iWidth / $iHeight For $iWidth = 300 To @DesktopWidth/2 Step 10 $_Gui = GUICreate ( '', $iWidth , $iWidth / $fRatio, -1, -1, -1, BitOR ( $WS_EX_LAYERED, $WS_EX_TOPMOST, $WS_EX_TOOLWINDOW ) ) $hImage = _ImageResize ( $sPngPath, $iWidth, $iHeight ) _SetBitMap ( $_Gui, $hImage, 255, $iWidth, $iWidth / $fRatio ) GUISetState ( @SW_SHOW ) Next Sleep ( 3000 ) _GDIPlus_GraphicsDispose ( $hImage ) _GDIPlus_Shutdown () $_GuiDelete= Not $_GuiDelete While Not $_GuiDelete $_GuiDelete= Not GUIDelete ( WinGetHandle ( 'gui' ) ) WEnd Exit Func _SetBitmap ( $hGUI, $hImage, $iOpacity, $n_width, $n_height ) Local $hScrDC, $hMemDC, $hBitmap, $hOld, $pSize, $tSize, $pSource, $tSource, $pBlend, $tBlend $hScrDC = _WinAPI_GetDC ( 0 ) $hMemDC = _WinAPI_CreateCompatibleDC ( $hScrDC ) $hBitmap = _GDIPlus_BitmapCreateHBITMAPFromBitmap ( $hImage ) $hOld = _WinAPI_SelectObject ( $hMemDC, $hBitmap ) $tSize = DllStructCreate ( $tagSIZE ) $pSize = DllStructGetPtr ( $tSize ) DllStructSetData ( $tSize, 'X', $n_width ) DllStructSetData ( $tSize, 'Y', $n_height ) $tSource = DllStructCreate ( $tagPOINT ) $pSource = DllStructGetPtr ( $tSource ) $tBlend = DllStructCreate ( $tagBLENDFUNCTION ) $pBlend = DllStructGetPtr ( $tBlend ) DllStructSetData ( $tBlend, 'Alpha', $iOpacity ) DllStructSetData ( $tBlend, 'Format', 1 ) _WinAPI_UpdateLayeredWindow ( $hGUI, $hScrDC, 0, $pSize, $hMemDC, $pSource, 0, $pBlend, $ULW_ALPHA ) _WinAPI_ReleaseDC ( 0, $hScrDC ) _WinAPI_SelectObject ( $hMemDC, $hOld ) _WinAPI_DeleteObject ( $hBitmap ) _WinAPI_DeleteDC ( $hMemDC ) EndFunc ;==> _SetBitmap () Func _ImageResize ( $sInImage, $newW, $newH, $sOutImage = '' ) Local $oldImage, $GC, $newBmp, $newGC If $sOutImage = '' Then _GDIPlus_Startup () $oldImage = _GDIPlus_ImageLoadFromFile ( $sInImage ) $GC = _GDIPlus_ImageGetGraphicsContext ( $oldImage ) $newBmp = _GDIPlus_BitmapCreateFromGraphics ( $newW, $newH, $GC ) $newGC = _GDIPlus_ImageGetGraphicsContext ( $newBmp ) _GDIPlus_GraphicsDrawImageRect ( $newGC, $oldImage, 0, 0, $newW, $newH ) _GDIPlus_GraphicsDispose ( $GC ) _GDIPlus_GraphicsDispose ( $newGC ) _GDIPlus_ImageDispose ( $oldImage ) If $sOutImage = '' Then Return $newBmp Else _GDIPlus_ImageSaveToFile ( $newBmp, $sOutImage ) _GDIPlus_BitmapDispose ( $newBmp ) _GDIPlus_Shutdown () Return 1 EndIf EndFunc ;==> _ImageResize () gui erasure is a bit jerky i don't know why...
-
Skype TM v1.6 Update : Version 1.1 Process detection added Version 1.2 Fixed error when opening saved .stm file Fixed bug with the skype window Version 1.3 Fixed context menu problem on new item imported Fixed other various bugs Version 1.4 Fixed error when Skype TM started-up before Skype Version 1.5 Added Hotkey to show Skype TM window Added Auto Skype TM open TextMood and play it Version 1.6 New GUI, now available in taskbar Fixed minor bugs Description : Skype TM can let you animate your personnal message in Skype like in wlm RichEdit is included in Skype PM (you can add Bold, Italic, Underlined format to text and put color on it ) Screenshot : Main GUI : Skype TextMood : How to use it ? Create MoodText : -Run Skype if the process doesn't exists, -Run Skype TM and wait for notice from Skype that tell you to allow Skype TM to use Skype or not - Select 'Access allowed' -Look at the left-top corner of your main Skype window, and you will see the 'Skype TM' button (For Exit Skype TM at any moment, right click on this button and select 'Exit') -Click on Skype TM button and you have now the main window of Skype TM, -Here is the list view of TextMood steps, click on 'Add Item' for add new TextMood step -Now you can right-click on this item and select 'Edit', -Add your TextMood and build it as you like, then you can show 'preview' of RichEdit text by Clicking on 'Rich Edit' button -Between steps you can choose the sleep time -Click on apply, you're now on main gui, -Click on 'Play TM' to start the animation in Skype ! Use Process : -Click on 'other...' to have access to Skype TM cmd window, -to always display your TextMood, enter the 'Skype.exe' process in Edit Note : -Skype TM works better with Skype 4.0 -Save your animations with the button 'Save...' or Hotkey Ctrl + S -Open your animations with the button 'Open...' or HotKey Ctrl + O -Run Skype before SkypeTM with the button '?' -Run Skype TM on startup with the button '?' -Show Skype TM window with Hotkey Ctrl + Alt + T + M Special thanks : ProgAndy for his RichEdit_UDF Attachments : Skype TM pack link : Skype_TM.txt Enjoy, Skype users ! Cheers, FireFox.


