Leaderboard
Popular Content
Showing content with the highest reputation on 11/11/2024 in all areas
-

RegExpQuickTester 2.5r
taurus905 and one other reacted to pixelsearch for a topic
Hi everybody I just uploaded the new version 2.5r (11 nov 2024) of the script, download from 1st post. Changes of 2 last versions are : 11 nov 2024 : added a function _ViewSubArrays() in the generated code: this is useful if the user checked Mode 4 which "returns an array of arrays containing global matches including the full match." In this case the function _ViewSubArrays() will display the content of all internal sub-arrays, each internal 1D sub-array becoming 1 row in a 2D array. Thanks to taurus905 for the suggestion, not forgetting jchd who indicated that the internal sub-arrays could have have a different number of rows, depending on the pattern. Changed version from "2.5q" to "2.5r" 10 feb 2024 : check length of 'Personal' Tab before exiting the script : refuse to leave if > 64KB (see notes in script, part Case $GUI_EVENT_CLOSE, $btnClose) Related : Edit Control $ebPersonal got an 'unlimited' text size to bypass the 30.000 characters by default. Changed version from "2.5p" to "2.5q" (version 2.5q wasn't uploaded on the Forum) Thanks @taurus905 for suggesting to display the internal arrays in Mode 4 A thought to @mikell (who sadly is not with us anymore) he insisted that I change this explanative line from the context menu... "\G beginning of string, then where previous match ended" To... "\G beginning of string, or end of the previous match" It's done buddy, I didn't forget2 points -

RegExpQuickTester 2.5r
CYCho reacted to pixelsearch for a topic
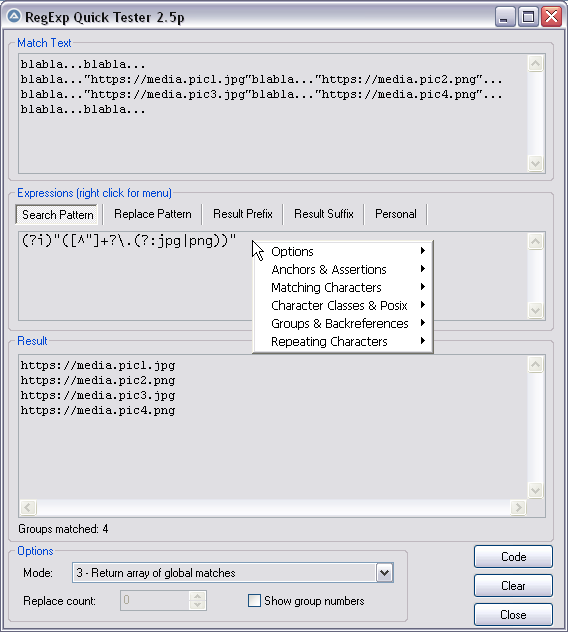
Hi everybody Here is the script I use to test RegEx patterns offline, it's handy. Credits go to Lazycat, who scripted it initially many years ago and thanked "w0uter for ideas and parts of code". I added some modifications (listed in next post) and would like to thank @jchd @mLipok @mikell @Nine @mistersquirrle @taurus905 and @ioa747 for their contribution. Below are the match text & patterns corresponding to the pic above. For a start, you can copy and paste them in their respective edit control. After you choose the corresponding RegExp mode from the ComboBox at the bottom of the screen (mode 3 = return array of global matches) then you'll have the same results as displayed in the pic above. Match Text : blabla...blabla... blabla..."https://media.pic1.jpg"blabla..."https://media.pic2.png"... blabla..."https://media.pic3.jpg"blabla..."https://media.pic4.png"... blabla...blabla... Pattern : (?i)"([^"]+?\.(?:jpg|png))" When you end the script, 2 files will be created in the same directory of the script. Assuming your script is named "RegExpQuickTester 2.5p.au3", the 2 files created will be : * "RegExpQuickTester 2.5p.txt" which contains the saved Match Text that will be reused when you run the script. * "RegExpQuickTester 2.5p.ini" which contains the saved options that will be reused when you run the script. A right click while hovering over the Edit control of the Search Pattern will display a helpful context menu, with possibility to paste something from the menu inside the Search Pattern. Personally I nearly don't paste anything from the context menu but as this feature was created by the original scripter... Instead I like to consult this context menu as a RegExp syntax reminder ! Anyway, just experiment it and choose what's best for you. 99% of the time, the Search Pattern Tab will be on top. If you notice another colored Tab (except the Personal Tab which will never be highlited), then it means that there is something written in this other tab : the color is here only to remind you that there IS something in this other tab, in case you had forgotten. Even a space or a blank line would color the Tab. YJ This particular design (due to original scripter) won't allow you to type "" in the Replace Pattern Tab (mikell frowned, concerning this missing feature). Gladly I found that typing a non existing group, for example $99 will have the same effect as "" so it's a workaround that seems to do the job. The "Code" button allows you to generate the corresponding AutoIt code, which will be copied to the Clipboard Don't hesitate to ask if you have questions. Our RegExp gurus (that's not me) just love RegExp questions Edit: I forgot. You can drag a text file (or htm etc...) inside the Match Text edit control (it's a droppable zone) . There shouldn't be a 32Kb file size limit anymore as I added code to override this limit. There are probably a couple of other functionalities I'm not thinking of now, you'll easily find what you need if you look at the code. And if you want to modify something in the code, don't hesitate. Just share here your modifications in case other users find them useful too, thanks. Updates are detailed in next post Download last version 11 nov 2024 : RegExpQuickTester 2.5r.au31 point -
Hello, the explanations at https://www.autoitscript.com/autoit3/docs/functions/ControlSend.htm and https://www.autoitscript.com/autoit3/docs/functions/Send.htm are not sufficent?1 point
-

To have the hint text automatically disappear when the input cell is clicked.
1stPK reacted to argumentum for a topic
#include <GUIConstants.au3> #include <GuiEdit.au3> Example() Func Example() Local $hGUI = GUICreate("Test Suggestion", 300, 100) Local $idButton = GUICtrlCreateButton("", 0, 0, 0, 0) Local $input = GUICtrlCreateInput("", 10, 10, 280, 30) Local $input1 = GUICtrlCreateInput("", 10, 40, 280, 30) _GUICtrlEdit_SetCueBanner($input, "suggested content...") _GUICtrlEdit_SetCueBanner($input1, "Not suggested content...") GUISetState() While True Switch GUIGetMsg() Case $GUI_EVENT_CLOSE GUIDelete() ExitLoop Case $GUI_EVENT_PRIMARYDOWN $aInfo = GUIGetCursorInfo() If @error Then ContinueLoop If $aInfo[4] = 0 Then GUICtrlSetState($idButton, $GUI_FOCUS) EndSwitch WEnd EndFunc ;==>Example 🤷♂️1 point -
Maybe this hack : #include <GUIConstants.au3> #include <GuiEdit.au3> Example() Func Example() Local $hGUI = GUICreate("Test Suggestion", 300, 100) Local $idButton = GUICtrlCreateButton("", 0, 0, 0, 0) Local $input = GUICtrlCreateInput("", 10, 10, 280, 30) _GUICtrlEdit_SetCueBanner($input, "suggested content...") GUISetState() While True Switch GUIGetMsg() Case $GUI_EVENT_CLOSE ExitLoop Case $GUI_EVENT_PRIMARYDOWN If GUIGetCursorInfo()[4] <> $input Then ControlFocus($hGUI, "", $idButton) EndSwitch WEnd EndFunc ;==>Example You can TAB or click away from the input box...1 point
-
yes you are right but BIG thanks to you for the example! I hope it will help me!1 point
-
Local $RM_mode = False ; * <-- try this option with True or False what I noticed is that when you drag it to the right or down, it becomes smooth. When you drag left or up, it flickers ; https://www.autoitscript.com/forum/topic/212427-window-flickering-when-resizing/?do=findComment&comment=1538161 #include <GUIConstantsEx.au3> #include <WindowsConstants.au3> #include <WinAPI.au3> #include <Misc.au3> HotKeySet("{ESC}", "_Exit") Local $size = 20 Local $hGUI = GUICreate("", 400, 400, -1, -1, $WS_POPUP) Local $aPos = WinGetPos($hGUI) _Hole($hGUI, $size, $size, $aPos[2] - 2 * $size, $aPos[3] - 2 * $size, $aPos[2], $aPos[3]) GUISetBkColor(0x000000) GUISetState() While 1 $msg = GUIGetMsg() Switch $msg Case $GUI_EVENT_CLOSE ExitLoop Case $GUI_EVENT_PRIMARYDOWN ; Get the position and size of window Local $winPos = WinGetPos($hGUI) Local $winX = $winPos[0] Local $winY = $winPos[1] Local $winWidth = $winPos[2] Local $winHeight = $winPos[3] ; Get the current mouse position Local $mousePos = MouseGetPos() Local $mouseX = $mousePos[0] Local $mouseY = $mousePos[1] ; Check if mouse is in any window edge Local $iLeftEdge = Abs($mouseX - $winX) < $size Local $iRightEdge = Abs($mouseX - ($winX + $winWidth)) < $size Local $iTopEdge = Abs($mouseY - $winY) < $size Local $iBottomEdge = Abs($mouseY - ($winY + $winHeight)) < $size Local $RM_mode = False ; * <-- try this option with True or False ; If the Left mouse button is pressed and we are in any window edge ; If _IsPressed("01") And ($iLeftEdge Or $iRightEdge Or $iTopEdge Or $iBottomEdge) Then If $iLeftEdge Or $iRightEdge Or $iTopEdge Or $iBottomEdge Then Local $resizeMode = 0 ; Check the active edge If $iLeftEdge Then $resizeMode += 1 If $iRightEdge Then $resizeMode += 2 If $iTopEdge Then $resizeMode += 4 If $iBottomEdge Then $resizeMode += 8 Do ; resizing mode $mousePos = MouseGetPos() $mouseX = $mousePos[0] $mouseY = $mousePos[1] ; resizing / moving mode If $RM_mode Then $winPos = WinGetPos($hGUI) $winX = $winPos[0] $winY = $winPos[1] EndIf ; Moves / resizes the window to mouse position Switch $resizeMode Case 1 ; Left edge Local $aPos = [$mouseX, $winY, $winWidth + ($winX - $mouseX), $winHeight] Case 2 ; Right edge Local $aPos = [$winX, $winY, $mouseX - $winX, $winHeight] Case 4 ; Top edge Local $aPos = [$winX, $mouseY, $winWidth, $winHeight + ($winY - $mouseY)] Case 8 ; Bottom edge Local $aPos = [$winX, $winY, $winWidth, $mouseY - $winY] Case 5 ; Top-left corner Local $aPos = [$mouseX, $mouseY, $winWidth + ($winX - $mouseX), $winHeight + ($winY - $mouseY)] Case 6 ; Top-right corner Local $aPos = [$winX, $mouseY, $mouseX - $winX, $winHeight + ($winY - $mouseY)] Case 9 ; Bottom-left corner Local $aPos = [$mouseX, $winY, $winWidth + ($winX - $mouseX), $mouseY - $winY] Case 10 ; Bottom-right corner Local $aPos = [$winX, $winY, $mouseX - $winX, $mouseY - $winY] EndSwitch WinMove($hGUI, "", $aPos[0], $aPos[1], $aPos[2], $aPos[3]) _Hole($hGUI, $size, $size, $aPos[2] - 2 * $size, $aPos[3] - 2 * $size, $aPos[2], $aPos[3]) Sleep(10) Until Not _IsPressed("01") ; Exit resizing mode when mouse button is released EndIf Sleep(10) EndSwitch WEnd Func _Hole($h_win, $i_x, $i_y, $i_sizew, $i_sizeh, $width, $Height) Local $outer_rgn, $inner_rgn, $combined_rgn $outer_rgn = _WinAPI_CreateRectRgn(0, 0, $width, $Height) $inner_rgn = _WinAPI_CreateRectRgn($i_x, $i_y, $i_x + $i_sizew, $i_y + $i_sizeh) $combined_rgn = _WinAPI_CreateRectRgn(0, 0, 0, 0) _WinAPI_CombineRgn($combined_rgn, $outer_rgn, $inner_rgn, $RGN_DIFF) _WinAPI_DeleteObject($outer_rgn) _WinAPI_DeleteObject($inner_rgn) _WinAPI_SetWindowRgn($h_win, $combined_rgn) EndFunc ;==>_Hole Func _Exit() Exit EndFunc ;==>_Exit1 point
-
#include <GUIConstants.au3> #include <GuiEdit.au3> Example() Func Example() GUICreate("Test Suggestion", 300, 100) Local $idButton = GUICtrlCreateButton("OK", 10, 70, 100, 20) Local $input = GUICtrlCreateInput("", 10, 10, 280, 30) _GUICtrlEdit_SetCueBanner($input, "suggested content...") GUISetState() While True Switch GUIGetMsg() Case $GUI_EVENT_CLOSE ExitLoop EndSwitch WEnd EndFunc ;==>Example1 point
-
Haha...thx, i made this centuries ago...if I remember right, it was a contribution to some other "digital desktop clock" scripts which took some hundret lines of code...my intention was to write a script in less than 50 lines of code. The "bitbanging" aka producing a polygon, means the position and orientation of an "equal shape", I taught myself about 40 years ago when I programmed "graphical" games for a calculator (sharp PC1401) with a 7-segment LC display in machine code. yepp, rotation is the key...and it is not necessary to use "graphical stuff" like GDI(+) or something like that to read or write "pixels"! A bitmap is an array of bytes/words/dwords representing the "pixels". If you put an AutoIt dllstruct "over" a bitmap (at the bitmap's starting address in memory), you can read or write "pixels" with a simple DllStructGetData() / DllStructSetData(), or, much faster, define/read the dllstruct as a "string" (characters) and use the super-fast AutoIt string commands like StringInstr() to locate a specific sequence of "bytes" (characters). As Werty mentioned, the first column of the digit is unique. This requires seven "bit tests" due to the way the pixels are arranged in memory, as each "pixel" is in a different area of the bitmap. After rotating the image, only one test is required, as the "pixels" of the first column are now in a row, one after the other. So only one read from memory is required to get the "number". And since the position of the next "number" on the screen is known in the bitmap's memory, a search for a sequence of 4 consecutive "numbers" would only require 4 reads from memory. This means that the first step is to look for the first "digit", then look at the (known) next position in memory and check if the byte at that position is the second "digit", and so on... With this technique the search of a sequence of "numbers" on a screenshot is possible in a few (milli)-Seconds. In native AutoIt code....1 point
-
ConsoleWrite("$kk=" & @CRLF) ;~ $kk = Run("NEW_BD_backup.au3") $kk = Run(FileGetShortName(@AutoItExe) & " /AutoIt3ExecuteScript " & FileGetShortName("full\path\of\NEW_BD_backup.au3")) ConsoleWrite("$kk=" & $kk & @CRLF)1 point


2_5p.png.bd11b44b55819fd742004e45c6181a8f.png)


