Leaderboard
Popular Content
Showing content with the highest reputation on 09/03/2023 in all areas
-
On win10 it is still "Edit1". Thanks for the info.1 point
-

Number fuction appears to be rounding small decimals
Musashi reacted to AspirinJunkie for a topic
First of all, what jchd wrote applies: This number cannot be represented exactly as a floating point number according to IEEE 754. And as mentioned,, this is not an AutoIt problem but affects all programs that use native floating point types. Your problem with rounding to ...33 lies somewhere else. Internally the precision of your number is higher than what is displayed to you. The problem here is with the output of the number and not its internal storage. If you output a variable via consolewrite, it must first be converted into a string. So implicitly ConsoleWrite(String($dNumber1) & @LF) is done. However, the conversion into a string does not have the task to output exactly up to the last decimal place, but to make a kind of compromise, so that the number does not become too long. Depending on the number of digits before the decimal point, sometimes more and sometimes less digits after the decimal point are displayed. I don't know the exact algorithm for this but it seems to me that the goal is not to use more than 16 characters for the display of the number. So in your case it rounds to the 16th character of the number. If you would add a digit to the digits before the decimal point, you would have another digit less in the decimal point area. This behavior can be deliberately avoided and then you will also see that the internal calculation is indeed more accurate and the phenomenon you describe only affects the output: $dNumber = 11044326.18126327 ConsoleWrite( "String(): " & $dNumber & _ stringformat("\nStringformat %%.8f: %18.8f\nStringformat %%.16f: %24.16f\n\n", $dNumber, $dNumber))1 point -
1 point
-
This value can't be represented exactly using 64-bit double value: Input value = 11044326.1812633 FP (hex) = 0x416510BCC5CCE8A1 Sign = + Exponent = 23 Scaling = 2^23 = 8388608 Mantissa = 1/4 + 1/16 + 1/256 + 1/8192 + 1/32768 + 1/65536 + 1/131072 + 1/262144 + 1/2097152 + 1/4194304 + 1/67108864 + 1/268435456 + 1/536870912 + 1/1073741824 + 1/8589934592 + 1/17179869184 + 1/137438953472 + 1/274877906944 + 1/549755813888 + 1/2199023255552 + 1/35184372088832 + 1/140737488355328 + 1/4503599627370496 Nearby exact double values (exact computation from FP bits) PrePrevious = +11044326.18126326613128185272216796875 Previous = +11044326.181263267993927001953125 Value = +11044326.18126326985657215118408203125 Next = +11044326.1812632717192173004150390625 NextNext = +11044326.18126327358186244964599609375 The ULPs (Unit of Least Precision) around 11044326.1812633 are -1.86264514923096e-09 and +1.86264514923096e-09 This isn't due to AutoIt but is the result of limits in floating-point 64 bit representation.1 point
-
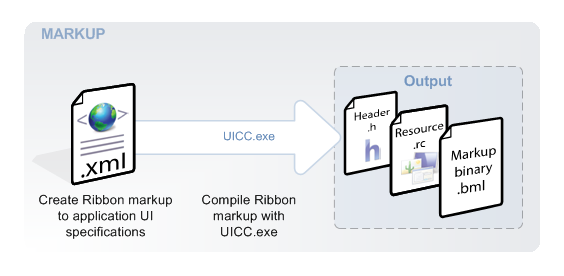
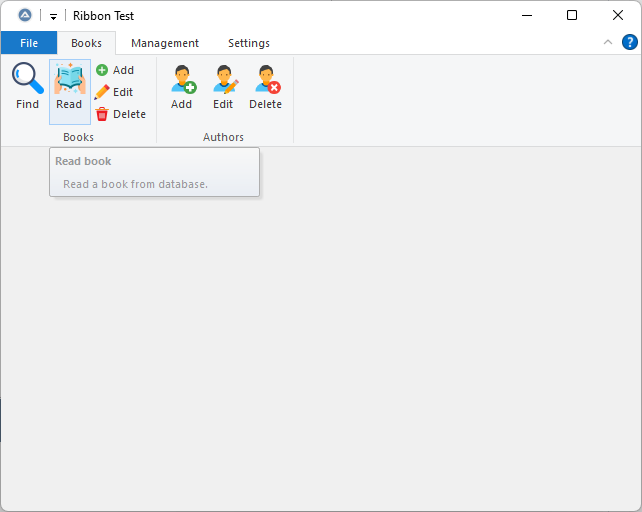
In order to manually create the ribbon resource DLL there are certain tools required such as UI Command Compiler (uicc.exe) that might be found in Windows SDK (7.0 or later), Microsoft Windows Resource Compiler (rc.exe) that might be found in Visual Studio or Microsoft Windows and MSVC Linker that might be found in Visual Studio. In my case I managed to pick up from Windows SDK and Visual Studio just the files required to create a ribbon resource DLL and put them all in a directory (zip attached), so I don’t really need to install anything. Actually with a little bit of code manipulation I can dynamically create the content of the resource DLL. How it works? We have to manually create the Ribbon Markup that describe the UI design of the ribbon. This Ribbon Markup it's basically an XML that describe what kind of controls do you want and how these controls should be displayed in certain situations. When we finish our Ribbon Markup we have to use UICC to generate a resource file (.rc) and a markup binary file (.bml). Then we have to use RC on the resource file generated by UICC to create a resource-definition file (.res). At this point we need to have all the resources prepared (like images from the ribbon, etc). The last step is to link everything into a DLL with MSVC Linker. What structure does have a Ribbon Markup file? There are two logical sections of the Ribbon Markup file: Commands - that are abstract structures without presentation constraints but with certain properties or attributes. Views - that controls how the ribbon entities are displayed. This is how it would look like a bare Ribbon Markup file. Basically in the first section (Commands) we define the tabs, groups, buttons, fonts and many other entities and in the second section (Views) we describe in what layouts and sizes will display these entities. A list of controls that might be defined as commands you can find in Windows Ribbon Framework Control Library. I will show you an example of a dummy application that might be a real case of a library management tool. Commands In my Commands sections I will define 3 tabs, 6 groups and lots of button controls, a font control and some menu items. Each Command needs a Name and an ID, everything else I think are not mandatory but you might set the titles, tooltips of keytips (these works like GUI accelerators). You need Name for Commands because in the next sections Commands are referenced by their name and ID because each Command entry is used by the framework to bind a Ribbon control, through a Command ID, to a Command handler defined in the application code. Also for buttons it's suitable to have images/icons that comes in two sizes: large (32x32 px) and small (16x16 px). The appropriate size will be displayed accordingly with size definitions from Views. <Application.Commands> <!-- Tabs --> <Command Name="Tab1" Id="11" LabelTitle="Books" Keytip="B" /> <Command Name="Tab2" Id="12" LabelTitle="Management" Keytip="M" /> <Command Name="Tab3" Id="13" LabelTitle="Settings" Keytip="S" /> <!-- Groups --> <Command Name="Group1" Id="101" LabelTitle="Books"/> <Command Name="Group2" Id="102" LabelTitle="Authors"/> <Command Name="Group3" Id="103" LabelTitle="Books management"/> <Command Name="Group4" Id="104" LabelTitle="Font"/> <Command Name="Group5" Id="105" LabelTitle="Settings"/> <Command Name="Group6" Id="106" LabelTitle="Database"/> <!-- Controls from Group 1 (Tab 1) --> <Command Name="Control1" Id="1001" LabelTitle="Find" TooltipTitle="Find book" TooltipDescription="Find a book in database." Keytip="F"> <Command.LargeImages><Image Source="C:\Ribbon\Icons\BMP\book_find_l.bmp" /></Command.LargeImages> <Command.SmallImages><Image Source="C:\Ribbon\Icons\BMP\book_find_s.bmp" /></Command.SmallImages> </Command> <Command Name="Control2" Id="1002" LabelTitle="Read" TooltipTitle="Read book" TooltipDescription="Read a book from database." Keytip="R"> <Command.LargeImages><Image Source="C:\Ribbon\Icons\BMP\book_read_l.bmp" /></Command.LargeImages> <Command.SmallImages><Image Source="C:\Ribbon\Icons\BMP\book_read_s.bmp" /></Command.SmallImages> </Command> <Command Name="Control3" Id="1003" LabelTitle="Add" TooltipTitle="Add book" TooltipDescription="Add a book in database." Keytip="A"> <Command.LargeImages><Image Source="C:\Ribbon\Icons\BMP\book_add_l.bmp" /></Command.LargeImages> <Command.SmallImages><Image Source="C:\Ribbon\Icons\BMP\book_add_s.bmp" /></Command.SmallImages> </Command> <Command Name="Control4" Id="1004" LabelTitle="Edit" TooltipTitle="Edit book" TooltipDescription="Edit a book from database." Keytip="E"> <Command.LargeImages><Image Source="C:\Ribbon\Icons\BMP\book_edit_l.bmp" /></Command.LargeImages> <Command.SmallImages><Image Source="C:\Ribbon\Icons\BMP\book_edit_s.bmp" /></Command.SmallImages> </Command> <Command Name="Control5" Id="1005" LabelTitle="Delete" TooltipTitle="Delete book" TooltipDescription="Delete a book in database." Keytip="D"> <Command.LargeImages><Image Source="C:\Ribbon\Icons\BMP\book_delete_l.bmp" /></Command.LargeImages> <Command.SmallImages><Image Source="C:\Ribbon\Icons\BMP\book_delete_s.bmp" /></Command.SmallImages> </Command> <!-- Controls from Group 2 (Tab 1) --> <Command Name="Control6" Id="1006" LabelTitle="Add" TooltipTitle="Add author" TooltipDescription="Add an author in database." Keytip="W"> <Command.LargeImages><Image Source="C:\Ribbon\Icons\BMP\\author_add_l.bmp" /></Command.LargeImages> <Command.SmallImages><Image Source="C:\Ribbon\Icons\BMP\\author_add_s.bmp" /></Command.SmallImages> </Command> <Command Name="Control7" Id="1007" LabelTitle="Edit" TooltipTitle="Edit author" TooltipDescription="Edit an author from database." Keytip="X"> <Command.LargeImages><Image Source="C:\Ribbon\Icons\BMP\\author_edit_l.bmp" /></Command.LargeImages> <Command.SmallImages><Image Source="C:\Ribbon\Icons\BMP\\author_edit_s.bmp" /></Command.SmallImages> </Command> <Command Name="Control8" Id="1008" LabelTitle="Delete" TooltipTitle="Delete author" TooltipDescription="Delete an author from database." Keytip="Y"> <Command.LargeImages><Image Source="C:\Ribbon\Icons\BMP\\author_delete_l.bmp" /></Command.LargeImages> <Command.SmallImages><Image Source="C:\Ribbon\Icons\BMP\\author_delete_s.bmp" /></Command.SmallImages> </Command> <!-- Controls from Group 3 (Tab 2) --> <Command Name="Control9" Id="1009" LabelTitle="Wishlist" TooltipTitle="Wishlist" TooltipDescription="Manage your wihlist." Keytip="W"> <Command.LargeImages><Image Source="C:\Ribbon\Icons\BMP\wishlist_l.bmp" /></Command.LargeImages> <Command.SmallImages><Image Source="C:\Ribbon\Icons\BMP\wishlist_s.bmp" /></Command.SmallImages> </Command> <Command Name="Control10" Id="1010" LabelTitle="Burrows" TooltipTitle="Burrows" TooltipDescription="Register a burrow." Keytip="B"> <Command.LargeImages><Image Source="C:\Ribbon\Icons\BMP\burrow_l.bmp" /></Command.LargeImages> <Command.SmallImages><Image Source="C:\Ribbon\Icons\BMP\burrow_s.bmp" /></Command.SmallImages> </Command> <Command Name="Control11" Id="1011" LabelTitle="Returns" TooltipTitle="Returns" TooltipDescription="Register a return." Keytip="R"> <Command.LargeImages><Image Source="C:\Ribbon\Icons\BMP\\return_l.bmp" /></Command.LargeImages> <Command.SmallImages><Image Source="C:\Ribbon\Icons\BMP\\return_s.bmp" /></Command.SmallImages> </Command> <!-- Controls from Group 4 (Tab 3) --> <Command Name="Control12" Id="1012" LabelTitle="Font" TooltipTitle="Font" TooltipDescription="Change you app font" Keytip="F"></Command> <!-- Controls from Group 5 (Tab 3) --> <Command Name="Control13" Id="1013" LabelTitle="General" TooltipTitle="General" TooltipDescription="Modify general settings." Keytip="G"> <Command.LargeImages><Image Source="C:\Ribbon\Icons\BMP\settings_l.bmp" /></Command.LargeImages> <Command.SmallImages><Image Source="C:\Ribbon\Icons\BMP\settings_s.bmp" /></Command.SmallImages> </Command> <Command Name="Control14" Id="1014" LabelTitle="Theme" TooltipTitle="Theme" TooltipDescription="Modify you application theme." Keytip="T"> <Command.LargeImages><Image Source="C:\Ribbon\Icons\BMP\\themes_l.bmp" /></Command.LargeImages> <Command.SmallImages><Image Source="C:\Ribbon\Icons\BMP\\themes_s.bmp" /></Command.SmallImages> </Command> <Command Name="Control15" Id="1015" LabelTitle="Integrity" TooltipTitle="Integrity" TooltipDescription="Check your application integrity." Keytip="I"> <Command.LargeImages><Image Source="C:\Ribbon\Icons\BMP\integrity_l.bmp" /></Command.LargeImages> <Command.SmallImages><Image Source="C:\Ribbon\Icons\BMP\integrity_s.bmp" /></Command.SmallImages> </Command> <!-- Controls from Group 6 (Tab 3) --> <Command Name="Control16" Id="1016" LabelTitle="Backup" TooltipTitle="Backup" TooltipDescription="Backup your database." Keytip="B"> <Command.LargeImages><Image Source="C:\Ribbon\Icons\BMP\backup_l.bmp" /></Command.LargeImages> <Command.SmallImages><Image Source="C:\Ribbon\Icons\BMP\backup_s.bmp" /></Command.SmallImages> </Command> <Command Name="Control17" Id="1017" LabelTitle="Restore" TooltipTitle="Restore" TooltipDescription="Restore your database." Keytip="R"> <Command.LargeImages><Image Source="C:\Ribbon\Icons\BMP\\restore_l.bmp" /></Command.LargeImages> <Command.SmallImages><Image Source="C:\Ribbon\Icons\BMP\\restore_s.bmp" /></Command.SmallImages> </Command> <!-- Application Menu --> <Command Name="ApplicationMenu" Id="10000" LabelTitle="Application Menu" Keytip="A" /> <!-- Application Menu Items --> <Command Name="Info" Id="10100" LabelTitle="Info" TooltipTitle="Info" TooltipDescription="Application information." Keytip="I"> <Command.LargeImages><Image Source="C:\Ribbon\Icons\BMP\info_l.bmp" /></Command.LargeImages> <Command.SmallImages><Image Source="C:\Ribbon\Icons\BMP\info_s.bmp" /></Command.SmallImages> </Command> <Command Name="Version" Id="10200" LabelTitle="Versions" TooltipTitle="Versions" TooltipDescription="Check you application verion." Keytip="V"> <Command.LargeImages><Image Source="C:\Ribbon\Icons\BMP\versions_l.bmp" /></Command.LargeImages> <Command.SmallImages><Image Source="C:\Ribbon\Icons\BMP\versions_s.bmp" /></Command.SmallImages> </Command> <!-- Quick Access Toolbar--> <Command Name="QuickAccessToolbar" Id="11000" Keytip="Q" /> <!-- Help Button --> <Command Name="HelpButton" Id="12000" Keytip="H" /> </Application.Commands> Notes: You can choose Name and ID by your own pleasure. To avoid any kind of mess in large projects I use this method to assign IDs from range 11-99 for tabs, from range 101-999 for groups and from 1001-9999 for other entities. Also I use ID 10000 for Application Menu and anything above for Menu Items. For Quick Access Toolbar and Help Button I use some larger values than last menu item. I highly recommend to use double backslashes (\\) in images paths as you could encounter errors for certain paths (like those ending with \a, \r, \t). Images have to be 32-bit bitmaps. I attached a script that converts PNGs to such BMPs. Views Now we need to describe how all these entities declared above will be displayed. Usually there are two sections in Application.Views but for the sake of simplicity I will go with a basic example without a context menu, so all we have under Application.Views it's just the Ribbon. <Application.Views> <Ribbon> <Ribbon.QuickAccessToolbar> <QuickAccessToolbar CommandName="QuickAccessToolbar" /> </Ribbon.QuickAccessToolbar> <Ribbon.ApplicationMenu> <ApplicationMenu CommandName="ApplicationMenu"> <MenuGroup> <Button CommandName="Info" /> <Button CommandName="Version" /> </MenuGroup> </ApplicationMenu> </Ribbon.ApplicationMenu> <Ribbon.HelpButton> <HelpButton CommandName="HelpButton" /> </Ribbon.HelpButton> <Ribbon.Tabs> <Tab CommandName="Tab1"> <Tab.ScalingPolicy> <ScalingPolicy> <ScalingPolicy.IdealSizes> <Scale Group="Group1" Size="Medium"/> <Scale Group="Group2" Size="Large"/> </ScalingPolicy.IdealSizes> </ScalingPolicy> </Tab.ScalingPolicy> <Group CommandName="Group1" SizeDefinition="FiveButtons"> <Button CommandName="Control1" /> <Button CommandName="Control2" /> <Button CommandName="Control3" /> <Button CommandName="Control4" /> <Button CommandName="Control5" /> </Group> <Group CommandName="Group2" SizeDefinition="ThreeButtons"> <Button CommandName="Control6" /> <Button CommandName="Control7" /> <Button CommandName="Control8" /> </Group> </Tab> <Tab CommandName="Tab2"> <Tab.ScalingPolicy> <ScalingPolicy> <ScalingPolicy.IdealSizes> <Scale Group="Group3" Size="Medium"/> </ScalingPolicy.IdealSizes> </ScalingPolicy> </Tab.ScalingPolicy> <Group CommandName="Group3" SizeDefinition="ThreeButtons-OneBigAndTwoSmall"> <Button CommandName="Control9" /> <Button CommandName="Control10" /> <Button CommandName="Control11" /> </Group> </Tab> <Tab CommandName="Tab3"> <Tab.ScalingPolicy> <ScalingPolicy> <ScalingPolicy.IdealSizes> <Scale Group="Group4" Size="Large"/> <Scale Group="Group5" Size="Large"/> </ScalingPolicy.IdealSizes> </ScalingPolicy> </Tab.ScalingPolicy> <Group CommandName="Group4" SizeDefinition="OneFontControl"> <FontControl CommandName="Control12" FontType="FontOnly" /> </Group> <Group CommandName="Group5" SizeDefinition="ThreeButtons"> <Button CommandName="Control13" /> <Button CommandName="Control14" /> <Button CommandName="Control15" /> </Group> <Group CommandName="Group6" SizeDefinition="TwoButtons"> <Button CommandName="Control16" /> <Button CommandName="Control17" /> </Group> </Tab> </Ribbon.Tabs> </Ribbon> </Application.Views> Then we specify what Commands are actually our Quick Access Toolbar, ApplicationMenu with Menu Items and Help Button. Next we have Ribbon.Tabs that will describe each Tab by their appropriate Command Name. Basically we group the Commands in specific Groups (with a layout defined by SizeDefinition and ScalePolicy) and then we place these Groups in specific Tabs. Microsoft provides a list of templates for SizeDefinition and ScalePolicy so you can Customize a Ribbon Through Size Definitions and Scaling Policies. Compiling the DLL After we finished our Ribbon Markup file (let's name it lib.xml) we can generate a resource file (.rc) and a markup binary file (.bml) through UICC using this command line: uicc.exe lib.xml lib.bml /res:lib.rc /name:APP Where APP it's the resource name for the binary markup file. The default is APPLICATION_RIBBON. By observation I saw that UICC actually adds _RIBBON after the name even if you specify something different from default name. This is important when you have to initialize the ribbon. The image below is suggestive about what UICC does. (Source: Microsoft) If these files are generated without any errors thrown we can go on and create a resource-definition file (.res) with Microsoft Windows Resource using this command line: rc.exe /v lib.rc Again, if there are no errors we can finally compile the DLL with our ribbon inside using this command line: link.exe /noentry /dll /out:lib.dll lib.res /machine:x86 If there are no errors then you can use Dragana's built-in example to test your ribbon, just change the lines 100 and 101 to match your ribbon DLL filename and resource name. Global $hRibInstance = _WinAPI_LoadLibraryEx("lib.dll", 2) Global $sResName = "APP_RIBBON" I won't insist here about initialization and handling because there are already many examples in this thread. Eventually I can answer if someone have specific questions about that. There is a page on Microsoft that explain more details about Ribbon Framework initialization and how you can handle the commands between your application and your ribbon. I attached a zip file with all the files: ribbon markup, resources, compiled dll, a script to convert PNGs to 32-bit BMP and Dragana's built-in example that load this DLL created in this example. And with that I have less then 1 MB available for attachments. Here is a picture of final ribbon. Enjoy! PS: This is just a basic example but there are more advanced features that are available through Windows Ribbon Framework but for now I think it's enough. I don't really intend to rewrite what it's already on Microsoft website. Ribbon.zip1 point
-
I just found out and want to share #include <MsgBoxConstants.au3> #include <Array.au3> ;~ ShellExecute(@WindowsDir & "\explorer.exe", ",") ;Open an Explorer window at 'the Computer ;~ ShellExecute(@WindowsDir & "\explorer.exe", "shell:MyComputerFolder") ;Open an Explorer window at 'the Computer ;~ ShellExecute(@WindowsDir & "\explorer.exe", "shell:AppUpdatesFolder") ;Display installed Windows Updates ;~ ShellExecute(@WindowsDir & "\explorer.exe", "shell:Cache") ;Open the Temporary Internet Files folder ;~ ShellExecute(@WindowsDir & "\explorer.exe", "shell:ControlPanelFolder") ;Display the Control Panel ;~ ShellExecute(@WindowsDir & "\explorer.exe", "shell:Desktop") ;Open the user’s desktop folder ;~ ShellExecute(@WindowsDir & "\explorer.exe", "shell:DpAPIKeys") ;Opens the user’s AppData\Roaming\Microsoft\Protect folder ;~ ShellExecute(@WindowsDir & "\explorer.exe", "Shell:AccountPictures") ;Account Pictures ;~ ShellExecute(@WindowsDir & "\explorer.exe", "shell:Profile") ;Open the user’s profile folder ;~ ShellExecute(@WindowsDir & "\explorer.exe", "shell:Links") ;Open the user’s Links folder ;~ ShellExecute(@WindowsDir & "\explorer.exe", "shell:User Pinned") ;Access shortcuts pinned to the Start menu or Taskbar ;~ ShellExecute(@WindowsDir & "\explorer.exe", "shell:Quick Launch") ;Open the Quick Launch folder (disabled by default) ;~ ShellExecute(@WindowsDir & "\explorer.exe", "shell:Recent") ;Open the user’s Recent Documents folder ;~ ShellExecute(@WindowsDir & "\explorer.exe", "shell:SendTo") ;Open the user’s Send To folder ShellExecute(@WindowsDir & "\explorer.exe", "shell:AppUpdatesFolder") ;Display installed Windows Updates ;~ More at https://ss64.com/nt/shell.html ;~ ShellExecute(@WindowsDir & "\explorer.exe", "ms-settings:autoplay") ;AutoPlay ;~ ShellExecute(@WindowsDir & "\explorer.exe", "ms-settings:privacy-email") ;Email & app accounts ;~ ShellExecute(@WindowsDir & "\explorer.exe", "ms-settings:yourinfo") ;Your info (Microsoft account) ShellExecute(@WindowsDir & "\explorer.exe", "ms-settings:windowsupdate-history") ;WinUpdate - Update history ;~ More at https://ss64.com/nt/syntax-settings.html ;~ _RestartExplorer() ;---------------------------------------------------------------------------------------- Func _RestartExplorer() ; Close a list of explorer.exe processes returned by ProcessList. Local $aProcessList = ProcessList("explorer.exe") For $i = 1 To $aProcessList[0][0] ConsoleWrite("- ProcessClose=" & ProcessClose($aProcessList[$i][1]) _ & ", PID:" & $aProcessList[$i][1] & ", " & $aProcessList[$i][0] & @CRLF) Next EndFunc ;==>Example ;----------------------------------------------------------------------------------------1 point
-

Send {Ctrl} key when keyboard layout is not English
fraizor reacted to JLogan3o13 for a topic
_WINAPI_SetKeyboardLayout - the help file is your friend.1 point


