Leaderboard
Popular Content
Showing content with the highest reputation on 02/14/2023 in all areas
-
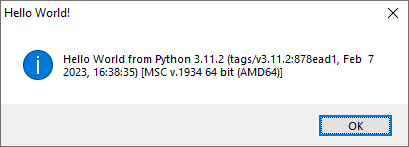
Step 1. Install Python Step 2. Open CMD, run "pip install pywin32" Step 3. Go to your_python_directory\Lib\site-packages\win32com\servers Step 4. Register python COM server by running script "interp.py" Example 1: $py = ObjCreate("Python.Interpreter") $py.exec("import sys") $py_version = $py.eval("sys.version") MsgBox(64, "Hello World!", "Hello World from Python " & $py_version) Example 2: $py = ObjCreate("Python.Interpreter") $py.exec("import customtkinter") $py.exec("import sys") $py.exec("gui = customtkinter.CTk()") $py.exec("GUI_WIDTH = 640") $py.exec("GUI_HEIGHT = 115") $py.exec("GUI_HORIZONTAL = int((gui.winfo_screenwidth() - GUI_WIDTH) / 2)") $py.exec("GUI_VERTICAL = int((gui.winfo_screenheight() - GUI_HEIGHT) / 2)") $py.exec("gui.geometry(f'{GUI_WIDTH}x{GUI_HEIGHT}+{GUI_HORIZONTAL}+{GUI_VERTICAL}')") $py.exec("gui.resizable(False, False)") $py.exec("gui.title('Hello World!')") $py.exec("customtkinter.CTkLabel(gui, text=f'Hello World from Python {sys.version}').pack(expand=1)") $py.exec("gui.mainloop()")2 points
-
This? 🤣 Joking aside, the most important thing for me so far is converting JSON to a dictionary. You can get data from Python (by using "eval" method), but you can't send the result of executing a function or variable from AutoIt to Python for some reason. Let's get some values from the beginning of this json https://api.invidious.io/instances.json?pretty=1 $py = ObjCreate("Python.Interpreter") $py.exec("from requests import get") $py.exec("from json import loads") $py.exec("INVIDIOUS_API = 'https://api.invidious.io/instances.json'") $py.exec("json_data = loads(get(INVIDIOUS_API).content)") ;Print "yewtu.be" ConsoleWrite($py.eval("json_data[0][0]") & @CRLF) ;Attempt to print Netherlands flag icon :D ConsoleWrite($py.eval('json_data[0][1]["flag"]') & @CRLF) ;Print "NL" ConsoleWrite($py.eval('json_data[0][1]["region"]') & @CRLF) ;Print "2.0" ConsoleWrite($py.eval('json_data[0][1]["stats"]["version"]') & @CRLF) ;Print "invidious" ConsoleWrite($py.eval('json_data[0][1]["stats"]["software"]["name"]') & @CRLF) ;Print "2023.02.14-d24b60c" ConsoleWrite($py.eval('json_data[0][1]["stats"]["software"]["version"]') & @CRLF) ;Print "master" ConsoleWrite($py.eval('json_data[0][1]["stats"]["software"]["branch"]') & @CRLF)2 points
-

RegExpQuickTester 2.5r
CYCho reacted to pixelsearch for a topic
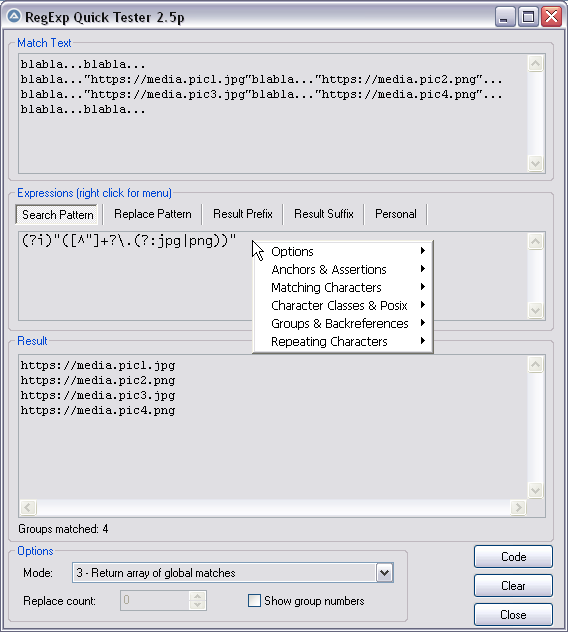
Hi everybody Here is the script I use to test RegEx patterns offline, it's handy. Credits go to Lazycat, who scripted it initially many years ago and thanked "w0uter for ideas and parts of code". I added some modifications (listed in next post) and would like to thank @jchd @mLipok @mikell @Nine @mistersquirrle @taurus905 and @ioa747 for their contribution. Below are the match text & patterns corresponding to the pic above. For a start, you can copy and paste them in their respective edit control. After you choose the corresponding RegExp mode from the ComboBox at the bottom of the screen (mode 3 = return array of global matches) then you'll have the same results as displayed in the pic above. Match Text : blabla...blabla... blabla..."https://media.pic1.jpg"blabla..."https://media.pic2.png"... blabla..."https://media.pic3.jpg"blabla..."https://media.pic4.png"... blabla...blabla... Pattern : (?i)"([^"]+?\.(?:jpg|png))" When you end the script, 2 files will be created in the same directory of the script. Assuming your script is named "RegExpQuickTester 2.5p.au3", the 2 files created will be : * "RegExpQuickTester 2.5p.txt" which contains the saved Match Text that will be reused when you run the script. * "RegExpQuickTester 2.5p.ini" which contains the saved options that will be reused when you run the script. A right click while hovering over the Edit control of the Search Pattern will display a helpful context menu, with possibility to paste something from the menu inside the Search Pattern. Personally I nearly don't paste anything from the context menu but as this feature was created by the original scripter... Instead I like to consult this context menu as a RegExp syntax reminder ! Anyway, just experiment it and choose what's best for you. 99% of the time, the Search Pattern Tab will be on top. If you notice another colored Tab (except the Personal Tab which will never be highlited), then it means that there is something written in this other tab : the color is here only to remind you that there IS something in this other tab, in case you had forgotten. Even a space or a blank line would color the Tab. YJ This particular design (due to original scripter) won't allow you to type "" in the Replace Pattern Tab (mikell frowned, concerning this missing feature). Gladly I found that typing a non existing group, for example $99 will have the same effect as "" so it's a workaround that seems to do the job. The "Code" button allows you to generate the corresponding AutoIt code, which will be copied to the Clipboard Don't hesitate to ask if you have questions. Our RegExp gurus (that's not me) just love RegExp questions Edit: I forgot. You can drag a text file (or htm etc...) inside the Match Text edit control (it's a droppable zone) . There shouldn't be a 32Kb file size limit anymore as I added code to override this limit. There are probably a couple of other functionalities I'm not thinking of now, you'll easily find what you need if you look at the code. And if you want to modify something in the code, don't hesitate. Just share here your modifications in case other users find them useful too, thanks. Updates are detailed in next post Download last version 11 nov 2024 : RegExpQuickTester 2.5r.au31 point -
TreeView Extended Styles The MS docu for TreeView extended styles can be found here. Most styles revolve around visual features. This is an implementation of some of these styles: TVS_EX_AUTOHSCROLL Failed to get this style to work. May depend on the TVM_SETAUTOSCROLLINFO message. TVS_EX_DIMMEDCHECKBOXES, TVS_EX_EXCLUSIONCHECKBOXES, TVS_EX_PARTIALCHECKBOXES Depends on the TVS_CHECKBOXES style also being set. The extended CheckBoxes styles must be set before the TVS_CHECKBOXES style. Necessary for the latter to know which extended styles to set. These CheckBoxes look better on Windows 7 than on Windows 10. On Windows 10, some of the state images become very similar. Maybe it's possible to save the state images as icons on Windows 7 and load the icons as new state images on Windows 10. Not tested. TVS_EX_DOUBLEBUFFER The double buffer extended style is usually used to reduce flicker when using the vertical ScrollBar. Therefore, the style is interesting compared to virtual TreeViews. However, it's somewhat uncertain whether the style has any effect at all for these TreeViews, or whether it only works for standard TreeViews. TVS_EX_DRAWIMAGEASYNC Has not been implemented so far. TVS_EX_FADEINOUTEXPANDOS Fade in/out of collapse/expand Buttons when the TreeView control gains/loses focus. Also works better on Windows 7 than on Windows 10. TVS_EX_MULTISELECT According to MS docu this style is not supported. Not implemented. TVS_EX_NOINDENTSTATE No indentation of collapse/expand Buttons. Thus, these Buttons are aligned along the left edge of the TreeView. Failed to get this style to work. TVS_EX_NOSINGLECOLLAPSE Intended for internal use. Not implemented. TVS_EX_RICHTOOLTIP Seems to depend on custom drawn ToolTips. Not implemented. TreeViewExtendedStyles.au3 include #include-once #include <SendMessage.au3> #include <TreeViewConstants.au3> Global Const $TVS_EX_MULTISELECT = 0x0002 Global Const $TVS_EX_DOUBLEBUFFER = 0x0004 Global Const $TVS_EX_NOINDENTSTATE = 0x0008 Global Const $TVS_EX_RICHTOOLTIP = 0x0010 Global Const $TVS_EX_AUTOHSCROLL = 0x0020 Global Const $TVS_EX_FADEINOUTEXPANDOS = 0x0040 Global Const $TVS_EX_PARTIALCHECKBOXES = 0x0080 Global Const $TVS_EX_EXCLUSIONCHECKBOXES = 0x0100 Global Const $TVS_EX_DIMMEDCHECKBOXES = 0x0200 Global Const $TVS_EX_DRAWIMAGEASYNC = 0x0400 Global Const $TVM_SETEXTENDEDSTYLE = $TV_FIRST + 44 Global Const $TVM_GETEXTENDEDSTYLE = $TV_FIRST + 45 Func _GUICtrlTreeView_GetExtendedStyle( $hWnd ) Return IsHWnd( $hWnd ) ? _SendMessage( $hWnd, $TVM_GETEXTENDEDSTYLE ) _ : GUICtrlSendMsg( $hWnd, $TVM_GETEXTENDEDSTYLE, 0, 0 ) EndFunc ; $iExStyle: Extended control styles ; $iExMask: Specifies which styles in $iExStyle are to be affected Func _GUICtrlTreeView_SetExtendedStyle( $hWnd, $iExStyle, $iExMask = 0 ) Local $iRet = IsHWnd( $hWnd ) ? _SendMessage( $hWnd, $TVM_SETEXTENDEDSTYLE, $iExMask, $iExStyle ) _ : GUICtrlSendMsg( $hWnd, $TVM_SETEXTENDEDSTYLE, $iExMask, $iExStyle ) _WinAPI_InvalidateRect( $hWnd ) Return $iRet EndFunc CheckBoxes.au3 example Examples in the Examples\Styles\ folder. Run the examples in SciTE with F5. This is the extended CheckBoxes example, CheckBoxes.au3: #AutoIt3Wrapper_Au3Check_Parameters=-d -w 1 -w 2 -w 3 -w 4 -w 5 -w 6 -w 7 #AutoIt3Wrapper_UseX64=Y ; Run script as 64 bit code Opt( "MustDeclareVars", 1 ) #include <GUIConstantsEx.au3> #include <WindowsConstants.au3> #include <GuiTreeView.au3> #include "..\..\Includes\CreateTreeViewFromSource.au3" #include "..\..\Includes\TreeViewExtendedStyles.au3" CreateTreeViewGui( "TreeViewSource.txt" ) Func CreateTreeViewGui( $sTreeViewSource ) ; Create GUI Local $hGui = GUICreate( "Create TreeView From Source - CheckBoxes", 400, 300, 600, 300, $GUI_SS_DEFAULT_GUI ) ; Create TreeView Local $idTV = GUICtrlCreateTreeView( 2, 2, 396, 296, $GUI_SS_DEFAULT_TREEVIEW, $WS_EX_CLIENTEDGE ) Local $hTV = GUICtrlGetHandle( $idTV ) ; Set CheckBoxes extended styles ; Click CheckBoxes several times to see the different styles _GUICtrlTreeView_SetExtendedStyle( $idTV, $TVS_EX_PARTIALCHECKBOXES+$TVS_EX_EXCLUSIONCHECKBOXES+$TVS_EX_DIMMEDCHECKBOXES ) ; Set CheckBoxes style ; Must be set AFTER extended styles ; Extended CheckBox styles depends on the TVS_CHECKBOXES style also being set. The extended CheckBox styles ; must be set BEFORE the TVS_CHECKBOXES style. Necessary for the latter to know which extended styles to set. DllCall( "user32.dll", "long_ptr", @AutoItX64 ? "SetWindowLongPtrW" : "SetWindowLongW", "hwnd", $hTV, "int", $GWL_STYLE, "long_ptr", _ DllCall( "user32.dll", "long_ptr", @AutoItX64 ? "GetWindowLongPtrW" : "GetWindowLongW", "hwnd", $hTV, "int", $GWL_STYLE )[0] + $TVS_CHECKBOXES ) ; Create TreeView from source file CreateTreeViewFromSource( $hTV, $sTreeViewSource ) _GUICtrlTreeView_Expand( $hTV ) ; Show GUI GUISetState( @SW_SHOW, $hGui ) ; Loop While 1 Switch GUIGetMsg() Case $GUI_EVENT_CLOSE ExitLoop EndSwitch WEnd ; Cleanup GUIDelete( $hGui ) EndFunc The image shows the 5 CheckBoxes on Windows 7 with state image indices 1 - 5: TreeView Explorer Theme Example in the Examples\Theme\ folder. Run the example in SciTE with F5. ExplorerTheme.au3: #AutoIt3Wrapper_Au3Check_Parameters=-d -w 1 -w 2 -w 3 -w 4 -w 5 -w 6 -w 7 #AutoIt3Wrapper_UseX64=Y ; Run script as 64 bit code Opt( "MustDeclareVars", 1 ) #include <GUIConstantsEx.au3> #include <WindowsConstants.au3> #include <GuiTreeView.au3> #include <WinAPITheme.au3> #include "..\..\Includes\CreateTreeViewFromSource.au3" CreateTreeViewGui( "TreeViewSource.txt" ) Func CreateTreeViewGui( $sTreeViewSource ) ; Create GUI Local $hGui = GUICreate( "Create TreeView From Source - ExplorerTheme", 400, 300, 600, 300, $GUI_SS_DEFAULT_GUI ) ; Create TreeView Local $idTV = GUICtrlCreateTreeView( 2, 2, 396, 296, $GUI_SS_DEFAULT_TREEVIEW, $WS_EX_CLIENTEDGE ) Local $hTV = GUICtrlGetHandle( $idTV ) ; Set Explorer theme _WinAPI_SetWindowTheme( $hTV, "Explorer", 0 ) ; Create TreeView from source file CreateTreeViewFromSource( $hTV, $sTreeViewSource ) _GUICtrlTreeView_Expand( $hTV ) ; Show GUI GUISetState( @SW_SHOW, $hGui ) ; Loop While 1 Switch GUIGetMsg() Case $GUI_EVENT_CLOSE ExitLoop EndSwitch WEnd ; Cleanup GUIDelete( $hGui ) EndFunc The Explorer theme on Windows 7. Looks better on Windows 10. 7z-file The 7z-file contains source code for UDFs and examples. You need AutoIt 3.3.12 or later. Tested on Windows 7 and Windows 10. Comments are welcome. Let me know if there are any issues. TreeViewStyles.7z1 point
-

Hello World from Python
SOLVE-SMART reacted to Nisteo for a topic
I still don't see the point why not just using machine code for all actions instead of creating compilers and interpreters and billion programming languages and transpilers from one language to another and interpreted versions of compiled languages and compiled versions of interpreted languages and more and more... 🤣 For example, people using IronPython instead of C#, Cython instead of C, Brython instead of JavaScript, Jython instead of Java, etc, etc, etc... Because python is language mainly for non-qualified programmers like scientists or home linux users or something. Mixing easier and harder languages allows people to do complex things right now, instead of wasting 100 years for learning C and another 100 for debugging "Hello World" program. By the same logic, learning few functions from Python and calling them from Autoit is easier task, than learning whole Python. Rapid development, you know 😎1 point -
Guess what you are looking for is FileCopy()?1 point
-

Hello World from Python
SOLVE-SMART reacted to AspirinJunkie for a topic
What do you see as the key criteria that distinguish Python dictionaries from AutoIt maps? Yup - for huge data you reach the reasonableness limit for AutoIT-based JSON parsers. In principle, of course, you can also parse a JSON file in AutoIt with a single function call like json.loads() in Python. However, with correspondingly less performance. I made a quick comparison: a 250kb JSON file parsed by Python in ~150-200ms, AutoIt needs ~850ms for this. With a 2MB file it looks already different: Python needs ~300ms and AutoIt already ~4s. In short: Yes, for large JSON files you should look for other tools. Whether it brings you much further to call Python within AutoIt instead of directly executing a Python script, would certainly be worth discussing. Because I assume that although you can run Python from AutoIt, it does not mean that you can process the JSON data parsed by Python in AutoIt - right? So you have to process the data in Python anyway. Whether you write this directly in a Python script or take the detour via AutoIt. I don't know - I don't really see the use case yet. Maybe a few examples will enlighten my mind a bit more. Otherwise it is nice to see that Python can play the Uno-Reverse card and use the performance argument against others. Normally Python-users are forced to listen to this argumentation from the respective supporters of compiled languages. But even there, I think it's a tedious discussion, since it only looks at a single aspect out of 1000. In the end, it remains as always: Choose the tool based on the task and therefore I agree with the argument that AutoIt is not very suitable for large JSON data. With the script here, we now have even more options for AutoIt and I think a fundamental discussion about the pros and cons of Python versus AutoIt would be harming the intent of the thread. By the way, I really enjoy programming in both. So thanks for the script - it will definitely prove a usefulness to some.1 point


2_5p.png.bd11b44b55819fd742004e45c6181a8f.png)


