Leaderboard
Popular Content
Showing content with the highest reputation on 05/15/2022 in all areas
-
BugFix version - 27 Dec 23 Fixed: No default value set for the MaxWidth parameter - took 12 years for someone to notice it! New UDF and new examples below and in zip. I just realised that although I have posted versions of this UDF many times in Help topics, I had never actually posted a "final" version here in Example scripts - better late than never, I suppose! StringSize takes a text string and calculates the size of label required to hold it as well as formatting the string to fit. Now AutoIt will, of course, size a label automatically to fit a text string, but it will not format the string in any way - what you use as the string is what you get in the label. If you do set any label sizes the text will be wrapped, but you can only determine the correct size of the label by trial and error. StringSize will, however, reformat the string to fit in a given width and tell you the required height so that you can read it all - whatever the font type or size - and you do not have to do the formatting beforehand. Here is a simple example to show what I mean (you need the UDF in the same folder for all the examples): And here is an example showing how StringSize can deal with different fonts and text sizes: You can see that the GUI is perfectly sized each time and that the button is always the right size and in the right place. StringSize returns an array which contains the formatted text to display and the size of the label needed to display it. All you need to do is to use the array elements when you create your label. Try changing the values in $aFont and $aSize if you want to try you own favourites - but beware, StringSize will return an error if you make the size so large that it cannot fit a word into the label width. NEW A more complex example showing how formatted and unformatted text can be sized correctly. The width of GUI holding the unformatted text varies randomly in width (the current value is displayed at top right): NEW And a final example showing how you can get your text in the largest possible font to fit in a given space: Finally here is the UDF itself: And all 5 files in zip format: StringSize.zip I hope you find this useful - I certainly do. M231 point
-
Got it fixed with: var element = document.getElementById('nav_exercises'); var result =''; var property =''; var ComputedStyles = getComputedStyle(element); for (let i = 0; i < element.style.length; i++) { property = element.style.item(i) result += property + '|' + ComputedStyles.getPropertyValue(property) + '\n' }1 point
-
As you've identified, there are multiple ways to do this. Here's an alternative using Javascript to return a dictionary object -- ;https://stackoverflow.com/questions/32537339/getting-the-values-of-all-the-css-properties-of-a-selected-element-in-selenium $sScript = 'var items = {};' & _ 'var compsty = getComputedStyle(arguments[0]);' & _ 'var len = compsty.length;' & _ 'for (index = 0; index < len; index++)' & _ '{items [compsty[index]] = compsty.getPropertyValue(compsty[index])};' & _ 'return items;' $oStyles = _WD_ExecuteScript($sSession, $sScript, __WD_JsonElement($sElement), Default, $_WD_JSON_Value) $aKeys = $oStyles.Keys() $aItems = $oStyles.Items() _ArrayDisplay($aKeys) _ArrayDisplay($aItems)1 point
-

WebP v0.5.0 build 2025-08-23 beta
argumentum reacted to UEZ for a topic
New version: added advanced compression functions for lossless and lossy encoding and WebP Advanced Encoder GUI -> see post #11 point -

Use input control as fake label to avoid flickering on update
VAN0 reacted to pixelsearch for a topic
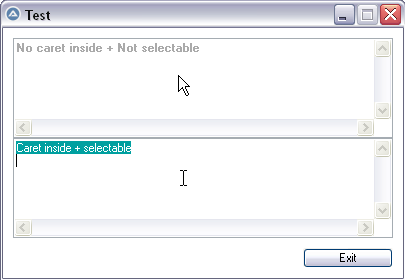
Hi VAN0, I think you did well by adding a transparent label that covers the edit box, making the GUI draggable. It takes just 1 line of code and does the job. It's useful especially when the GUI got no caption. "About hiding cursor in edit box" : @jguinch showed a way to do it in this script, by registering WM_COMMAND and testing EN_SETFOCUS. You can see the difference in his script when you run it again, after commenting out the line : ; GUIRegisterMsg($WM_COMMAND, 'WM_COMMAND') But you also "don't want to allow text selection, aka making [the edit control] visibly a true label element" If you're ok with the fact that the front color of the edit box won't be black as night, then this could help : #include <WindowsConstants.au3> #include <EditConstants.au3> #include <GUIConstantsEx.au3> Local $hForm = GUICreate('Test' , 400, 250) GUICtrlCreateLabel("", 10, 10, 380, 100, -1, $GUI_WS_EX_PARENTDRAG) ; => $Input1 draggable Local $Input1 = GUICtrlCreateEdit('No caret inside + Not selectable', 10, 10, 380, 100, _ $WS_HSCROLL + $WS_VSCROLL + $ES_READONLY) ; GUICtrlSetColor(-1, 0x000000) ; front color : black (doesn't work on disabled control) GUICtrlSetBkColor(-1, 0xFFFFFF) ; back color : white (works on disabled control) GUICtrlSetFont(-1, Default, 900) ; boldest (to appear a bit 'less grey' on disabled control) GUICtrlSetState(-1, $GUI_DISABLE) Local $Input2 = GUICtrlCreateEdit('Caret inside + selectable', 10, 110, 380, 100) Local $Button = GUICtrlCreateButton('Exit', 300, 220, 90, 20) Local $msg GUISetState() While 1 $msg = GUIGetMsg() If $msg = $GUI_EVENT_CLOSE OR $msg = $Button Then Exit WEnd @Melba23 indicated in this script : GUICtrlSetBackColor does work on disabled controls, although GUICtrlSetColor appears not to. Good luck1 point -

HighMem - Maximise your RAM access on x64
argumentum reacted to RTFC for a topic
Please answer me these questions three, ere the other side you see: Are you running a 64-bit machine with a 64-bit Windows operating system? Can your AutoIt scripts cope with having directive #AutoIt3Wrapper_UseX64=Y, and thus @AutoItX64=True? Are you sick and tired of seeing this error message? If you (like me) answered "YES" to all three questions, then the _HighMem library may ease your pain (the name commemorates a useful utility from the days when CPUs were still steam-powered). Forget about pathetic boot switches /3GB and /userva; in a full-fledged 64-bit environment, _HighMem can pre-allocate all available physical/virtual RAM you've got (or any smaller size you need), and manage individual allocations therein with four simple functions: _HighMem_StartUp( $nSize, $sUnit="GB" ) ; parse size of total region to pre-allocate, e.g. (10,"GB") _HighMem_Allocate( $nSize, $sUnit="B" ) ; returns $pOffset (new allocation's base address) _HighMem_Release( $pOffset ) ; existing allocations are identified by their offset (base address) _HighMem_CleanUp() ; close handles, release all pre-allocated memory Of course, existing AutoIt limitations remain in force (e.g., DllstructCreate() is still limited to 2 GB per call), but the maximum of 2-4 GB of virtual memory per Windows process can (under the right circumstances, in the proper environment) be circumvented. However, this is the first beta release, so glitches are likely, and performance may vary. In fact, it may not work at all for you (if you're running 32-bit, for example). And since this involves your own hardware, it's unlikely I would be able to reproduce your issues in my own work environment. Nevertheless, if you find obvious bugs or mistakes in the code, please do post. And if it works for you, that's also good to hear. My own motivation for developing it was to supercharge my matrix computing environment (Eigen4AutoIt), so it can handle matrices of any size that fit in machine RAM. The attached zip contains the library itself (HighMem.au3) and two test examples. HighMem_Test1 performs a dry run stress test of the allocation management system; it does not actually do any memory I/O. By contrast, HighMem_Test2 pre-allocates a 6 GB space, stores 3 x 2GB structs there, performs some basic I/O, and releases the allocations one by one. Obviously, for this to work you'll need at least that much free RAM to begin with (check with Task Manager -> Performance -> Memory if you're unsure). My own test environment has 16 GB of physical RAM, and runs W10Pro/64. EDIT: minor edits added to improve user experience (many more status messages if $_HighMem_Verbose=True) HighMem.v0.85.7z EDIT: from beta version 0.9, HighMem supports shared memory, including mutex negotiation. HighMemv0.9.2.7z1 point -
_ChooseColor in <Misc.au3> is based on ChooseColor function in comdlg32.dll. ChooseColor is depending on a CHOOSECOLOR structure. The Flags and lpfnHook fields in this structure can be used to create a hook function for the ChooseColor window. This hook function can be used to simulate a modeless ChooseColor window. There are two interesting features of a hook funtion. It allows you to receive windows messages even if the ChooseColor dialog is a modal window. And it makes it possible to determine which messages are to be forwarded to the ChooseColor dialog, and which are not to be forwarded. The hook function receives Windows messages before the ChooseColor dialog. If the hook function returns 0, the messages are forwarded to the ChooseColor dialog. If the hook function returns 1 (not 0), the messages are not forwarded to the ChooseColor dialog. Messages that are not forwarded to ChooseColor should be processed by the hook function. When the OK button in ChooseColor dialog is clicked, this click is handled by the hook function and not forwarded to the ChooseColor dialog. This means, that the ChooseColor window does not close. In the hook function the selected color is calculated and send to the AutoIt window with _SendMessage. In the zip below the main AutoIt GUI, ChooseColor.au3, contains a button. When you click this button another script, ModelessCC.au3, is started with ShellExecute. ModelessCC.au3 opens the ChooseColor dialog. There is no message loop in ModelessCC.au3. But because ChooseColor is modal, ModelessCC.au3 will not exit until ChooseColor is closed. The hook function is also running in ModelessCC.au3. The hook function is running even if ChooseColor is modal. The function catches the OK button clicks in ChooseColor and sends the color to the main AutoIt GUI with _SendMessage. The hook function and ChooseColorEx is coded in MiscEx.au3. The main AutoIt GUI contains 12 labels. Click a label, select a color in the ChooseColor dialog, click the OK button, and the background color of the label will be set to the selected color. You can select colors for all 12 labels without closing the ChooseColor dialog. Tested with AutoIt 3.3.10 on Windows 7 64 bit and Windows XP 32 bit. ModelessChooseColor.7z1 point


