Leaderboard
Popular Content
Showing content with the highest reputation on 07/06/2021 in all areas
-

@ComSpec Command-line arguments ERROR
jchd and 2 others reacted to argumentum for a topic
Run(@ComSpec & ' /c "title this is the new title"&&dir&&pause') Is not an AutoIt bug. Is a cmd.exe (buggy)feature to add a title. =/ I've had these problems before and that's how I know of the solution. That I did not know was about the ^ use.3 points -

@ComSpec Command-line arguments ERROR
SkysLastChance and 2 others reacted to Subz for a topic
You need to escape your first quote Local $sCommand = '^"' & @ScriptDir etc... A double quote also appear to work, I believe this is what @argumentum meant above. Local $sCommand = '""' & @ScriptDir etc...3 points -

GuiFlatButton UDF : Change Colors of Regular Buttons
mumpel reacted to kurtykurtyboy for a topic
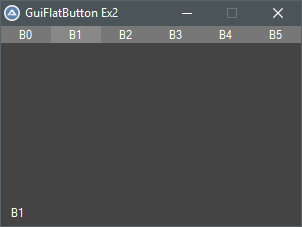
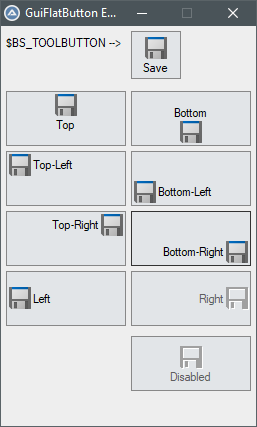
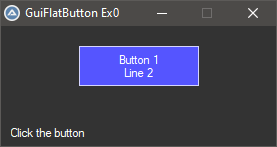
GuiFlatButton is a UDF to easily create regular buttons with different colors for background, foreground, border, hover, focus, etc.. This started as an effort to change the background color of a button and eventually grew into a full UDF. If you've looked around forums for changing button background colors, you have probably noticed that each proposed workaround has its own set of issues/side-effects. The answers usually circle back to 'use ownerdrawn buttons' and 'not worth it'. Well, now it is possible for anyone to easily create ownerdrawn buttons - totally worth it! Some issues with other workarounds such as drawing with GDI+ or using a colored label as a 'button': Not 'real' buttons so you lose built-in functionality that windows gives to buttons Messy / inefficient code in the main while loop to check for mouse position Slow to respond to click, paint, etc... Having to deal with GUIRegisterMsg messages Not straight-forward to implement GuiFlatButton is not a workaround; it is a technique to respond to Windows' built-in owner-drawn button events. With minimal effort, we can now create true simple colored buttons. The idea is to create an owner-drawn button using GUICtrlCreateButton then subclass the GUI and controls to handle the button-specific events to paint it however we want. This UDF magically does all of this for us! No need to worry about event handling or main while loop logic. How to use It couldn't be any easier! Simply create a new button using the familiar syntax. This creates an ownerdrawn button with default colors. $mybutton1 = GuiFlatButton_Create("Button 1", 78, 20, 120, 40) If you want to change the background and text colors: GuiFlatButton_SetBkColor(-1, 0x5555FF) GuiFlatButton_SetColor(-1, 0xFFFFFF) Advanced Usage Set background/text/border all at once GuiFlatButton_SetColors(-1, 0x0000FF, 0xFFFFFF, 0x9999FF) Set ALL colors for ALL button states! (normal, focus, hover, selected) Local $aColorsEx = [0x0000FF, 0xFFFFFF, -2, 0x4444FF, 0xFFFFFF, 0xAAAAFF, 0x6666FF, 0xFFFFFF, 0xCCCCFF, 0x0000EE, 0xFFFFFF, 0x7777EE] GuiFlatButton_SetColorsEx(-1, $aColorsEx) Set default colors to apply to any future buttons ;set colors GuiFlatButton_SetDefaultColors(0x0000FF, 0xFFFFFF, 0x9999FF) ;create buttons $mybutton1 = GuiFlatButton_Create("Button 1", 12, 20, 120, 40) $mybutton2 = GuiFlatButton_Create("Button 2", 143, 20, 120, 40) Set ALL color defaults ;set colors Local $aColorsEx = [0x0000FF, 0xFFFFFF, -2, 0x4444FF, 0xFFFFFF, 0xAAAAFF, 0x6666FF, 0xFFFFFF, 0xCCCCFF, 0x0000EE, 0xFFFFFF, 0x7777EE] GuiFlatButton_SetDefaultColorsEx($aColorsEx) ;create buttons $mybutton1 = GuiFlatButton_Create("Button 1", 12, 20, 120, 40) $mybutton2 = GuiFlatButton_Create("Button 2", 143, 20, 120, 40) Available Functions Simple Example #include <GUIConstantsEx.au3> #include <MsgBoxConstants.au3> #include "GuiFlatButton.au3" Example() ;GUI with one button Func Example() Local $hGUI, $mybutton1 $hGUI = GUICreate("GuiFlatButton Ex0", 275, 120) GUISetBkColor(0x333333) Local $idLabel = GUICtrlCreateLabel("Click the button", 10, 100, 150, 30) GUICtrlSetColor(-1, 0xFFFFFF) ;create new button then set the background and foreground colors $mybutton1 = GuiFlatButton_Create("Button 1" & @CRLF & "Line 2", 78, 20, 120, 40, $BS_MULTILINE) GuiFlatButton_SetBkColor(-1, 0x5555FF) GuiFlatButton_SetColor(-1, 0xFFFFFF) GUISetState(@SW_SHOW, $hGUI) Local $i = 0 Local $iMsg While 1 $iMsg = GUIGetMsg() Switch $iMsg Case $GUI_EVENT_CLOSE ExitLoop Case $mybutton1 $i += 1 GUICtrlSetData($idLabel, $i) ConsoleWrite($i & @CRLF) EndSwitch Sleep(10) WEnd GUIDelete() EndFunc ;==>Example Menu/Toolbar Example #include <GUIConstantsEx.au3> #include <MsgBoxConstants.au3> #include "GuiFlatButton.au3" Example() ;Example GUI with toolbar Func Example() Local $hGUI, $idLabel, $aButtons, $iTbSize $hGUI = GUICreate("GuiFlatButton Ex2", 300, 200) GUISetBkColor(0x444444) $idLabel = GUICtrlCreateLabel("Click a button", 10, 180, 150, 30) GUICtrlSetColor(-1, 0xFFFFFF) $aButtons = createToolbar() $iTbSize = UBound($aButtons) GUISetState(@SW_SHOW, $hGUI) Local $i = 0 Local $iMsg While 1 $iMsg = GUIGetMsg() Switch $iMsg Case $GUI_EVENT_CLOSE ExitLoop Case $aButtons[0] To $aButtons[$iTbSize - 1] ConsoleWrite("1") GUICtrlSetData($idLabel, GuiFlatButton_Read($iMsg)) EndSwitch Sleep(10) WEnd GUIDelete() EndFunc ;==>Example Func createToolbar() Local $aButtons[6] Local $bkColor = 0x777777 Local $textColor = 0xFFFFFF Local $borderColor = 0x999999 Local $aBtnClrs[12] = [0x777777, 0xFFFFFF, $GUI_BKCOLOR_TRANSPARENT, 0x888888, 0xFFFFFF, $GUI_BKCOLOR_TRANSPARENT, 0x999999, 0xFFFFFF, $GUI_BKCOLOR_TRANSPARENT, 0x666666, 0xFFFFFF, $GUI_BKCOLOR_TRANSPARENT] For $i = 0 To UBound($aButtons) - 1 $aButtons[$i] = GuiFlatButton_Create("B" & $i, $i * 50, 0, 50, 17) GuiFlatButton_SetColorsEx($aButtons[$i], $aBtnClrs) Next Return $aButtons EndFunc ;==>createToolbar Icon Example You can even easily add icons to your buttons -- just create a new button and send it an icon! #include <GDIPlus.au3> #include "GuiFlatButton.au3" Example() ;buttons with Icon images Func Example() ;get images for demonstration _GDIPlus_Startup() ;initialize GDI+ Local $hIcon = _WinAPI_ShellExtractIcon(@SystemDir & '\shell32.dll', 258, 24, 24) ;extract the 'Save' icon Local $hBitmap = _GDIPlus_BitmapCreateFromHICON($hIcon) ;Create Bitmap from Icon (for demonstration) Local $hHBitmap = _GDIPlus_BitmapCreateHBITMAPFromBitmap($hBitmap) ;Create HBitmap from Bitmap _GDIPlus_BitmapDispose($hBitmap) ;dispose the bitmap _GDIPlus_Shutdown() ;done with GDI+ Local $hGUI = GUICreate("GuiFlatButton Ex5", 255, 400) GUISetBkColor(0xEEEEEE) ;set default colors of future buttons Local $aColorsEx = _ [0xE2E5E8, 0X000000, 0x888888, _ ; normal : Background, Text, Border 0xE2E5E8, 0X000000, 0x333333, _ ; focus : Background, Text, Border 0xE8E8E8, 0X000000, 0x666666, _ ; hover : Background, Text, Border 0xDDDDDD, 0X000000, 0xAAAAAA] ; selected : Background, Text, Border GuiFlatButton_SetDefaultColorsEx($aColorsEx) ;normal button with icon $label1 = GUICtrlCreateLabel( "$BS_TOOLBUTTON -->", 5, 10) GUICtrlSetBkColor(-1, $GUI_BKCOLOR_TRANSPARENT) Local $mybutton1 = GuiFlatButton_Create("Save", 130, 5, 50, 48, $BS_TOOLBUTTON) _WinAPI_DeleteObject(_SendMessage(GUICtrlGetHandle($mybutton1), $BM_SETIMAGE, $IMAGE_ICON, $hIcon)) ;align top Local $mybuttonT = GuiFlatButton_Create("Top", 5, 65, 120, 55, $BS_TOP) _WinAPI_DeleteObject(_SendMessage(GUICtrlGetHandle($mybuttonT), $BM_SETIMAGE, $IMAGE_ICON, $hIcon)) ;align top-left Local $mybuttonTL = GuiFlatButton_Create("Top-Left", 5, 125, 120, 55, BITOR($BS_TOP, $BS_LEFT)) _WinAPI_DeleteObject(_SendMessage(GUICtrlGetHandle($mybuttonTL), $BM_SETIMAGE, $IMAGE_ICON, $hIcon)) ;align top-right Local $mybuttonTR = GuiFlatButton_Create("Top-Right", 5, 185, 120, 55, BITOR($BS_TOP, $BS_RIGHT)) _WinAPI_DeleteObject(_SendMessage(GUICtrlGetHandle($mybuttonTR), $BM_SETIMAGE, $IMAGE_ICON, $hIcon)) ;align left Local $mybuttonL = GuiFlatButton_Create("Left", 5, 245, 120, 55, $BS_LEFT) _WinAPI_DeleteObject(_SendMessage(GUICtrlGetHandle($mybuttonL), $BM_SETIMAGE, $IMAGE_ICON, $hIcon)) ;align bottom Local $mybuttonB = GuiFlatButton_Create("Bottom", 130, 65, 120, 55, $BS_BOTTOM) _WinAPI_DeleteObject(_SendMessage(GUICtrlGetHandle($mybuttonB), $BM_SETIMAGE, $IMAGE_ICON, $hIcon)) ;align bottom-left Local $mybuttonBL = GuiFlatButton_Create("Bottom-Left", 130, 125, 120, 55, BITOR($BS_BOTTOM, $BS_LEFT)) _WinAPI_DeleteObject(_SendMessage(GUICtrlGetHandle($mybuttonBL), $BM_SETIMAGE, $IMAGE_ICON, $hIcon)) ;align bottom-right Local $mybuttonBR = GuiFlatButton_Create("Bottom-Right", 130, 185, 120, 55, BITOR($BS_BOTTOM, $BS_RIGHT)) _WinAPI_DeleteObject(_SendMessage(GUICtrlGetHandle($mybuttonBR), $BM_SETIMAGE, $IMAGE_ICON, $hIcon)) ;align right Local $mybuttonR = GuiFlatButton_Create("Right", 130, 245, 120, 55, $BS_RIGHT) _WinAPI_DeleteObject(_SendMessage(GUICtrlGetHandle($mybuttonR), $BM_SETIMAGE, $IMAGE_ICON, $hIcon)) GuiFlatButton_SetState($mybuttonR, $GUI_DISABLE ) ;disabled Local $mybuttonDisable = GuiFlatButton_Create("Disabled", 130, 310, 120, 55, $BS_TOOLBUTTON) _WinAPI_DeleteObject(_SendMessage(GUICtrlGetHandle($mybuttonDisable), $BM_SETIMAGE, $IMAGE_BITMAP, $hHBitmap)) GuiFlatButton_SetState($mybuttonDisable, $GUI_DISABLE ) ;clean up! _WinAPI_DestroyIcon( $hIcon ) _WinAPI_DeleteObject( $hHBitmap ) GUISetState(@SW_SHOW, $hGUI) Local $iMsg While 1 $iMsg = GUIGetMsg() Switch $iMsg Case $GUI_EVENT_CLOSE ExitLoop EndSwitch Sleep(10) WEnd GUIDelete() EndFunc ;==>Example I'm sure there are some use-cases I've forgotten, so feedback is welcome! Download the latest UDF and several more examples: GuiFlatButton_20220919.zip (1,121) Update 2022-09-19 Added update from 05/25 back in after it was accidentally removed Update 2022-09-01 Added $BS_MULTILINE button style Added ellipses when text is longer than the button Fixed compatibility with Opt("MustDeclareVars", 1) Update 2022-05-25 Fixed issue, buttons disappear when a GUI containing a child window with WS_EX_MDICHILD extended style is moved Update 2022-05-24 Fixed issue releasing subclassing when GUI is deleted but program is not closed Fixed occasional white background flicker Added function GuiFlatButton_GetPos Update 2021-01-02 Fixed bug, not drawing correctly after deleting GUI with GUIDelete() Fixed bug, changing default colors changed all buttons, even previously created buttons Made some internal functions more efficient Update 2019-04-14 Fixed bug, not showing pressed down state when clicking rapidly Added Icon/Bitmap support! Added function GuiFlatButton_SetPos to change the position and/or size of a button Update 2019-02-09 Added 2 new functions to set the button colors globally for all future buttons. GuiFlatButton_SetDefaultColors GuiFlatButton_SetDefaultColorsEx Credits to: Melba23 (UDF template) LarsJ (general subclassing code) 4ggr35510n (TrackMouseEvent example) binhnx (disable dragging with $WS_EX_CONTROLPARENT) GUIRegisterMsg in AutoIt Help (owner-draw button example) funkey (_WinAPI_DrawState example)1 point -
1 point
-
How to send virtual mouse clicks
argumentum reacted to Nyl- for a topic
I may not be that good but I can help you with this. Can you share what you've got so far and lets figure out what went wrong. Just a reminder, you got to do some inputs first before asking for help.1 point -

@ComSpec Command-line arguments ERROR
Trong reacted to argumentum for a topic
try Local $sCommand = '"" "' & @ScriptDir & '\SumatraPDF-3.2-64.exe' & '"' Those extra " may do the trick with cmd.exe. Let me know. Edit: also https://www.autoitscript.com/forum/topic/139260-autoit-snippets/?do=findComment&comment=1478119 may be useful.1 point -
Using recursive algorithm : #include <Constants.au3> #include <GUIConstants.au3> #include <GuiTreeView.au3> Local $hGUI = GUICreate("ControlTreeView Example", 212, 212) Local $idTreeView_1 = GUICtrlCreateTreeView(6, 6, 200, 160, BitOR($TVS_HASBUTTONS, $TVS_HASLINES, $TVS_LINESATROOT, $TVS_CHECKBOXES), $WS_EX_CLIENTEDGE) Local $hTreeView_1 = ControlGetHandle($hGUI, "", $idTreeView_1) Local $arr[] = [ _ "Org/Unit1/Users", _ "Org/Unit1/Computers", _ "Org/Unit1/Computers/Wifi1", _ "Org/Unit1/Computers/Wifi2", _ "Org/Unit1/Computers/Guest/Wifi1", _ "Org/Unit2/Company/Users", _ "Org/Unit2/Company/Tables", _ "Org/Unit2/Computers", _ "Org2/Unit1/Users", _ "Org2/Unit1/Computers", _ "Org2/Unit1/Computers/Wifi1", _ "Org2/Unit1/Computers/Wifi2", _ "Org2/Unit1/Computers/Guest/Wifi1", _ "Org2/Unit2/Company/Users", _ "Org2/Unit2/Company/Tables", _ "Org2/Unit2/Computers"] GUISetState() Create_Tree($hTreeView_1, "Root") ControlTreeView($hGUI, "", $hTreeView_1, "Expand", "Root") While 1 Switch GUIGetMsg() Case $GUI_EVENT_CLOSE ExitLoop EndSwitch WEnd Func Create_Tree($hTVC, $sRoot) Local $hRoot = _GUICtrlTreeView_Add($hTVC, 0, $sRoot) Global $iIndx = 0, $aPart While $iIndx < UBound($arr) $aPart = StringSplit($arr[$iIndx], "/", $STR_NOCOUNT) Recurse_Tree($hTVC, 0, $hRoot) WEnd EndFunc ;==>Create_Tree Func Recurse_Tree($hTVC, $iPart, $hParent) If $iIndx = UBound($arr) Then Return If $iPart >= UBound($aPart) Then $iIndx += 1 If $iIndx = UBound($arr) Then Return $aPart = StringSplit($arr[$iIndx], "/", $STR_NOCOUNT) Return EndIf Local $sPart = $aPart[$iPart] Local $hChild = _GUICtrlTreeView_AddChild($hTVC, $hParent, $sPart) While $iIndx < UBound($arr) And $iPart < UBound($aPart) And $sPart = $aPart[$iPart] Recurse_Tree($hTVC, $iPart + 1, $hChild) WEnd EndFunc ;==>Recurse_Tree1 point
-
Multi column searchIn this example a ListView Combo control is used to define search filters. The main ListView is a custom drawn and virtual ListView. Searching and sorting is based on array indexes (1d arrays of integers). ListView ComboIn the ListView Combo control in the image, a search is defined for rows that matches search filters in 3 columns: 2 x's in the Strings column, dates in the range 2015 - 2019 in the Dates column, and 2 consecutive 5 digits in the Floats column. Note that the rows in the ListView Combo corresponds to the columns in $g_aArray and in the main ListView. There are 5 columns in the ListView Combo: Col is the column index in $g_aArray/main ListView The Checkbox is used to enable/disable a search filter Column is the column name in the main ListView Ord is the order of the search filter. The order is filled in automatically when a search filter is enabled and a search string is entered. The order is cleared on a disabled search filter or an empty search string. RegEx indicates RegEx or Normal search Click the Checkbox to switch The Search string column contains search strings that are entered through an Edit control. Click to open the Edit control. Move the mouse out of the Edit control to close it. Note the order of the 3 search filters in the image. The Strings column with order 0 is the first and most significant search filter. The Dates column with order 1 is the next search filter. The Floats column with order 2 is the last and least significant search filter. Rule: For search filters provided with an order, you can only change the least significant search filter (with the highest order). If you want to change the order of the Strings and Floats search filters so that Floats gets order 0 and Strings order 2, you must first disable all 3 search filters in this order: Floats, Dates, Strings. Click the Checkbox in first column to disable the search filters. Then you have to enable the 3 search filters again in this order: Floats, Dates, Strings. Performance considerations are the reason for this rule. Because the search is an incremental search, it's expected to be very dynamic and responsive. There must be no delays if you e.g. adds or removes a character in a search string. Therefore, it's important that only the least significant search filter can be changed. If only the least significant search filter can be changed, only one search and one sort must be recalculated. If it was possible to update the search string in the most significant search filter then both the search and the sort would have to be recalculated for all search filters. In this example with 6 columns in $g_aArray and main ListView, 6 search filters are possible. If all 6 search filters had to be recalculated for both the search and the sort, then it would certainly cause a significant delay. Use the Reset button to completely reset all search filters. Main ListViewThe main ListView uses two different WM_NOTIFY message handlers: WM_NOTIFY_All is used to display all rows in $g_aArray when no search filter is applied. WM_NOTIFY_Search is used to display the matching rows in $g_aArray when one or more search filters are applied. LVN_GETDISPINFO code in WM_NOTIFY_All: Case $LVN_GETDISPINFOW Local $tNMLVDISPINFO = DllStructCreate( $tagNMLVDISPINFO, $lParam ) Local Static $tText = DllStructCreate( "wchar Text[50]" ), $pText = DllStructGetPtr( $tText ) $tText.Text = $g_aArray[$g_aIndex[($g_iSortDir=$HDF_SORTUP?$tNMLVDISPINFO.Item:$g_iRows-1-$tNMLVDISPINFO.Item)]][$tNMLVDISPINFO.SubItem] $tNMLVDISPINFO.Text = $pText Return Note usage of the sort index $g_aIndex: $g_aArray[$g_aIndex[($g_iSortDir=$HDF_SORTUP?$tNMLVDISPINFO.Item:$g_iRows-1-$tNMLVDISPINFO.Item)]] LVN_GETDISPINFO code in WM_NOTIFY_Search: Case $LVN_GETDISPINFOW Local $tNMLVDISPINFO = DllStructCreate( $tagNMLVDISPINFO, $lParam ) If Not ( $g_aSearchCols[$tNMLVDISPINFO.SubItem] == "" ) Then Return ; Skip $g_aSearchCols Local Static $tText = DllStructCreate( "wchar Text[50]" ), $pText = DllStructGetPtr( $tText ) $tText.Text = $g_aArray[$g_aSearchRows[$g_aSearchIndex[($g_iSortDir=$HDF_SORTUP?$tNMLVDISPINFO.Item:$g_iSearchRows-1-$tNMLVDISPINFO.Item)]]][$tNMLVDISPINFO.SubItem] $tNMLVDISPINFO.Text = $pText Return Note the If statement that skips columns, which are subsequently drawn with custom draw code. Usage of the search index $g_aSearchRows (see below) and the sort index $g_aSearchIndex (see below): $g_aArray[$g_aSearchRows[$g_aSearchIndex[($g_iSortDir=$HDF_SORTUP?$tNMLVDISPINFO.Item:$g_iSearchRows-1-$tNMLVDISPINFO.Item)]]] The custom draw code in WM_NOTIFY_Search that shows the part of a subitem text that exactly matches the search string on a cyan or yellow background is similar to the custom draw code here. Main LoopThe interesting messages in the main loop regarding multi column search are $g_idComboListViewSubItem0,3,4, $idExtractRowsBySearchFilter and $idListViewSort. $g_idComboListViewSubItem0,3,4 handles changes to a search filter made through the ListView Combo control in columns 0, 3, and 4. Rows that match the search filter are extracted from $g_aArray through a $idExtractRowsBySearchFilter message. Finally, the rows are sorted through a $idListViewSort message. SearchingCode to extract the rows that match a search filter is implemented this way for a RegEx search: For $i = 0 To $iSearchRowsAll - 1 If StringRegExp( $g_aArray[$aSearchRowsAll[$i]][$g_iCLVRow], $sSearch ) Then $g_aSearchRows[$g_iSearchRows] = $aSearchRowsAll[$i] $g_iSearchRows += 1 EndIf Next For the first search filter with order 0 in the image $iSearchRowsAll = $g_iRows. And $aSearchRowsAll = $g_aIndex as calculated for the last column (the current sort column) in the main ListView. $g_iSearchRows is the number of matching rows and $g_aSearchRows is an index of the matching rows. For the last search filter with order 2 in the image $iSearchRowsAll = $g_iSearchRows as calculated for the previous search filter with order 1. And $aSearchRowsAll = $g_aSearchIndex (see below) also as calculated for the previous search filter with order 1. SortingSorting the rows that match a search filter is performed this way: $g_tIndex = FAS_Sort2DArrayAu3( $g_aArray, $aCompare, $g_aSearchRows, $g_iSearchRows ) AccessVariables01( IntStructToArraySearchMtd, $g_aSearchIndex ) $g_aSearchRows and $g_iSearchRows are passed to FAS_Sort2DArrayAu3() as parameters. FAS_Sort2DArrayAu3() returns a sort index as a DllStruct, which is converted to a 1d array of integers in $g_aSearchIndex. $g_aSearchIndex is the sort index for rows extracted through a search filter. FAS_Sort2DArrayIndexFunc() performs the sorting when the two additional parameters are passed to FAS_Sort2DArrayAu3(). This is the first part of FAS_Sort2DArrayIndexFunc() to sort strings: Func FAS_Sort2DArrayIndexFunc( $aArray, $aCompare, $aSearchRows, $iSearchRows ) Local $iRows = $iSearchRows, $tIndex = DllStructCreate( "uint[" & $iRows & "]" ), $pIndex = DllStructGetPtr( $tIndex ) Static $hDll = DllOpen( "kernel32.dll" ) Local $c, $a, $lo, $hi, $mi If $aCompare[0][1] Then ; Sorting by one column of strings $c = $aCompare[0][0] $a = $aCompare[0][2] For $i = 1 To $iRows - 1 $lo = 0 $hi = $i - 1 Do $mi = Int( ( $lo + $hi ) / 2 ) Switch StringCompare( $aArray[$aSearchRows[$i]][$c], $aArray[$aSearchRows[DllStructGetData($tIndex,1,$mi+1)]][$c] ) * $a Case -1 $hi = $mi - 1 Case 1 $lo = $mi + 1 Case 0 ExitLoop EndSwitch Until $lo > $hi DllCall( $hDll, "none", "RtlMoveMemory", "struct*", $pIndex+($mi+1)*4, "struct*", $pIndex+$mi*4, "ulong_ptr", ($i-$mi)*4 ) DllStructSetData( $tIndex, 1, $i, $mi+1+($lo=$mi+1) ) Next The very last code box in the Main ListView section above shows how to extract a row from $g_aArray, taking into account both $g_aSearchRows and $g_aSearchIndex. Miscellaneous That's not correct. Starting with Windows 7, all the different parts that make up a listview item or subitem (checkbox, icon, subicon, label, sublabel, left and top margins) have the same size. Only older Windows versions use other sizes. Only very few Windows styles will change these sizes on Windows 7 and later. Code MultiColumnSearch.7z I'll probably add a few more posts in relation to these examples. Then I'll include all the examples in the 7z-file at bottom of first post.1 point
-
ListView ComboA ListView Combo is created by replacing the original ListBox with a ListView. Replacement of the controls is mainly implemented through the subclassing technique. Only a small amount of owner draw code is used. Because much of the code depends on the functionality of the ListView, and because the functionality will obviously differ from one example to another, it's not easy to create a set of general functions in a UDF. However, it should be possible to implement if not all then some of the functions in a UDF. So there may come an update, with some of the functions coded in a UDF. In the absence of a UDF in this version the example is created with quite a lot of different ListView functionality, so that it contains most of the code you may need. The functionality includes: Create item and subitem checkboxes Disable focused and selected states Create Edit control to edit cell texts The ListView is created in the "Case $WM_USER" section of Examples\ListViewCombo.au3. The ListView is a virtual ListView that's feeded with data from the $g_aLVData array. Because the ListView in a ListView Combo isn't open all the time, a ListView Combo works best if the ListView plays a minor role in the entire GUI. E.g. if the ListView is used to select settings or options used in the rest of the GUI. The big advantage of a ListView Combo is that it doesn't take up much space when the ListView is closed. The images shows a closed and open ListView Combo: The texts in the last column can be edited through an Edit control. Click to open the Edit control. Move the mouse out of the Edit control to close it. Tomorrow I'll show an example of how to use a ListView Combo control. 7z-file The 7z-file contains source code for the example. You need AutoIt 3.3.12 or later. Tested on Windows 7 and Windows 10. Comments are welcome. Let me know if there are any issues. ListViewCombo.7z1 point


