Leaderboard
Popular Content
Showing content with the highest reputation on 06/11/2020 in all areas
-

can we automate using class / href
FrancescoDiMuro and one other reacted to Melba23 for a topic
tak09, And now a FOURTH! No more posting for you today! M232 points -
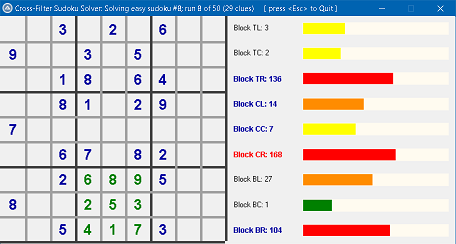
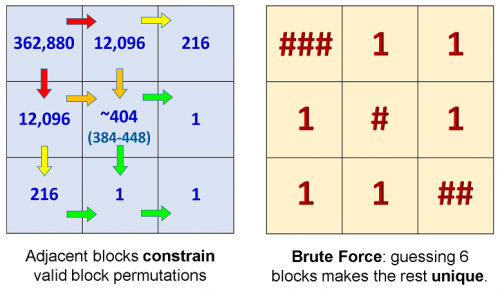
The Short Version: This set of well-annotated example scripts shows how to solve sudoku puzzles with simple, powerful bitmask functions applied on a massive scale, demonstrating both common solving techniques and highly-optimised brute-force. All you need is: to like sudoku's basic logic primary school maths to download & install this bundle (v1.2; 25 July 2020) and this #include file (v5.1+) the CrossFilter GUI1 point
-
Version 1.2
271 downloads
This small, well-annotated example script solves sudoku puzzles with simple, powerful bitmask functions applied on a massive scale, demonstrating both common solving techniques and highly-optimised brute-force, using Eigen4AutoIt's (E4A) logical functions toolkit. No advanced maths is required, just basic logic.1 point -

PSPad4AutoIt3 (editor IDE)
argumentum reacted to Professor_Bernd for a topic
Thanks for the code and the tip! It simplifies things.1 point -

PSPad4AutoIt3 (editor IDE)
Professor_Bernd reacted to argumentum for a topic
MsgBox(0, "WrapperVerGetter()", WrapperVerGetter(), 60) Func WrapperVerGetter() Local $wrapperFN = StringLeft(@AutoItExe, StringInStr(@AutoItExe, "\", 0, -1)) & "SciTE\AutoIt3Wrapper\AutoIt3Wrapper.au3" Local $n, $chunk = StringSplit(FileRead($wrapperFN, 10240), @CRLF & "=") For $n = 2 To UBound($chunk) -1 If $chunk[$n - 1] = "#AutoIt3Wrapper_Res_Fileversion" Then Return $chunk[$n] Next SetError(1, 0, "") EndFunc ...if this returns the minimum version of the wrapper, the rest will be there too1 point -
Alas, I never slept, decided that I should just get up and use it as a leap day to reset my schedule. I slept at 8 PM on that day and woke-up at ~3 AM today, I did some nice work on a function to read the contents of a file but had to stop due to a rather long power outage. Eventually I got a bit tired after breakfast and decided to take a nap around 6-7 AM, that turned out to be a bad decision, as I ended up sleeping/laying in bed for 6 hours! It was just the perfect temperature with cool air and my warm bed, so I couldn't manage to get up even though I was a bit awake. So I did not have much time for coding today. I managed to get my function to a working state: The idea behind the function is that it will read the contents of the file in chunks by using a linked list and then concatenate all of those chunks into a big buffer which is a lot easier to work with. Here is the code for those who are interested, note that it has some rough edges and can be optimized further: It is 8:20 PM now, so I better go and sleep soon. Later guys1 point
-

[SOLVED] How to automate an opened File Explorer?
nooneclose reacted to Nine for a topic
I don't have Chrome on Win10, but this is working fine with Edge : Local $PoAttachPath = @ScriptDir Local $sFileName = "Temp1.au3" If WinExists("[CLASS:#32770]") Then ; Check if File Explorer exists Local $hWnd = WinActivate("[CLASS:#32770]") ConsoleWrite($hWnd & " / File Explorer is NOW active." & @CRLF) Sleep(500) ; Send File Name ConsoleWrite(ControlSetText($hWnd, "", "Edit1", $PoAttachPath & "\" & $sFileName) & @CRLF) Sleep(500) ; Click 'OPEN' ControlClick($hWnd, "", "Button1") Sleep(2500) EndIf1 point -

can we automate using class / href
FrancescoDiMuro reacted to Jos for a topic
@tak09, Creating a ban evasion account is not much appreciated, so consider yourself banned for 7 days now and your new account @candysingh will be banned permanently. Consider this your final warning before you will be totally banned from these forums. Jos1 point -
#Include oddities
argumentum reacted to Titortian for a topic
I can be an idiot... most of the functions have coordinates. When moving from a 4k PC to a 720 VM it helps if you adjust the coordinate system to match.1 point -
Hi, i took the script from lyee and modified it a bit to record and replay the (left) mouse clicks. It does not save the recorded clicks (but can be done with few modification from other posts) ... You can press ctrl R to start/stop the recordings then Press Ctrl P to Play/stop the recoded clicks. The time between clicks is saved too - the code is taken from abberration's post. Recording and replaying can be started/stopped from the tray menue, as well as setup some configuration. #include <Misc.au3> #include <Timers.au3> #include <TrayConstants.au3> ; Original code by Lyee - www.autoitscript.com ; ; Mouse click recorder (atm only left mouse clicks are used) ;Press ctrl/strg r to start recording. Use multiple clicks, the delay between clicks is saved. Press ctrl/strg r again to stop ;After recording, you can use ctrl/strg p to replay the mouse clicks. ;Th Opt("TrayMenuMode", 3) ; The default tray menu items will not be shown and items are not checked when selected. These are options 1 and 2 for TrayMenuMode. If _Singleton("MouseClicker", 1) = 0 Then Exit EndIf Global Const $MIM_APPLYTOSUBMENUS = 0x80000000, $MIM_BACKGROUND = 0x00000002 ; Constants required for SetMenuColor Local $hDLL = DllOpen("user32.dll") HotKeySet('^p', '_ReplaySwitch') ;Ctrl/Strg p HotKeySet('^r', '_RecSwitch') ;Ctrl/Strg r AutoItSetOption("TrayAutoPause", 0) Global $log = -1, $i = 0, $logcounter = 0, $tmptxt = "" Global $imax = 100, $pos[($imax)][3] ;0 = x, 1 = y, 2 = delay in ms Global $clickdelay = 500, $var = 0, $State = 0, $varTimerDiff, $varTimerStart, $repeatcounter = 0 Global $clickrepeat = 0 ;0 = forever, 1 - do it 1 time, 2,3,...n n* Global $idREC = TrayCreateItem("Record") Global $idReplay = TrayCreateItem("Replay") TrayCreateItem("") Global $idRepeat = TrayCreateItem("Repeatcount :" & $clickrepeat) Global $idDelay = TrayCreateItem("Loop Delay :" & $clickdelay & " ms ") TrayCreateItem("") Global $idExit = TrayCreateItem("Exit") SetMenuColor(0,0x00FFFF) MAIN() Func MAIN() While 1 Switch $State Case 0 Case 1 $var = 0 _Rec() Case 2 _Replay() Case 3 ToolTip("") $State = 0 TrayItemSetState ($idREC,$TRAY_ENABLE) TrayItemSetState ($idReplay,$TRAY_ENABLE) TrayItemSetText ($idREC,"Record") TrayItemSetText ($idReplay,"Replay") SetMenuColor(0,0x00FFFF) EndSwitch Sleeper(15) WEnd EndFunc ;==>MAIN Func CheckTray() Local $tmp Switch TrayGetMsg() Case $idExit DllClose($hDLL) Exit Case $idREC _RecSwitch() Case $idReplay _ReplaySwitch() Case $idRepeat $tmp = Int(InputBox("MouseClicker", "How many times to do a set of clicks ?" & @CRLF & "0 for Endless", "", " M4", 220, 150)) If @error = 0 Then If IsNumber($tmp) Then $clickrepeat = $tmp TrayItemSetText($idRepeat, "Repeatcount :" & $tmp) EndIf Case $idDelay $tmp = Int(InputBox("MouseClicker", "Enter a new delay" & @CRLF & "(used at the end of the set)" & @CRLF & "1000 = 1 second" & @CRLF & "min 50, max 999999 ms!" , "", " M6", 220, 180)) If @error = 0 Then If IsNumber($tmp) And $tmp > 49 Then $clickdelay = $tmp TrayItemSetText($idDelay, "Loop Delay :" & $clickdelay & " ms ") EndIf EndIf EndSwitch EndFunc ;==>CheckTray Func _ReplaySwitch() If $State = 0 Then $State = 2 $repeatcounter = 0 $logcounter = 0 $tmptxt = "" TrayItemSetState ($idREC,$TRAY_DISABLE) TrayItemSetText ($idReplay,"Stop Replay") SetMenuColor(0,0x20FF20) ElseIf $State = 2 Then $State = 3 ToolTip("Replay Stopped") EndIf EndFunc ;==>_ReplaySwitch Func _RecSwitch() If $State = 1 Then $State = 3 ElseIf $State = 0 Then $State = 1 ToolTip("Recording stopped") EndIf EndFunc ;==>_RecSwitch Func _Rec() TrayItemSetText ($idREC,"Stop Recording") TrayItemSetState ($idReplay,$TRAY_DISABLE) SetMenuColor(0,0x8181FF) Local $mx, $my While ($var < ($imax)) And $State = 1 $mx = MouseGetPos(0) $my = MouseGetPos(1) ToolTip("Rec " & $var & "/" & ($imax - 1)) If _IsPressed("01", $hDLL) Then ;MouseRec $pos[($var)][0] = $mx $pos[($var)][1] = $my $pos[($var)][2] = $clickdelay ;Default delay If $var > 0 Then $varTimerDiff = _Timer_Diff($varTimerStart) $pos[($var - 1)][2] = $varTimerDiff $varTimerStart = _Timer_Init() ElseIf $var = 0 Then $varTimerStart = _Timer_Init() EndIf $var = $var + 1 $log = $var - 1 While _IsPressed("01", $hDLL) ;Wait for release Sleeper(50) WEnd ;ConsoleWrite("-> " & @HOUR & ":" & @MIN & ":" & @SEC & ' MX= ' & $mx & ' MY= ' & $my & " log= " & $log & " tdiff= " & $varTimerDiff & @CRLF) EndIf Sleeper(50) WEnd $State = 3 EndFunc ;==>_Rec Func _Replay() If $log > -1 Then For $count = 0 To $log If $State = 2 Then MouseClick("left", $pos[$count][0], $pos[$count][1]) ToolTip("Replay " & $count & "/" & $log & $tmptxt) ;ConsoleWrite( @HOUR & ":" & @MIN & ":" & @SEC & "." & @MSEC & @CRLF) If $count < $log Then Sleeper($pos[$count][2]) Else Sleeper($clickdelay) EndIf Else $State = 3 EndIf Next If $log=0 Then $logcounter = $logcounter + 1 $tmptxt = " (" & ($logcounter) & ")" EndIf If $clickrepeat > 0 Then $repeatcounter = $repeatcounter + 1 $tmptxt = " (" & ($repeatcounter) & ")" If $repeatcounter >= $clickrepeat Then $State = 3 EndIf CheckTray() Sleeper(500) Else $State = 3 EndIf EndFunc ;==>_Replay Func SetMenuColor($iMenuID, $iColor) ;code from https://www.autoitscript.com/forum/topic/182563-solved-change-tray-menu-text-color/ Local $hMenu = TrayItemGetHandle($iMenuID) ; Get the internal menu handle Local $hBrush = DllCall("gdi32.dll", "hwnd", "CreateSolidBrush", "int", $iColor) $hBrush = $hBrush[0] Local $tMenuInfo = DllStructCreate("dword;dword;dword;uint;ptr;dword;ptr") DllStructSetData($tMenuInfo, 1, DllStructGetSize($tMenuInfo)) DllStructSetData($tMenuInfo, 2, BitOR($MIM_APPLYTOSUBMENUS, $MIM_BACKGROUND)) DllStructSetData($tMenuInfo, 5, $hBrush) DllCall("user32.dll", "int", "SetMenuInfo", "hwnd", $hMenu, "struct*", $tMenuInfo) EndFunc ;==>SetMenuColor Func Sleeper($nr) Local $varTS = _Timer_Init() While _Timer_Diff($varTS) < $nr CheckTray() WEnd EndFunc ;==>Sleeper1 point
-

System image lists for extra large and jumbo icons
musicstashall reacted to LarsJ for a topic
System image lists _WinAPI_ShellGetImageList (based on Shell_GetImageLists) in WinAPIShPath.au3 creates system image lists for small (16x16) and large (32x32) icons. SHGetImageList creates system image lists for small, syssmall (usually 16x16), large, extra large (48x48) and jumbo (256x256) icons. Jumbo icons are supported on Vista+. (On a Windows system, no more than these four system image lists exists (disregarding the syssmall list). That's why every decent icon editor by default should be able to create icons of the corresponding sizes.) On XP you can scale up extra large icons to 64x64, 96x96, 128x128, 160x160, 192x192, 224x224 and 256x256 pixel icons to create image lists (not system image lists) with these sizes. On Vista+ you can scale down jumbo icons to create image lists with the same sizes. GetSystemImageList in SystemImageLists.au3 is an implementation of SHGetImageList. SHGetFileInfo can be used to insert icons for files and folders into the system image lists. To get the proper icons, it's important to call SHGetFileInfo with the full paths for the files and folders represented as PIDLs. _WinAPI_ShellGetFileInfo in WinAPIShellEx.au3 is an implementation of SHGetFileInfo. But this function does not support PIDLs. GetSystemImageListIcon is based on code for SHGetFileInfo that supports PIDLs. GetSystemImageListIcon inserts an icon into the system image lists, and returns the index of the icon. If the icon already exists, it just returns the index. If more system image lists are created (with different sizes), a single call of GetSystemImageListIcon (SHGetFileInfo) will insert the icon into all lists. If you have created copies of the system image lists with other sizes, you have to manually create icons with the proper sizes, and insert into these image lists. State information SHGetFileInfo and GetSystemImageListIcon can extract state information for files and folders. GetSystemImageListIcon can extract ghosted, open folder and compressed states, and information for an overlay icon. File and folder states are demonstrated in the second example below. If state information includes ghosted or compressed flags, GetSystemImageListIcon returns an array with icon index in first row and state flags (ghosted or compressed) in second row. Note that state information not directly have anything to do with system image lists. But icon images in the lists are used to visually show file and folder states e.g. in a listview. SystemImageLists UDF SystemImageLists.au3 is a small (120 lines) UDF, which contains the two functions GetSystemImageList and GetSystemImageListIcon. The UDF creates five global constant variables $SHIL_LARGE, $SHIL_SMALL, $SHIL_EXTRALARGE, $SHIL_SYSSMALL and $SHIL_JUMBO with values 0 - 4. Examples First example Two examples are included in the zip. The first example is pretty much the same as the example for _WinAPI_ShellGetImageList in the help file. This example fills a system image list with (hundreds of) icons, and draw the icons into a single big picture control. In the example here, a picture control is created for each icon, and the GUI window is supplied with a vertical scroll bar. The number of icons is limited to 100. There are five versions of the example. One version for each of the five system image lists. The version with jumbo icons can be run on Vista+. Second example The second example shows how to use system image lists in a listview. The starting point are empty system image lists, which gradually are filled with icons of files and folders, as you drop on the listview. Icons which represents a file or folder, are supplied with the name of the file or folder. Icons which represents an image in a list, are supplied with a name that shows the index. The example shows how to display different states of the files and folders, and it shows how to copy and resize the image lists. This is a picture of the second example with a few extra large icons. You see a ghosted folder, a folder with an overlay icon, four compressed and one uncompressed item. The toolbar is hot-track enabled. To prevent flicker in the listview, resizing is done with this code by KaFu and Siao. The menu items of the Icons button fills the listview with icons of the Desktop, Computer, Control Panel, Documents and the System image list. For the first four menu items, icons are added to existing icons. For the last menu item (System image list) existing icons are deleted, before images are filled into the listview. The state items of the States button can be applied to icons which represents files or folders (icons with a name). Not icons which represents images in the system image lists (icons with a number). In absence of any of the former icons, the state items have no effect. The latter icons are deleted, when a state is set or unset. The menu items of the View button sets the size of the icons. Note that overlay icons are not drawn for sizes, which does not represent a system image list. The Delete button deletes the icons in the listview. The example shows how to copy and resize icons to 64x64, 96x96, 128x128, 160x160, 192x192, 224x224 and 256x256 pixels, and create image lists with these sizes. When icons are scaled to other sizes, it's very important to use proper functions to do the scaling. If not you can easily get icons of poor quality. On XP the extra large (48x48) icons are scaled up to larger sizes. On Vista+ the jumbo (256x256) icons are scaled down to smaller sizes. Here the scaling is done with internal functionality of the image lists. Zip file The size of the zip is caused by 4 icon files which includes 256x256 pixel images. System Image Lists.7z Testet on XP 32 bit and Win 7 32/64 bit.1 point


