Leaderboard
Popular Content
Showing content with the highest reputation on 11/16/2019 in all areas
-

CSV file editor
pixelsearch and one other reacted to LarsJ for a topic
Inpho, A virtual listview can only be used for many rows, not many columns. If you need many columns, look at this example.2 points -

CSV file editor
AutoBert reacted to pixelsearch for a topic
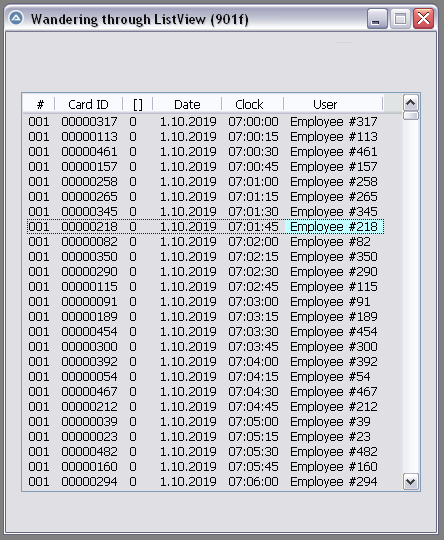
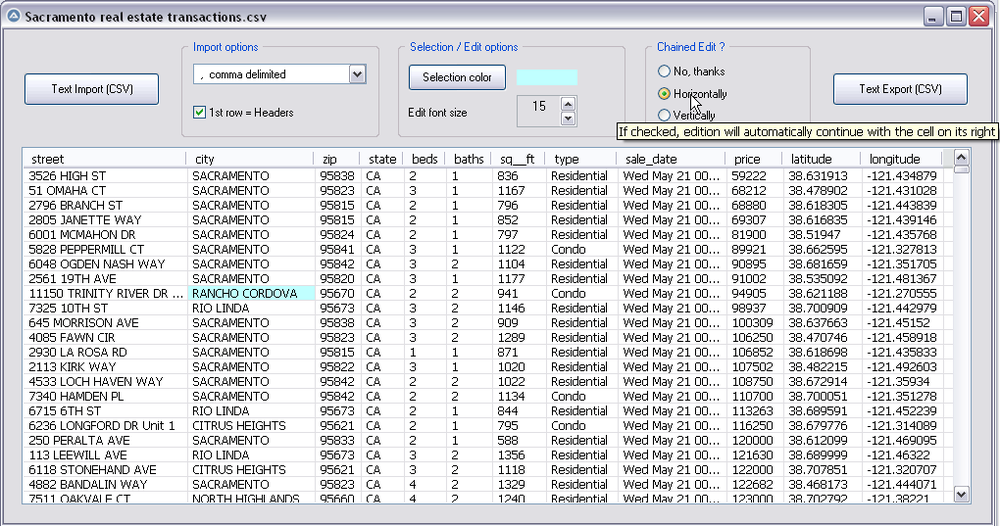
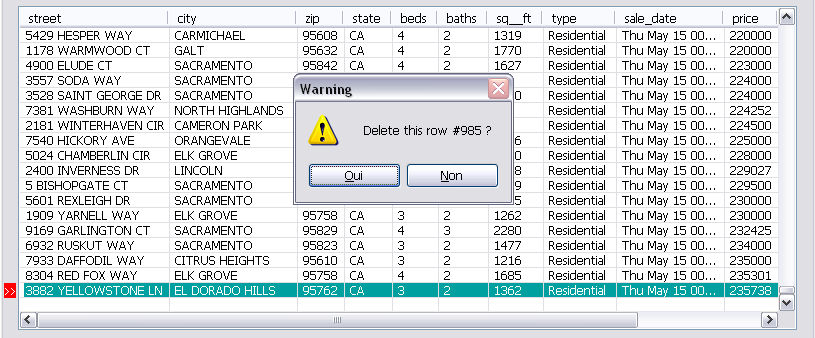
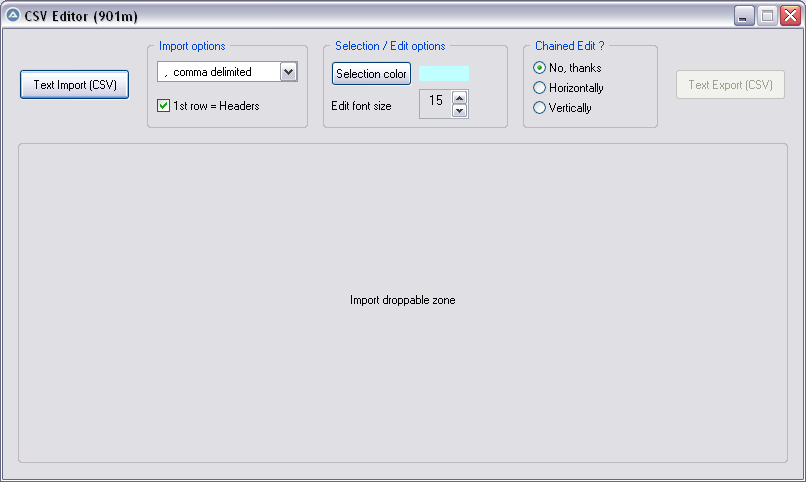
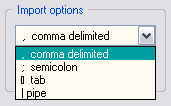
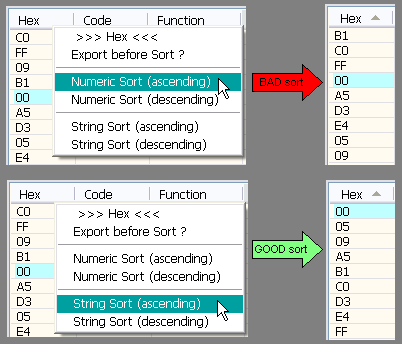
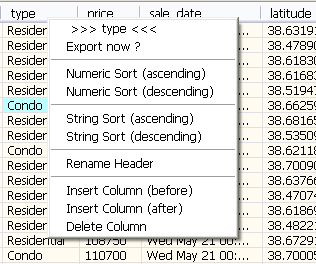
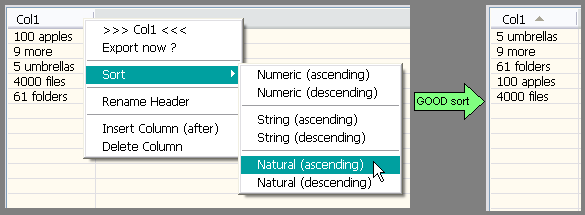
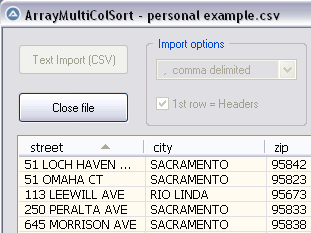
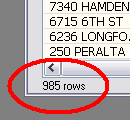
Hi everybody The script below (901f) allows to wander easily through a listview, selecting any item or subitem by using the 4 direction keys. The Enter key is also managed and allows to fire an event (as double-click does) With the help of mikell (many thanks !) and after several tests based on 1000 rows & 6 columns, we succeeded to code a clear WM_NOTIFY function, which is simple (though solid) and should be reusable without any modification in other scripts dealing with basic listviews (we didn't use or check any particular style for the listview) Trapping the Enter key has been done by using a dummy control + Accelerators, though we spent the whole last week trapping it in another way, using Yashied's Wsp.dll (without any problem) . Finally we choosed the dummy control option... to have a smaller code. Version 901f (Nov 11, 2019) : the pic below shows how the selected subitem appears, with its specific background colour (light blue) Version 901f code : #include <GUIConstantsEx.au3> #include <GuiListView.au3> #include <WindowsConstants.au3> #include <WinAPIvkeysConstants.au3> Global $hGUI = GUICreate("Wandering through ListView (901f)", 460, 500) Global $idListView = GUICtrlCreateListView _ (" Col 0 | Col 1| Col 2| Col 3", 15, 60, 430, 400) Global $hListView = GuiCtrlGetHandle($idListView) For $iRow = 0 To 99 $sRow = StringFormat("%2s", $iRow) GUICtrlCreateListViewItem( _ "Row " & $sRow & " / Col 0 |" & _ "Row " & $sRow & " / Col 1 |" & _ "Row " & $sRow & " / Col 2 |" & _ "Row " & $sRow & " / Col 3", $idListView) Next Global $g_iColumnCount = _GUICtrlListView_GetColumnCount($idListView) -1 Global $g_iItem = -1, $g_iSubItem = -1 ; item/subitem selected in ListView control Global $idDummy_Dbl_Click = GUICtrlCreateDummy() Global $idDummy_Enter = GUICtrlCreateDummy() Global $aAccelKeys[1][2] = [["{ENTER}", $idDummy_Enter]] GUISetAccelerators($aAccelKeys) GUIRegisterMsg($WM_NOTIFY, "WM_NOTIFY") GUISetState(@SW_SHOW) While 1 Switch GUIGetMsg() Case $GUI_EVENT_CLOSE GUIDelete($hGUI) Exit Case $idDummy_Dbl_Click MsgBox($MB_TOPMOST, "Double-click activated cell", _ "Row " & $g_iItem & " / Col " & $g_iSubItem) Case $idDummy_Enter If _WinAPI_GetFocus() = $hListView And $g_iItem > -1 Then MsgBox($MB_TOPMOST, "Enter activated cell", _ "Row " & $g_iItem & " / Col " & $g_iSubItem) EndIf EndSwitch WEnd ;============================================ Func WM_NOTIFY($hWnd, $iMsg, $wParam, $lParam) #forceref $hWnd, $iMsg, $wParam Local $tNMHDR, $hWndFrom, $iIDFrom, $iCode $tNMHDR = DllStructCreate($tagNMHDR, $lParam) $hWndFrom = DllStructGetData($tNMHDR, "hWndFrom") $iCode = DllStructGetData($tNMHDR, "Code") Static $bMouseDown = False, $bNotXP = Not (@OSVersion = "WIN_XP") Switch $hWndFrom Case $hListView Switch $iCode Case $NM_CUSTOMDRAW Local $tCustDraw = DllStructCreate($tagNMLVCUSTOMDRAW, $lParam) Local $iDrawStage = DllStructGetData($tCustDraw, "dwDrawStage") If $iDrawStage = $CDDS_PREPAINT Then Return $CDRF_NOTIFYITEMDRAW If $iDrawStage = $CDDS_ITEMPREPAINT Then Return $CDRF_NOTIFYSUBITEMDRAW Local $iItem = DllStructGetData($tCustDraw, "dwItemSpec") Local $iSubItem = DllStructGetData($tCustDraw, "iSubItem") Local $iColor = 0xFF000000 ; this is $CLR_DEFAULT in ColorConstants.au3 If $iItem = $g_iItem And $iSubItem = $g_iSubItem Then $iColor = 0xFFFFC0 ; light blue for 1 subitem (BGR) EndIf DllStructSetData($tCustDraw, "clrTextBk", $iColor) Return $CDRF_NEWFONT Case $LVN_KEYDOWN If $bMouseDown Or $g_iItem = -1 Then Return 1 ; don't process Local $tInfo = DllStructCreate($tagNMLVKEYDOWN, $lParam) Local $iVK = DllStructGetData($tInfo, "VKey") Switch $iVK Case $VK_RIGHT If $g_iSubItem < $g_iColumnCount Then $g_iSubItem += 1 If $bNotXP Then _GUICtrlListView_RedrawItems($hListview, $g_iItem, $g_iItem) EndIf Case $VK_LEFT If $g_iSubItem > 0 Then $g_iSubItem -= 1 If $bNotXP Then _GUICtrlListView_RedrawItems($hListview, $g_iItem, $g_iItem) EndIf Case $VK_SPACE ; spacebar would select the whole row Return 1 EndSwitch Case $NM_RELEASEDCAPTURE $bMouseDown = True Local $iItemSave = $g_iItem Local $aHit = _GUICtrlListView_SubItemHitTest($hListView) $g_iItem = $aHit[0] $g_iSubItem = $aHit[1] If $g_iItem = -1 And $iItemSave > -1 Then _GUICtrlListView_RedrawItems($hListview, $iItemSave, $iItemSave) EndIf Case $LVN_ITEMCHANGED Local $tInfo = DllStructCreate($tagNMLISTVIEW, $lParam) Local $iNewState = DllStructGetData($tInfo, "NewState") Switch $iNewState Case BitOr($LVIS_FOCUSED, $LVIS_SELECTED) $g_iItem = DllStructGetData($tInfo, "Item") _GUICtrlListView_SetItemSelected($hListview, $g_iItem, False) EndSwitch Case $NM_CLICK, $NM_RCLICK $bMouseDown = False Case $NM_DBLCLK $bMouseDown = False If $g_iItem > -1 Then GUICtrlSendToDummy($idDummy_Dbl_Click) EndSwitch EndSwitch Return $GUI_RUNDEFMSG EndFunc ;==>WM_NOTIFY Version 901k (Dec 16, 2019) What started with a simple "wander through listview" has turned now to a functional CSV file editor, which can be useful to modify your CSV files with AutoIt : Here are the instructions to use the script, based on a CSV file starting like this : street,city,zip,state,beds,baths,sq__ft,type,sale_date,price,latitude,longitude 3526 HIGH ST,SACRAMENTO,95838,CA,2,1,836,Residential,Wed May 21 00:00:00 EDT 2008,59222,38.631913,-121.434879 51 OMAHA CT,SACRAMENTO,95823,CA,3,1,1167,Residential,Wed May 21 00:00:00 EDT 2008,68212,38.478902,-121.431028 ... 1) Import options : comma delimited (default) No need to change anything if your CSV is comma delimited (other options are Semicolon delimited, Tab delimited) 2) Import options : First row = headers (default = checked) * Keep it checked if the 1st row of your imported file contains headers (that's the case in our example) * UNcheck it if the 1st row contains data, making listview headers appear like this : Col 0 | Col 1 | Col 2 ... 3) Import your CSV file : Only now the listview will be created dynamically. As soon as it is populated, GUI becomes resizable/maximizable, which can be helpful during modifications of a listview containing many columns. 4) Selection color : light blue (default) You can change the selected cell background color by clicking the "Selection color" button : this will open Windows color picker. 5) Editing a listview cell : done by Enter key (or double-click), this is how the edited cell will appear : * Please note that the edited background color (green in the pic) depends on each computer theme. It is not related to the selected background we discussed in 4) * Validate your modification with Enter key, or cancel the modification (revert) with Escape Key 6) Edit Font size : 15 (default) 15 was good in the precedent pic, the edited cell had its content "RIO LINDA" perfectly aligned with all other cells (on my computer). Here again, the font height required depends on each computer : if you want the edited font to be bigger (or smaller), just use the updown control. 7) Chained Edit ? (default = No) * "No" => when you finish editing a cell (Enter key), the same cell stays selected. * "Horizontally" => If checked, edition will automatically continue with the cell on its right. * "Vertically" => If checked, edition will automatically continue with the cell below. This feature can be very useful when you modify cells of a whole colum (vertically) or cells by row (horizontally) 8 ) Inserting a blank line (not in Gui) : press the "Ins" key : 9) Deleting a line (not in Gui) : press the "Del" key : 10) Export CSV file : Filename automatically suggested for export will be : Filename import & actual date & actual time, for example : Import name = "Sales Results.csv" => suggested Export name = "Sales Results_2019-12-16 16:00:59.csv" Version 901m (Dec 18, 2019) Yesterday, mikell suggested to import the csv file by dropping it directly into the GUI, good idea This new version 901m allows it. Now there are 2 ways to import the csv file : * Import button * Drag and drop into the large droppable zone, as shown in the pic below (this zone will be reused to create the listview at same coords) Version 901n (Dec 20, 2019) As t0nZ got tons of csv files, pipe "|" separated, here is a new version allowing this 4th separator Version 901p (Dec 25, 2019) New functionality : now you can drag headers to reorder columns. It may help some users who need it while editing their file. Exported CSV file will be saved according to the new columns order. Version 901r (Dec 29, 2019) New functionality : Numeric sort on any column (right click on column header) It is recommended to backup (export) your file before sorting, just in case you need a copy of it, unsorted. Version 901s (Dec 30, 2019) 1 functionality added : String sort (right click on column header) Numeric sort is alright in most cases, but sometimes we also need a String sort like shown in the following picture. Both ways of sorting (numeric and string) are found in this new release. Version 901t (Jan 3, 2020) 3 functionalities added Rename Header , Insert Column , Delete Column (right click on column header to display its context menu) Version 901u (Jan 6, 2020) 1 functionality added : Natural sort. Thanks to jchd for the idea and Melba23 for his function ArrayMultiColSort() included in the script. Though this natural sort isn't fully implemented, it should work when numbers precede letters (see pic below or better, try it on the "street" column found in the downloadable csv test file below) Natural sort duration + listview update are fast, maybe because of the new function _BufferCreate() described here and now added to the script. Version 901w (Jan 10, 2020) Two functionalities added : 1) Close File button, which allows to import other csv file(s) during the same session 2) Import speed has been improved because the listview control is now populated directly by an Array and not anymore by GUICtrlCreateListViewItem() This explains why, in this version, there are no more Control id's for listview items, allowing to empty the listview content in a snap with this line of code : _SendMessage($g_hListView, $LVM_DELETEALLITEMS) That's what it took to add the Close File button and import several csv files during the same session, avoiding id leaks. Please report if any issue is encountered. Version 901x (Jan 14, 2020) One minor functionality added : number of rows is now displayed just under the listview, it may be handy sometimes. Other minor changes included (natural sort speed improved) Credits : Many thanks to Czardas for his function _CSVSplit() and guinness for his function _SaveCSV(), guys you did a great job. Thanks to Musashi : your suggestions and time passed on testing beta versions of the script, that was really helpful and challenging. Not sure I would have ended this script without your detailed reports. Mikell : the 1st step above (901f) that we wrote together, it all started from here. Your knowledge and kindness are legendary ! Not forgetting all other persons who were inspiring : LarsJ, Melba23, jpm, that list could be endless... Download link : version 901x - Jan 14, 2020 (minor update on Jan 15) 901x - CSV file editor.au3 Test csv file (986 rows/12cols) : Sacramento real estate transactions.csv1 point -

AutoIt3Wrapper - "run" with stop on error by parameter
Professor_Bernd reacted to Jos for a topic
Ah ok.... tried that and it works ..... also the Ctrl+Break .1 point -

Get Link Google
ngthanhdam reacted to Jos for a topic
Hi newbie, telling us it doesn't run doesn't mean anything! Provide the needed details like errors or whatever you do see so we understand. On the other hand: You do realise that this thread is 5 years old and the code might be outdated? Jos1 point -

AutoIt3Wrapper - "run" with stop on error by parameter
Professor_Bernd reacted to Jos for a topic
When your point is that the Ctrl+End can always be set for AutoIt3Wrapper then I would agree. ... and also just tested it, so will remove that If in the next Beta version available now. :-) Jos1 point -
@CYCho Here's an alternative method of getting the Chrome version details -- #include <Inet.au3> #include <String.au3> $sChromeVersion = FileGetVersion("C:\Program Files (x86)\Google\Chrome\Application\chrome.exe") ConsoleWrite("Chrome version - " & $sChromeVersion & @CRLF) $iPID = Run(@ScriptDir & "\chromedriver.exe --version", @ScriptDir, @SW_HIDE, $STDOUT_CHILD) ProcessWaitClose($iPID) $sOutput = StdoutRead($iPID) $aResult = _StringBetween($sOutput, "ChromeDriver ", " (") $sChromeDriver = @error ? "" : $aResult[0] ConsoleWrite("Chromedriver version -- " & $sChromeDriver & @CRLF) $sChromeVersionShort = StringLeft($sChromeVersion, StringInStr($sChromeVersion, ".", 0, -1) - 1) $sChromeDriverLatest = _INetGetSource("https://chromedriver.storage.googleapis.com/LATEST_RELEASE_" & $sChromeVersionShort) ConsoleWrite("Chromedriver latest -- " & $sChromeDriverLatest & @CRLF) If $sChromeDriver <> $sChromeDriverLatest Then ConsoleWrite("ChromeDriver upgrade needed!" & @CRLF) EndIf1 point
-

[solved] Help with fake GUI coloring
argumentum reacted to therks for a topic
UEZ's function will work if you just need to merge the color with black, but if you want to merge any two colors together, you can try this: Func _ColorMerge($iBaseColor, $iMergeColor) Local $aBase[3] = [ _ BitAND(BitShift($iBaseColor, 16), 0xff), _ ; R BitAND(BitShift($iBaseColor, 8), 0xff), _ ; G BitAND($iBaseColor, 0xff) ] ; B Local $aMerge[3] = [ _ BitAND(BitShift($iMergeColor, 16), 0xff), _ ; R BitAND(BitShift($iMergeColor, 8), 0xff), _ ; G BitAND($iMergeColor, 0xff) ] ; B Local $aReturn[3], $nAlpha = BitAND(BitShift($iMergeColor, 24), 0xff) / 255 For $i = 0 To 2 $aReturn[$i] = Round($aBase[$i] * (1-$nAlpha) + $aMerge[$i] * $nAlpha) Next Return BitOR(0xff000000, BitShift($aReturn[0], -16), BitShift($aReturn[1], -8), $aReturn[2]) EndFunc ConsoleWrite(Hex(_ColorMerge(0xFF0000, 0x80FFFF00)) & @CRLF) ; Red plus 50% yellow = orange (#ff8000) Consider the first color as a background, it has no alpha value (technically it defaults to 100%). The second color requires an alpha value. The return is a full AARRGGBB color value.1 point -

AutoIt3Wrapper - "run" with stop on error by parameter
argumentum reacted to Professor_Bernd for a topic
First of all, thank you both! Well, then that's settled! That's right! But AutoIt3Wrapper registers the HotKey Ctrl+Break, so it also works (unfortunately) in my CompilerRunner. The problem is that AutoIt3Wrapper doesn't close the "Example.au3" properly because it doesn't run in SciTE. (The CompilerRunner is started by PSPad.) As described above, I can't use the same HotKey, because then SciTE doesn't work properly anymore. At the moment I'm trying to use _isPressed() to monitor whether Ctrl+Break is pressed. If this works, SciTE and PSPad can coexist.1 point -

AutoIt3Wrapper - "run" with stop on error by parameter
Professor_Bernd reacted to argumentum for a topic
exactly. Like I said, you may close you script with the editor's hotkey and it will close the one PID but, at times, I write some ugly things, and the editor can not know that. So the CV running in the background is a life saver, say, I make my code reload my code, in a loop. The CPU is 100%, ... the only way to stop it w/o reboot is this CV running in the background ( with the "Extras" enabled. As far as HotKeys, I'm sure you can find something not in use, to use in the other setup.1 point -
Hi, I have modified ANYGUIv2.8.au3 so that it works again. Only changes are: ;$sztext = _GUICtrlListGetText($nID, $dragIdx) $sztext = _GUICtrlListBox_GetText($nID, $dragIdx) ;_GUICtrlListDeleteItem($nID, $dragIdx) _GUICtrlListBox_DeleteString($nID, $dragIdx) ;_GUICtrlListInsertItem($nID, $sztext, $dragIdto) _GUICtrlListBox_InsertString($nID, $sztext, $dragIdto) ;_GUICtrlListSelectIndex($nID, $dragIdto) _GUICtrlListBox_SetCurSel($nID, $dragIdto) The following script now works (to remove title bar from existing notepad window): #include "ANYGUIv2.8.au3" Opt ("WinTitleMatchMode", 4) $xh = WinGetHandle("Untitled - Notepad") $Style = 0x00C00000 $ExStyle = -1 $result = _TargetStyle("unset", 1, $Style, $ExStyle, $xh) Btw the includes are: #include <GUIconstants.au3> #include <WindowsConstants.au3> #include <GUIListBox.au3> Thanks and enjoy. ANYGUIv2.8.au31 point
-
Currently, ByRef values on COM object methods don't work out of the box. It's even hard to make them work at all. The simplest route is to issue another SQL statement.1 point

