Leaderboard
Popular Content
Showing content with the highest reputation on 02/04/2019 in all areas
-

GuiFlatButton UDF : Change Colors of Regular Buttons
mumpel and one other reacted to kurtykurtyboy for a topic
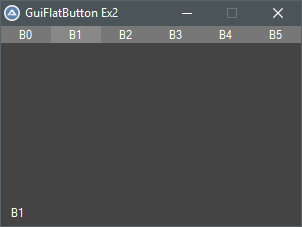
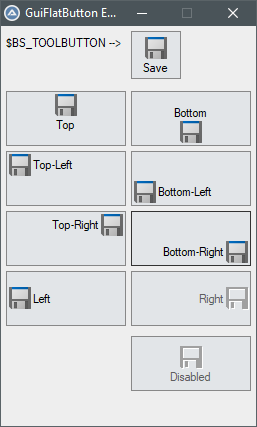
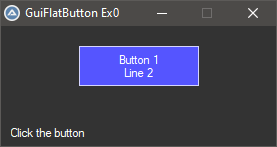
GuiFlatButton is a UDF to easily create regular buttons with different colors for background, foreground, border, hover, focus, etc.. This started as an effort to change the background color of a button and eventually grew into a full UDF. If you've looked around forums for changing button background colors, you have probably noticed that each proposed workaround has its own set of issues/side-effects. The answers usually circle back to 'use ownerdrawn buttons' and 'not worth it'. Well, now it is possible for anyone to easily create ownerdrawn buttons - totally worth it! Some issues with other workarounds such as drawing with GDI+ or using a colored label as a 'button': Not 'real' buttons so you lose built-in functionality that windows gives to buttons Messy / inefficient code in the main while loop to check for mouse position Slow to respond to click, paint, etc... Having to deal with GUIRegisterMsg messages Not straight-forward to implement GuiFlatButton is not a workaround; it is a technique to respond to Windows' built-in owner-drawn button events. With minimal effort, we can now create true simple colored buttons. The idea is to create an owner-drawn button using GUICtrlCreateButton then subclass the GUI and controls to handle the button-specific events to paint it however we want. This UDF magically does all of this for us! No need to worry about event handling or main while loop logic. How to use It couldn't be any easier! Simply create a new button using the familiar syntax. This creates an ownerdrawn button with default colors. $mybutton1 = GuiFlatButton_Create("Button 1", 78, 20, 120, 40) If you want to change the background and text colors: GuiFlatButton_SetBkColor(-1, 0x5555FF) GuiFlatButton_SetColor(-1, 0xFFFFFF) Advanced Usage Set background/text/border all at once GuiFlatButton_SetColors(-1, 0x0000FF, 0xFFFFFF, 0x9999FF) Set ALL colors for ALL button states! (normal, focus, hover, selected) Local $aColorsEx = [0x0000FF, 0xFFFFFF, -2, 0x4444FF, 0xFFFFFF, 0xAAAAFF, 0x6666FF, 0xFFFFFF, 0xCCCCFF, 0x0000EE, 0xFFFFFF, 0x7777EE] GuiFlatButton_SetColorsEx(-1, $aColorsEx) Set default colors to apply to any future buttons ;set colors GuiFlatButton_SetDefaultColors(0x0000FF, 0xFFFFFF, 0x9999FF) ;create buttons $mybutton1 = GuiFlatButton_Create("Button 1", 12, 20, 120, 40) $mybutton2 = GuiFlatButton_Create("Button 2", 143, 20, 120, 40) Set ALL color defaults ;set colors Local $aColorsEx = [0x0000FF, 0xFFFFFF, -2, 0x4444FF, 0xFFFFFF, 0xAAAAFF, 0x6666FF, 0xFFFFFF, 0xCCCCFF, 0x0000EE, 0xFFFFFF, 0x7777EE] GuiFlatButton_SetDefaultColorsEx($aColorsEx) ;create buttons $mybutton1 = GuiFlatButton_Create("Button 1", 12, 20, 120, 40) $mybutton2 = GuiFlatButton_Create("Button 2", 143, 20, 120, 40) Available Functions Simple Example #include <GUIConstantsEx.au3> #include <MsgBoxConstants.au3> #include "GuiFlatButton.au3" Example() ;GUI with one button Func Example() Local $hGUI, $mybutton1 $hGUI = GUICreate("GuiFlatButton Ex0", 275, 120) GUISetBkColor(0x333333) Local $idLabel = GUICtrlCreateLabel("Click the button", 10, 100, 150, 30) GUICtrlSetColor(-1, 0xFFFFFF) ;create new button then set the background and foreground colors $mybutton1 = GuiFlatButton_Create("Button 1" & @CRLF & "Line 2", 78, 20, 120, 40, $BS_MULTILINE) GuiFlatButton_SetBkColor(-1, 0x5555FF) GuiFlatButton_SetColor(-1, 0xFFFFFF) GUISetState(@SW_SHOW, $hGUI) Local $i = 0 Local $iMsg While 1 $iMsg = GUIGetMsg() Switch $iMsg Case $GUI_EVENT_CLOSE ExitLoop Case $mybutton1 $i += 1 GUICtrlSetData($idLabel, $i) ConsoleWrite($i & @CRLF) EndSwitch Sleep(10) WEnd GUIDelete() EndFunc ;==>Example Menu/Toolbar Example #include <GUIConstantsEx.au3> #include <MsgBoxConstants.au3> #include "GuiFlatButton.au3" Example() ;Example GUI with toolbar Func Example() Local $hGUI, $idLabel, $aButtons, $iTbSize $hGUI = GUICreate("GuiFlatButton Ex2", 300, 200) GUISetBkColor(0x444444) $idLabel = GUICtrlCreateLabel("Click a button", 10, 180, 150, 30) GUICtrlSetColor(-1, 0xFFFFFF) $aButtons = createToolbar() $iTbSize = UBound($aButtons) GUISetState(@SW_SHOW, $hGUI) Local $i = 0 Local $iMsg While 1 $iMsg = GUIGetMsg() Switch $iMsg Case $GUI_EVENT_CLOSE ExitLoop Case $aButtons[0] To $aButtons[$iTbSize - 1] ConsoleWrite("1") GUICtrlSetData($idLabel, GuiFlatButton_Read($iMsg)) EndSwitch Sleep(10) WEnd GUIDelete() EndFunc ;==>Example Func createToolbar() Local $aButtons[6] Local $bkColor = 0x777777 Local $textColor = 0xFFFFFF Local $borderColor = 0x999999 Local $aBtnClrs[12] = [0x777777, 0xFFFFFF, $GUI_BKCOLOR_TRANSPARENT, 0x888888, 0xFFFFFF, $GUI_BKCOLOR_TRANSPARENT, 0x999999, 0xFFFFFF, $GUI_BKCOLOR_TRANSPARENT, 0x666666, 0xFFFFFF, $GUI_BKCOLOR_TRANSPARENT] For $i = 0 To UBound($aButtons) - 1 $aButtons[$i] = GuiFlatButton_Create("B" & $i, $i * 50, 0, 50, 17) GuiFlatButton_SetColorsEx($aButtons[$i], $aBtnClrs) Next Return $aButtons EndFunc ;==>createToolbar Icon Example You can even easily add icons to your buttons -- just create a new button and send it an icon! #include <GDIPlus.au3> #include "GuiFlatButton.au3" Example() ;buttons with Icon images Func Example() ;get images for demonstration _GDIPlus_Startup() ;initialize GDI+ Local $hIcon = _WinAPI_ShellExtractIcon(@SystemDir & '\shell32.dll', 258, 24, 24) ;extract the 'Save' icon Local $hBitmap = _GDIPlus_BitmapCreateFromHICON($hIcon) ;Create Bitmap from Icon (for demonstration) Local $hHBitmap = _GDIPlus_BitmapCreateHBITMAPFromBitmap($hBitmap) ;Create HBitmap from Bitmap _GDIPlus_BitmapDispose($hBitmap) ;dispose the bitmap _GDIPlus_Shutdown() ;done with GDI+ Local $hGUI = GUICreate("GuiFlatButton Ex5", 255, 400) GUISetBkColor(0xEEEEEE) ;set default colors of future buttons Local $aColorsEx = _ [0xE2E5E8, 0X000000, 0x888888, _ ; normal : Background, Text, Border 0xE2E5E8, 0X000000, 0x333333, _ ; focus : Background, Text, Border 0xE8E8E8, 0X000000, 0x666666, _ ; hover : Background, Text, Border 0xDDDDDD, 0X000000, 0xAAAAAA] ; selected : Background, Text, Border GuiFlatButton_SetDefaultColorsEx($aColorsEx) ;normal button with icon $label1 = GUICtrlCreateLabel( "$BS_TOOLBUTTON -->", 5, 10) GUICtrlSetBkColor(-1, $GUI_BKCOLOR_TRANSPARENT) Local $mybutton1 = GuiFlatButton_Create("Save", 130, 5, 50, 48, $BS_TOOLBUTTON) _WinAPI_DeleteObject(_SendMessage(GUICtrlGetHandle($mybutton1), $BM_SETIMAGE, $IMAGE_ICON, $hIcon)) ;align top Local $mybuttonT = GuiFlatButton_Create("Top", 5, 65, 120, 55, $BS_TOP) _WinAPI_DeleteObject(_SendMessage(GUICtrlGetHandle($mybuttonT), $BM_SETIMAGE, $IMAGE_ICON, $hIcon)) ;align top-left Local $mybuttonTL = GuiFlatButton_Create("Top-Left", 5, 125, 120, 55, BITOR($BS_TOP, $BS_LEFT)) _WinAPI_DeleteObject(_SendMessage(GUICtrlGetHandle($mybuttonTL), $BM_SETIMAGE, $IMAGE_ICON, $hIcon)) ;align top-right Local $mybuttonTR = GuiFlatButton_Create("Top-Right", 5, 185, 120, 55, BITOR($BS_TOP, $BS_RIGHT)) _WinAPI_DeleteObject(_SendMessage(GUICtrlGetHandle($mybuttonTR), $BM_SETIMAGE, $IMAGE_ICON, $hIcon)) ;align left Local $mybuttonL = GuiFlatButton_Create("Left", 5, 245, 120, 55, $BS_LEFT) _WinAPI_DeleteObject(_SendMessage(GUICtrlGetHandle($mybuttonL), $BM_SETIMAGE, $IMAGE_ICON, $hIcon)) ;align bottom Local $mybuttonB = GuiFlatButton_Create("Bottom", 130, 65, 120, 55, $BS_BOTTOM) _WinAPI_DeleteObject(_SendMessage(GUICtrlGetHandle($mybuttonB), $BM_SETIMAGE, $IMAGE_ICON, $hIcon)) ;align bottom-left Local $mybuttonBL = GuiFlatButton_Create("Bottom-Left", 130, 125, 120, 55, BITOR($BS_BOTTOM, $BS_LEFT)) _WinAPI_DeleteObject(_SendMessage(GUICtrlGetHandle($mybuttonBL), $BM_SETIMAGE, $IMAGE_ICON, $hIcon)) ;align bottom-right Local $mybuttonBR = GuiFlatButton_Create("Bottom-Right", 130, 185, 120, 55, BITOR($BS_BOTTOM, $BS_RIGHT)) _WinAPI_DeleteObject(_SendMessage(GUICtrlGetHandle($mybuttonBR), $BM_SETIMAGE, $IMAGE_ICON, $hIcon)) ;align right Local $mybuttonR = GuiFlatButton_Create("Right", 130, 245, 120, 55, $BS_RIGHT) _WinAPI_DeleteObject(_SendMessage(GUICtrlGetHandle($mybuttonR), $BM_SETIMAGE, $IMAGE_ICON, $hIcon)) GuiFlatButton_SetState($mybuttonR, $GUI_DISABLE ) ;disabled Local $mybuttonDisable = GuiFlatButton_Create("Disabled", 130, 310, 120, 55, $BS_TOOLBUTTON) _WinAPI_DeleteObject(_SendMessage(GUICtrlGetHandle($mybuttonDisable), $BM_SETIMAGE, $IMAGE_BITMAP, $hHBitmap)) GuiFlatButton_SetState($mybuttonDisable, $GUI_DISABLE ) ;clean up! _WinAPI_DestroyIcon( $hIcon ) _WinAPI_DeleteObject( $hHBitmap ) GUISetState(@SW_SHOW, $hGUI) Local $iMsg While 1 $iMsg = GUIGetMsg() Switch $iMsg Case $GUI_EVENT_CLOSE ExitLoop EndSwitch Sleep(10) WEnd GUIDelete() EndFunc ;==>Example I'm sure there are some use-cases I've forgotten, so feedback is welcome! Download the latest UDF and several more examples: GuiFlatButton_20220919.zip (1,121) Update 2022-09-19 Added update from 05/25 back in after it was accidentally removed Update 2022-09-01 Added $BS_MULTILINE button style Added ellipses when text is longer than the button Fixed compatibility with Opt("MustDeclareVars", 1) Update 2022-05-25 Fixed issue, buttons disappear when a GUI containing a child window with WS_EX_MDICHILD extended style is moved Update 2022-05-24 Fixed issue releasing subclassing when GUI is deleted but program is not closed Fixed occasional white background flicker Added function GuiFlatButton_GetPos Update 2021-01-02 Fixed bug, not drawing correctly after deleting GUI with GUIDelete() Fixed bug, changing default colors changed all buttons, even previously created buttons Made some internal functions more efficient Update 2019-04-14 Fixed bug, not showing pressed down state when clicking rapidly Added Icon/Bitmap support! Added function GuiFlatButton_SetPos to change the position and/or size of a button Update 2019-02-09 Added 2 new functions to set the button colors globally for all future buttons. GuiFlatButton_SetDefaultColors GuiFlatButton_SetDefaultColorsEx Credits to: Melba23 (UDF template) LarsJ (general subclassing code) 4ggr35510n (TrackMouseEvent example) binhnx (disable dragging with $WS_EX_CONTROLPARENT) GUIRegisterMsg in AutoIt Help (owner-draw button example) funkey (_WinAPI_DrawState example)2 points -
@argumentum thats a good tip. I have to look into it. @jchd I have to admit that i talked BullSh... Since i found out that the result in the console is a scientific notation. Sorry for that. The coordinate system in Google Earth provides long,lat and altitude. It looks like this: <longitude>10.96324445910746</longitude> <latitude>10.81192423951603</latitude> <altitude>10.34491166798213</altitude> Thats 14 digits after the comma. So when i have a number 0.00000000000001 and i have to get the vector lenght (x^2) then i get this number: 0.0000000000000000000000000001 thats 28 digits after comma. $x = 0.00000000000001 $e = $x^2 ConsoleWrite($e & @LF) ConsoleWrite(StringFormat("%20.28f\t\r", $e)) ;Result ;1e-028 ;0.0000000000000000000000000001 So the question now is. Can i still calculate with such small numbers without loosing precision? Does Autoit's "Variant" handle datatypes like "long double" ? I thought i give C++ a try and wrote a little DLL to see how far i get with it. With cout.precision(150); and cout << fixed; i was able to see really long numbers. I did not count the digits but im sure it was more than 100 after comma. However, it kind of works. Horizontal is perfect, but vertical its kinda distance dependent. It does follow up and down, but is not really centered to the screen. (The camera interest is a Placemark Pin in Google Earth) I will maybe really give quaternions a shot although iam not grasping them. C++ code: #include <iostream> #include <string> using namespace std; double RAD = 57.2957795130823; struct vec3 { long double x, y, z; }; // Prototypes long double VectorLength(vec3 V); vec3 VectorNormalize(vec3 vector); vec3 VectorSubtract(vec3 v1, vec3 v2); extern "C" __declspec(dllexport) long double GetYaw(double CamX, double CamY, double CamZ, double TarX, double TarY, double TarZ) { vec3 CamPos; vec3 TarPos; CamPos.x = CamX; CamPos.y = CamY; CamPos.z = CamZ; TarPos.x = TarX; TarPos.y = TarY; TarPos.z = TarZ; cout.precision(150); vec3 CamPosNormal = VectorNormalize(CamPos); vec3 TarPosNormal = VectorNormalize(TarPos); vec3 CamDirection = VectorSubtract(TarPosNormal, CamPosNormal); long double Dx = CamDirection.x; long double Dy = CamDirection.y; long double Dz = CamDirection.z; long double Pitch = asin(Dz) * RAD; long double Yaw = atan2(Dx, Dy) * RAD; //cout << fixed; //cout << "H Yaw: " << Yaw << endl; //cout << "V Pitch: " << Pitch << endl; return Yaw; } extern "C" __declspec(dllexport) long double GetPitch(double CamX, double CamY, double CamZ, double TarX, double TarY, double TarZ) { vec3 CamPos; vec3 TarPos; CamPos.x = CamX; CamPos.y = CamY; CamPos.z = CamZ; TarPos.x = TarX; TarPos.y = TarY; TarPos.z = TarZ; cout.precision(150); vec3 CamPosNormal = VectorNormalize(CamPos); vec3 TarPosNormal = VectorNormalize(TarPos); vec3 CamDirection = VectorSubtract(TarPosNormal, CamPosNormal); long double Dx = CamDirection.x; long double Dy = CamDirection.y; long double Dz = CamDirection.z; long double Pitch = asin(Dz) * RAD; long double Yaw = atan2(Dx, Dy) * RAD; //cout << fixed; //cout << "H Yaw: " << Yaw << endl; //cout << "V Pitch: " << Pitch << endl; return Pitch; } long double VectorLength(vec3 V) { return sqrt((V.x * V.x) + (V.y * V.y) + (V.z * V.z)); } vec3 VectorNormalize(vec3 V) { long double Len = VectorLength(V); if (Len == 0) { V.x = 0; V.y = 0; V.z = 0; return V; } V.x = V.x / Len; V.y = V.y / Len; V.z = V.z / Len; return V; } vec3 VectorSubtract(vec3 v1, vec3 v2) { vec3 V; V.x = v1.x - v2.x; V.y = v1.y - v2.y; V.z = v1.z - v2.z; return V; } Autoit "UDF" #AutoIt3Wrapper_UseX64=y Func Euler($CamX, $CamY, $CamZ, $TarX, $TarY, $TarZ) Local $Yaw = DllCall("LookAt.dll", "double:cdecl", "GetYaw", "double", $CamX, "double", $CamY, "double", $CamZ, "double", $TarX, "double", $TarY, "double", $TarZ) Local $Pit = DllCall("LookAt.dll", "double:cdecl", "GetPitch", "double", $CamX, "double", $CamY, "double", $CamZ, "double", $TarX, "double", $TarY, "double", $TarZ) Local $Ret[2] = [$Yaw[0], $Pit[0]] Return $Ret EndFunc ;==>Euler Autoit Main #AutoIt3Wrapper_UseX64=y #include <Vector.au3> #include <LookAt.au3> If Not WinExists("Google Earth Pro") Then Exit Global $P = @DesktopDir & "\IntPos.kml" ; File Path Global $CamPos = Vector(-75, 40, 20) ; Camera Position XYZ Global $TarPos = Vector(-75, 40.002, 0) ; Target Position XYZ For $NR = 0 To 30 Step 5 ;$TarPos[0] = $TarPos[0] - ($NR / 100000) ; Interest X ;$TarPos[1] = $TarPos[1] + ($NR / 100000) ; Interest Y $TarPos[2] = $TarPos[2] + $NR ; Interest Z Local $E = Euler($CamPos[0], $CamPos[1], $CamPos[2], $TarPos[0], $TarPos[1], $TarPos[2]) Local $Yaw = $E[0] Local $Pit = $E[1] $Yaw = $Yaw - 90 $Pit = $Pit + 90 ConsoleWrite("Yaw: " & $Yaw & @LF) ConsoleWrite("Pit: " & $Pit & @LF & @LF) KML($CamPos[0], $CamPos[1], $CamPos[2], $Yaw, $Pit, 0, $TarPos[0], $TarPos[1], $TarPos[2]) Go(1000) Next Func KML($long, $lat, $alt, $head, $tilt, $roll, $longP, $latP, $altP) ; Open File Local $H = FileOpen($P, 2) ; Open Overwrite ; Header FileWriteLine($H, '<?xml version="1.0" encoding="UTF-8"?>') FileWriteLine($H, '<kml xmlns="http://www.opengis.net/kml/2.2" xmlns:gx="http://www.google.com/kml/ext/2.2" xmlns:kml="http://www.opengis.net/kml/2.2" xmlns:atom="http://www.w3.org/2005/Atom">') FileWriteLine($H, '<Document>') FileWriteLine($H, '<name>IntPos.kml</name>') ; Camera FileWriteLine($H, '<Camera>') FileWriteLine($H, '<longitude>' & $long & '</longitude>') FileWriteLine($H, '<latitude>' & $lat & '</latitude>') FileWriteLine($H, '<altitude>' & $alt & '</altitude>') FileWriteLine($H, '<heading>' & $head & '</heading>') FileWriteLine($H, '<tilt>' & $tilt & '</tilt>') FileWriteLine($H, '<roll>' & $roll & '</roll>') ;FileWriteLine($H, '<altitudeMode>relativeToSeaFloor</altitudeMode>') FileWriteLine($H, '<altitudeMode>relativeToGround</altitudeMode>') FileWriteLine($H, '</Camera>') ; Pin FileWriteLine($H, '<Placemark>') FileWriteLine($H, '<name>Pin</name>') FileWriteLine($H, '<Point>') FileWriteLine($H, '<extrude>1</extrude>') FileWriteLine($H, '<altitudeMode>relativeToGround</altitudeMode>') FileWriteLine($H, '<drawOrder>1</drawOrder>') FileWriteLine($H, '<coordinates>' & $longP & ',' & $latP & ',' & $altP & '</coordinates>') FileWriteLine($H, '</Point>') FileWriteLine($H, '</Placemark>') ;End FileWriteLine($H, '</Document>') FileWriteLine($H, '</kml>') ;Close File FileClose($H) EndFunc ;==>KML Func Go($Pause) ; Execute KML in Google Earth If Not WinExists("Google Earth Pro") Then Exit ShellExecute($P) Sleep($Pause) EndFunc ;==>Go LookAt.dll1 point
-
Using UI Automation Code in AutoIt
LarsJ reacted to AtomicSeek for a topic
Dear LarsJ, Your UIASpy tool and related examples are simply amazing. I was struggling for months to automate WindowsForms10 and other types of applications that resist to classic AutoIt and this helps me a lot. UI Automation is like the "missing chapter" of AutoIt, and I am very excited to see that it starts to take a functional form. I think this example can be considered even more classic because it does not contain any other UDFs: ; open Notepad Run ( "Notepad.exe" ) ; wait for Notepad window to exist Local $hNotepad = WinWait ( "[CLASS:Notepad; TITLE:Untitled - Notepad;]" ) ; write "HelloWorld" ControlSetText ( $hNotepad, "", "[CLASS:Edit; INSTANCE:1]", "HelloWorld" ) ; open the SaveAs window (by pressing ALT+f and a) ControlSend ( $hNotepad, "", "", "{ALT}fa" ) ; wait for Save As window to exist Local $hSaveAs = WinWait ( "[CLASS:#32770; TITLE:Save As;]" ) ; complete the File Name field with "HelloWorld.txt" ControlSetText ( $hSaveAs, "", "[CLASS:Edit; INSTANCE:1]", "HelloWorld.txt" ) ; press the Save button ControlClick ( $hSaveAs, "", "[CLASS:Button; INSTANCE:2]" ) ; wait for Save As window to close WinWaitClose ( $hSaveAs, "" ) ; close the Notepad window WinClose ( $hNotepad, "" ) ; wait for Notepad window to close WinWaitClose ( $hNotepad, "" ) Thank you! Best regards, AtomicSeek1 point -
It turns out that I lacked basic understanding of how handles work... and that they are duplicated when passed through CreateProcess, so you need to close your own copies of the handles in order for the pipe to properly close when the program exits. I also discovered that inheritence is a bit more complicated, as both handles (each for an end of the pipe) are marked as inheritable by the CreatePipe function during creation... this causes problems yet again by passively duplicating the handles which were not even passed to CreateProcess, you can prevent this by using the SetHandleInformation function. Here is the working code: bool allium_start(struct TorInstance *instance, char *config, allium_pipe *output_pipes) { // Prepare startup info with appropriate information SecureZeroMemory(&instance->startup_info, sizeof instance->startup_info); instance->startup_info.dwFlags = STARTF_USESTDHANDLES; SECURITY_ATTRIBUTES pipe_secu_attribs = {sizeof(SECURITY_ATTRIBUTES), NULL, true}; HANDLE pipes[2]; if (output_pipes == NULL) { CreatePipe(&pipes[0], &pipes[1], &pipe_secu_attribs, 0); output_pipes = pipes; } SetHandleInformation(output_pipes[0], HANDLE_FLAG_INHERIT, 0); instance->startup_info.hStdOutput = output_pipes[1]; instance->startup_info.hStdError = output_pipes[1]; instance->stdout_pipe = output_pipes[0]; // Stored for internal reference // Create the process bool success = CreateProcessA( NULL, cmd, NULL, NULL, config ? true : false, 0, NULL, NULL, &instance->startup_info, SecureZeroMemory(&instance->process, sizeof instance->process) ); // Close the write end of our stdout handle CloseHandle(output_pipes[1]); // Return on failure if (!success) return false; } You can refer to the accepted answer in my StackOverflow question for more details, many thanks to Remy Lebeau and RbMm for answering my questions there.1 point
-
Windows won't allow this as long as there is a program with a open handle to a file... Option C is probably your best bet if you force the operation.1 point
-
If a file handle is returned; It has been allocated and should be freed. (That's how I look at it, but there are other symptoms, like the file staying in use)1 point
-
Yes, I would close the file handle in all cases.1 point
-
1 point
-
Three main features are implemented to navigate in an image: Zoom in/out with the mouse wheelClick a point to zoom in/out around this pointDrag the image with the mouse to move it in the picture controlTo zoom in/out the mouse pointer must be located over the picture control. 10 zoom levels are defined with the following zoom factors: 1, 2, 3, 4, 6, 8, 12, 16, 24, 32. A zoom factor of e.g. 24 means, that a pixel in the source image is shown as a 24x24 square in the picture control. When you drag the image with the mouse and then zoom in/out, you'll zoom in/out around the point in the middle of the picture control. The picture shows the GUI and an image of a small forest. The image is zoomed in to zoom factor 3. A pixel in the source image is shown as a 3x3 square in the picture control. To zoom in/out around one of the two lakes, just click in the middle of the lake and zoom in/out, or drag the lake to the middle of the picture control and zoom in/out. Keyboard actions Page Up/Down to zoom in/outArrow keys to move the image a pixel at a timeShift plus arrow keys to move the image a page at a timeTo use the keyboard, the mouse pointer must be located over the picture control. Menu bar The menu bar is not implemented in this version. Tab control The purpose of the tab control is to be able to switch between more images. If you click a tab item, the image in the picture control will be replaced with the image in the tab item. When you switch from one image to another, the image settings are stored and restored. You can change the order of the images by dragging the tab items to the right or left. Right (secondary) click a tab item to get a context menu for the image. Among other things, you can choose colors for the frame and grid (see below) that best fits respectively a bright and dark image. By default colors are set to fit a bright image. Toolbars The left group is the File toolbar. 1) New image2) Open image3) Save image4) Close imageThe right group is the View toolbar.5) View mode6) Center middle point7) Frame is on/off8) Grid is on/offButton 1, 3 and 5 are not implemented in this version. You can right (secondary) click button 6, 7, and 8. Note that all toolbar buttons are provided with tooltips. More details Status bar The status bar is not used in this version. Resize GUI The initial size of the picture control is 6 * 96 pixels for both width and height. 96 is the smallest number that can be divided by all 10 zoom factors (1, 2, 3, 4, 6, 8, 12, 16, 24, 32) without giving a residue. This means, that there is always space for a whole number of pixels in the picture control. This makes all calculations much simpler. E.g. when the image is zoomed in/out, when the image is moved and when the grid is drawn. The GUI and the picture control are resized in steps of 96 pixels. When the picture control is resized, the number of pixels is always increased or decreased with a whole number. Transparent images For a transparent image that really contains transparent pixels, it's necessary to clear the image control each time it's updated. This provides some flicker, especially when the image is moved. For a non-transparent image, it's enough to clear the picture control when the image is zoomed out, and the image is smaller than the picture control. This makes navigation to work much smoother. GIF- and PNG-images support transparency. This doesn't necessarily mean, that the images contain any transparent pixels. To verify that there are transparent pixels, you have to investigate every single pixel, and calculate if it's transparent or not. The investigation can stop, when you find the first transparent pixel, or at the end of the image. This can be time consuming. It's not done in this version. Because of the issue with the flicker, a GIF- or PNG-image is by default set to be non-transparent. If you open a GIF- or PNG-image you have to verify visually, if there are any transparent pixels. If this is the case, then right (secondary) click the tab item, and set the Transparent flag. Merlin.gif and Torus.png (from the AutoIt installation), which are included as test images, does contain transparent pixels. For these images, the Transparent flag is set in the inifile. You can turn off the flag, to see what happens, if it's not set. There is an issue with transparent images. If the picture control only contains pixels, that exactly matches the transparent color, which is set in pixel 0x0 in the source image, the picture control gets black. Settings In this version it's not possible to set and save settings. E.g. a setting to open an image automatically, when the program starts up. The five images that opens automatically, are typed directly into the inifile. This version This version is implemented for use in Non-rectangular selections in an image. Only functionality, that's needed in this example, is coded. The code is not cleaned up according to double defined local variables or unused parameters in function calls (primary functions to handle windows messages). This means a lot of warnings if you run Au3Check. Zipfile The top level is the folder "Image Editor". It contains two subfolders: "1) Navigating in an image" and images. images is five test images. "1) Navigating in an image" contains source and resource files: Navigating.au3 - run this scriptincludesVariables.au3 - common global variablesincludesNavigatingImage.au3 - contains most of the calculationsincludesDrawFunctions.au3 - draw image and graphics on top of imageincludesTabCtrlFunctions.au3 - functions for the tab controlincludesToolbarFunctions.au3 - functions for the toolbarincludestoolsFileToolbar.au3 - code for buttons in File toolbarincludestoolsViewToolbar.au3 - code for buttons in View toolbarincludesModernMenuRaw.au3 - copied from this thread by Holgericons - icon filesTested with AutoIt 3.3.10 on Windows 7 32/64 bit and Windows XP 32 bit. Navigating.7z1 point
-

Toggle Button UDF
GoogleGonnaSaveUs reacted to wraithdu for a topic
... I'm gonna go shoot myself now.1 point -
send keys to embedded InternetExplorer ?
SkysLastChance reacted to trancexx for a topic
There is one other option. The main problem is how to get control handle of the embedded object. You can do it like this: #include <IE.au3> #include <GUIConstantsEx.au3> #include <WindowsConstants.au3> _IEErrorHandlerRegister() $oIE = _IECreateEmbedded() $hGUI = GUICreate("myWindow", 800, 600, (@DesktopWidth - 640) / 2, (@DesktopHeight - 580) / 2, _ $WS_OVERLAPPEDWINDOW + $WS_VISIBLE + $WS_CLIPSIBLINGS) $GUIActiveX = GUICtrlCreateObj($oIE, 0, 0, 800, 600) GUISetState();Show GUI _IENavigate($oIE, "http://www.autoitscript.com/forum/index.php?showtopic=82184") ;XXXXXXXXXXXXXXXXXXXXXXXXXXXXXXXXXXXXXXXXXXXXXXXXXXXXXXXXXXXXXXXXXXXXXXX ; Get control handle Global $hHandle = _GetObjectWinHandle($oIE) ConsoleWrite("--- " & $hHandle & @CRLF) ;XXXXXXXXXXXXXXXXXXXXXXXXXXXXXXXXXXXXXXXXXXXXXXXXXXXXXXXXXXXXXXXXXXXXXXX ; Focus it $oIE.document.focus For $i = 1 To 10 #cs $oIE.document.parentwindow.scrollBy(500, 500) ; DaleHohm's suggestion Sleep(1000) #ce ConsoleWrite("sending command:" & ControlSend($hHandle, 0, 0, "{DOWN}") & @CRLF) Sleep(1000) Next Func _GetObjectWinHandle($oObject) Local $aCall = DllCall("oleacc.dll", "int", "WindowFromAccessibleObject", _ "idispatch", $oObject, _ "hwnd*", 0) If @error Or $aCall[0] Then Return SetError(1, 0, 0) EndIf Return $aCall[2] EndFunc ;==>_GetObjectWinHandle1 point -

Gracefully close process that hides in tray when window closed?
FrancescoDiMuro reacted to JLogan3o13 for a topic
Just so everyone knows we are in agreement I will pile on. Well-intentioned or not, none of us needs to be bombarded with PMs about why you feel a post should be opened. None of us is perfect, but we are the ones tasked with ensuring the forum adheres to the rules set forth by the site owner. We all do our best at this task based on our love of the language and a desire to keep it's reputation unsullied. Please show some respect for that fact and, if you disagree with us (assuming you are not the OP) agree to disagree and move on. If, after discussing an edge case among ourselves as we often do, we are incorrect, Jon will certainly set us straight. Edit: This would include, as an afterthought, not creating some word wall in Chat either to voice your opinion for or against what has been stated in this thread.0 points


