Leaderboard
Popular Content
Showing content with the highest reputation on 07/06/2018 in all areas
-
Sure, thanks for pointing this out to us and we will get to it first thing. Jos2 points
-
After having lot of issues myself with getting ImageSearch to work I decided to make topic with explanation how to proper use this script. Here is link of original topic at this topic: Credits to kangkeng for creating such useful piece of code. What is ImageSearch? It's script that find part of screen which you before defined with given image. When should I use ImageSearch? You should use it whenever it's not possible or unlikely that pixelsearch will give what you need. So how can I use ImageSearch and enjoy it's awesome benefits? First of all to avoid mostly caused problems I recompiled DLLs for both architectures which you can download at end of this post. When you pick your package you should place both ImageSearch.au3 and ImageSearch.dll inside script folder. Usage Example: First of all take picture of what you want to search for (print screen + paint + corp + save as bmp). Place that picture in script directory (I named my picture checkImage (checkImage.bmp is full name with extension). You must include ImageSearch.au3 in your script. ImageSearch.au3 consist of 2 Functions you can use: _ImageSearch and _ImageSearchArea Note: Use _ImageSearch to search the entire desktop, _ImageSearchArea to specify a desktop region to search Values to put in for _ImageSearch function (entire screen search) ($findImage,$resultPosition,ByRef $x, ByRef $y,$tolerance, $HBMP=0) Values to put in for _ImageSearchArea function (you declare part of screen to be searched) ($findImage,$resultPosition,$x1,$y1,$right,$bottom,ByRef $x, ByRef $y, $tolerance,$HBMP=0) Description of parameters from ImageSearch.au3 itself: ; Description: Find the position of an image on the desktop ; Syntax: _ImageSearchArea, _ImageSearch ; Parameter(s): ; $findImage - the image to locate on the desktop ; $tolerance - 0 for no tolerance (0-255). Needed when colors of ; image differ from desktop. e.g GIF ; $resultPosition - Set where the returned x,y location of the image is. ; 1 for centre of image, 0 for top left of image ; $x $y - Return the x and y location of the image ; ; Return Value(s): On Success - Returns 1 ; On Failure - Returns 0 Example of my script using _ImageSearch ( entire screen search) #include <ImageSearch.au3> HotKeySet("p", "checkForImage") global $y = 0, $x = 0 Func checkForImage() Local $search = _ImageSearch('checkImage.bmp', 0, $x, $y, 0) If $search = 1 Then MouseMove($x, $y, 10) EndIf EndFunc while 1 sleep(200) WEnd Example of my script using _ImageSearchArea #include <ImageSearch.au3> HotKeySet("p", "checkForImage") global $y = 0, $x = 0 Func checkForImage() local $search = _ImageSearchArea('check5.bmp', 1, 800, 40, 900, 80, $x, $y, 0) If $search = 1 Then MouseMove($x, $y, 10) EndIf EndFunc while 1 sleep(200) WEnd I would like to apologize if by writing this I offended any of member that thinks this script is too simple to even have it explained, it's just as me being new to autoIt it took me so much time getting around errors and making this script to work. Thanks for reading, if you bump on any problems using it post it here, I will try to help you fixing it and update topic for further reference. Download links: 32bit: ImageSearch 32bit.rar 64bit: ImageSearch 64 bit.rar1 point
-

Beats Player
parsisnotebook2 reacted to careca for a file
Version 4.66
2,316 downloads
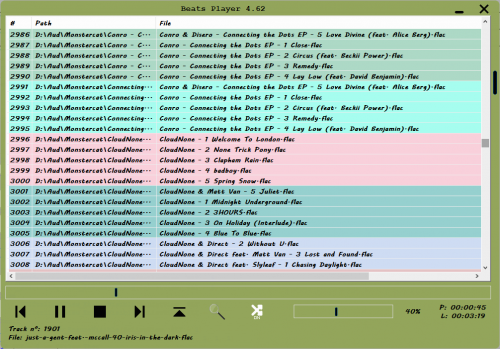
Music player, supports most known filetypes and flac, with a low memory and processor usage, designed to be used in the traybar, drag-drop files/folders to listview, save and load playlists, 5 recent folders (stores last imported folders), playback available with media keys, 1 click in tray icon to hide/show, double click title bar to hide to tray, and much more. It was made for me, and my needs, but im open to sugestions. Modifier key: +Arrows Up/Down Change volume, +P Pause/Resume, Play from start if stopped, +S Stops playback, +Arrows Left/Right Jump to previous/next track, +numbers 1,2,3.. being 1=10%, 2=20% etc and 0 being 100% volume of the player, (not numpad) (modifier key can be changed in the menu.) None of this would be possible without the help of the community! Coment or send PM for suggestions of improvement or issues you have. Thank ya'll.1 point -
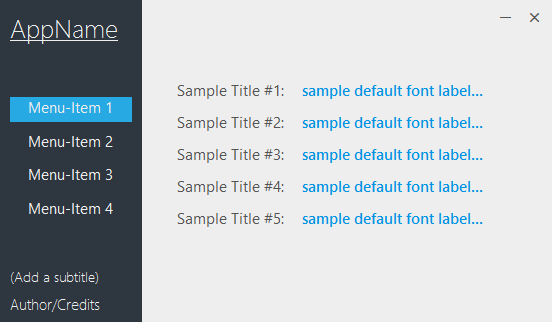
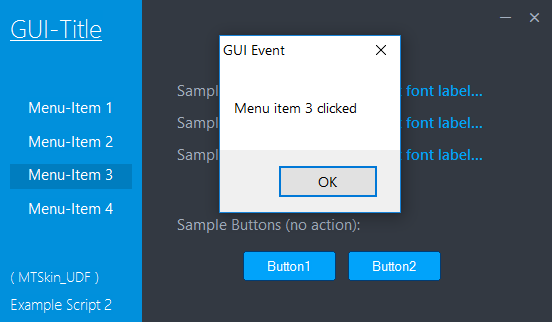
Description: UDF to simply create modern looking GUIs Features: Create light modern aesthetic borderless GUI Interactive menu panel (with mouse-over detection) A bunch of skins (color sets) are available with possibility to create your owns Files: UDF (MTSkin_UDF.au3) + Example Scripts (Example.au3 & Example2.au3) Screenshots: I would be glad to know what you've done with this, so do not hesitate to send me messages. Of course the code can be improved, but I hope you'll find it useful (This is the first time I share my work on this forum, please be indulgent...) Download: MTSkin-UDF.zip Edit: - Scripts modified according to ChuckS' comment - Fixed link broken by reuploading files1 point
-
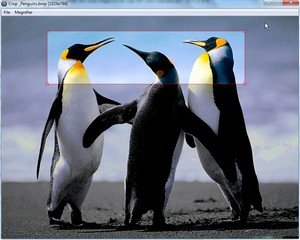
This is a visual Crop Tool, Version 1.0.0.5 Load the image in the Crop GUIMove the cross-hair to the upper left corner where to start croppingMark the rectangle with left mouse button, releaseAdjust the position with left mouse, release (right mouse = start over)Press enterImage is saved in same folder, same format, with '_cr' added to file nameAs simple as that. Updated script, Visual Crop UDF 1.0.0.4 examples.au3 Visual Crop UDF 1.0.0.4.au3 (No obscuration of non-selected area) Visual Crop UDF 1.0.0.5.au3 (with obscuration) Ver 1.0.0.1 Avoid trespassing the edge of the GUI while selecting the crop area.Ver 1.0.0.4 Mark crop area in any directionResizing Corner grabbers (use with Ctrl Left Mouse button)Mouse cursor changes over move and resizing corner grabbersRedraw when left mouse clicking outside of crop area (restart crop), right Mouse click, same result.Magnifier de-/selectable with Ctrl-M or F2. (original function by Melba23) Note: without image ratio: Magnifier remains visible till the crop area has been marked with image ratio: Magnifier is only visible until the rectangle appears, first corner has been marked. Ver 1.0.0.5 Obscure non crop area, did some hard thinking and found my way... Missing still: ?Enjoy GreenCan Related:1 point
-

Using C# and VB Code in AutoIt through .NET Framework
Earthshine reacted to LarsJ for a topic
Passing variables and arrays Passing variables and arrays back and forth between AutoIt code and C#/VB.NET is demonstrated in examples in UsingCSandVB.7z as you can find in bottom of first post. There are two set of examples: A set with C# code and a set with VB code. You can find the examples in these folders: Examples\1) Introductory C# and VB examples\ 3) Passing variables\ 1) From AutoIt to C# or VB\ 2) From C# or VB to AutoIt\ 4) Passing 1D arrays\ 1) From AutoIt to C# or VB\ 2) From C# or VB to AutoIt\ 5) Passing 2D arrays\ 1) From AutoIt to C# or VB\ 2) From C# or VB to AutoIt\1 point -

DotNet.au3 UDF to access .NET Framework from AutoIt
AppleB reacted to Earthshine for a topic
well, in your case, would you not rather be using the capability to run your compiled assembly from memory? you are using the LoadCS Code, no? do me a favor, make this a different support thread and give me the vcsproj files,1 point -

[Solved] _Word_DocFindReplace() doesn't find and replace in Headers/Footers
FrancescoDiMuro reacted to water for a topic
Thanks Glad the problem could be solved. I think I will add a section about "story" to the Word wiki1 point -

[Solved] _Word_DocFindReplace() doesn't find and replace in Headers/Footers
Earthshine reacted to water for a topic
Correct. You need to specify the StoryRange to process. To do the find/replace operation everywhere you need to do something like: For $oStoryRange In $oDoc.StoryRanges _Word_DocFindReplace($oDoc, "Find", "ReplaceWith", Default, $oStoryRange) Next1 point -
So if you don't set the $vRange parameter it searches every worksheet, however you can use something like below to search "Sheet2" only or whatever the name is of your sheet and then it will only search that sheet. #include <Array.au3> #include <Excel.au3> Local $sFilePath = @ScriptDir & "\TestExcel.xlsx" Local $oExcel = _Excel_Open() Local $oWorkBook = _Excel_BookOpen($oExcel, $sFilePath) Local $oWorkBook = _Excel_BookAttach($sFilePath) $aResult = _Excel_RangeFind($oWorkBook, "Ahmed", $oWorkBook.Sheets("Sheet2").UsedRange) _ArrayDisplay($aResult) If IsArray($aResult) Then MsgBox(4096, "Excel Result", "Sheet = " & $aResult[0][0] & @CRLF & _ "Cell Location = " & $aResult[0][2] & @CRLF & _ "Cell Value = " & $aResult[0][3]) You could also search for a particular sheet and column, note in the code below I've specified to only search "sheet2" and only column "D" #include <Array.au3> #include <Excel.au3> Local $sFilePath = @ScriptDir & "\TestExcel.xlsx" Local $oExcel = _Excel_Open() Local $oWorkBook = _Excel_BookOpen($oExcel, $sFilePath) Local $oWorkBook = _Excel_BookAttach($sFilePath) $aResult = _Excel_RangeFind($oWorkBook, "Ahmed", $oWorkBook.Sheets("Sheet2").Range("D:D")) _ArrayDisplay($aResult) If IsArray($aResult) Then MsgBox(4096, "Excel Result", "Sheet = " & $aResult[0][0] & @CRLF & _ "Cell Location = " & $aResult[0][2] & @CRLF & _ "Cell Value = " & $aResult[0][3])1 point
-

How to code it using AutoIT?
oemript reacted to JLogan3o13 for a topic
I'm not understanding what you want to do. If you just want to run a PowerShell command in AutoIt, you would do something like this: Run("powershell.exe <commands>") But why mix languages in your script? If you would explain what you're actually trying to do, it might help others help you.1 point -

Attach to pid (specifically the one used by Run)
Psychobird25 reacted to careca for a topic
https://www.autoitscript.com/wiki/FAQ#How_can_I_get_a_window_handle_when_all_I_have_is_a_PID.3F https://www.autoitscript.com/forum/topic/116692-window-handle-from-pid/1 point -

GUI IN GUI
JuanFelipe reacted to Subz for a topic
Couple of pointers: Always rename your Guis differently e.g. in your code you have main Gui called Form1 and additional Gui also named Form1, doing so allows you to target the correct Gui. Don't use Exit unless you wish to close your entire script, instead Exit the loop and use GuiDelete. But as Melba23 mentioned read the link he provided and also the help file.1 point -

GUI IN GUI
JuanFelipe reacted to Melba23 for a topic
JuanFelipe, I suggest reading the Managing Multiple GUIs tutorial in the Wiki - that will explain how to do it. M231 point -
Setting affinity on a runninng process
masvil reacted to supraspecies for a topic
OK, here's the problem: I need to start an old application, then, in about 5 to 10 seconds, restrict its affinity to a single core. Launching the application with affinity already preset is not an option - needs to be done on a running process. Windows XP support is required. Usage of third party tools is allowed, but if it is possible to do with AutoIt alone, that would be preferable. Googled the hell out of it, still did not manage to find script examples or utilities to do what I need. Thank you very much for your support. UPDATE: Looks like I'm able to solve the problem using the script from the topic below, but I will not hurry and say "problem solved" until I am done testing. UPDATE 2: Yup, completely solved everything and tested on different computers and different operating systems. No more help needed. If anyone needs to set affinity to a running process, refer to the forum topic I posted above. Cheers.1 point -

Crop an image from file
pixelsearch reacted to UEZ for a topic
Try this: #include <GDIPlus.au3> Example() Func Example() Local $hBitmap, $hClone, $hImage, $iX, $iY ; Initialize GDI+ library _GDIPlus_Startup() ; Capture 32 bit bitmap $hImage = _GDIPlus_ImageLoadFromFile("result.bmp") ; Create 24 bit bitmap clone $iX = _GDIPlus_ImageGetWidth($hImage) $iY = _GDIPlus_ImageGetHeight($hImage) $hClone = _GDIPlus_BitmapCloneArea($hImage, 0, 0, $iX/2, $iY/2, $GDIP_PXF24RGB) ; Save bitmap to file _GDIPlus_ImageSaveToFile($hClone, @ScriptDir & "\GDIPlus_Image.bmp") ; Clean up resources _GDIPlus_ImageDispose($hClone) _GDIPlus_ImageDispose($hImage) ; Shut down GDI+ library _GDIPlus_Shutdown() ShellExecute(@ScriptDir & "\GDIPlus_Image.bmp") EndFunc ;==>Example This makes no sense: $hBitmap = "result.bmp" $hImage = _GDIPlus_BitmapCreateFromHBITMAP($hBitmap) How can a string be a bitmap? Br, UEZ1 point


