

smartee
-
Posts
652 -
Joined
-
Last visited
-
Days Won
1


smartee's Achievements
Universalist (7/7)
18
Reputation
-
 pat4005 reacted to a post in a topic:
Real-Time Object Detection using YOLOv3 wrapper
pat4005 reacted to a post in a topic:
Real-Time Object Detection using YOLOv3 wrapper
-
Parsix reacted to a post in a topic:
Real-Time Object Detection using YOLOv3 wrapper
-
yutijang reacted to a post in a topic:
Real-Time Object Detection using YOLOv3 wrapper
-
jimmy123j reacted to a post in a topic:
Real-Time Object Detection using YOLOv3 wrapper
-
SEuBo reacted to a post in a topic:
Real-Time Object Detection using YOLOv3 wrapper
-
FrancescoDiMuro reacted to a post in a topic:
Real-Time Object Detection using YOLOv3 wrapper
-
 mLipok reacted to a post in a topic:
Real-Time Object Detection using YOLOv3 wrapper
mLipok reacted to a post in a topic:
Real-Time Object Detection using YOLOv3 wrapper
-
cloudofxyz reacted to a post in a topic:
Real-Time Object Detection using YOLOv3 wrapper
-
Real-Time Object Detection using YOLOv3 wrapper
smartee replied to smartee's topic in AutoIt Example Scripts
Hi sloppyjoe, glad you got it working, it just might work with some other weights and config files you find laying about, give it a shot and let us know how it goes, here is the relevant part of the dll C source where the network is loaded: // Load the network Net net = readNetFromDarknet(modelConfiguration, modelWeights); net.setPreferableBackend(DNN_BACKEND_OPENCV); frame = GdiPlusBitmapToOpenCvMat(bmp); // Create a 4D blob from a frame. blobFromImage(frame, blob, 1 / 255.0, cvSize(inpWidth, inpHeight), Scalar(0, 0, 0), true, false); //Sets the input to the network net.setInput(blob); // Runs the forward pass to get output of the output layers vector<Mat> outs; net.forward(outs, getOutputsNames(net)); If you want to dive deeper and work with custom object classes I'd advise checking out his site and trying to utilize his darknet application to see if you can successfully train and test your network etc with his native tools. Also take a look at the sites I posted in the credits section above. I've only just started playing with these networks myself, I look forward to hearing of your adventures. Feel free to post back here or in General Help section with any follow ups, I'll chime in when I can and will be happy to share any code and resources to help you bridge the python and c dominated domain of ML with AutoIt. Good luck. -
Real-Time Object Detection using YOLOv3 wrapper
smartee replied to smartee's topic in AutoIt Example Scripts
Hi bazanski, you will find detailed instructions on training your own network with different datasets such as Pascal VOC and COCO on Joseph Redmon's site, https://pjreddie.com/darknet/yolo/ , using his darknet application like: ./darknet detector train cfg/coco.data cfg/yolov3.cfg darknet53.conv.74 If you want to use multiple gpus run: ./darknet detector train cfg/coco.data cfg/yolov3.cfg darknet53.conv.74 -gpus 0,1,2,3 If you want to stop and restart training from a checkpoint: ./darknet detector train cfg/coco.data cfg/yolov3.cfg backup/yolov3.backup -gpus 0,1,2,3 -
Danyfirex reacted to a post in a topic:
Real-Time Object Detection using YOLOv3 wrapper
-
smartee reacted to a post in a topic:
Real-Time Object Detection using YOLOv3 wrapper
-
smartee reacted to a post in a topic:
Real-Time Object Detection using YOLOv3 wrapper
-
argumentum reacted to a post in a topic:
Real-Time Object Detection using YOLOv3 wrapper
-
Real-Time Object Detection using YOLOv3 wrapper
smartee replied to smartee's topic in AutoIt Example Scripts
Great! Thanks for not giving up! -
Real-Time Object Detection using YOLOv3 wrapper
smartee replied to smartee's topic in AutoIt Example Scripts
What version of windows are you using? -
Real-Time Object Detection using YOLOv3 wrapper
smartee replied to smartee's topic in AutoIt Example Scripts
oh hmm, and your project directory looks like this? C:\projectdir\ │ autoyolo.dll │ AutoYOLO3.au3 │ basic_example.au3 │ gui_example.au3 │ opencv_videoio_ffmpeg430_64.dll │ opencv_world430.dll │ people-2557408_1920.jpg │ scooter-5180947_1920.jpg │ └───yolo yolov3.cfg yolov3.txt yolov3.weights -
Real-Time Object Detection using YOLOv3 wrapper
smartee replied to smartee's topic in AutoIt Example Scripts
Good, download and extract/install https://sourceforge.net/projects/opencvlibrary/files/4.3.0/opencv-4.3.0-vc14_vc15.exe/download The DLLs will be in {your extracted path}\opencv\build\x64\vc15\bin\ Good luck!- 43 replies
-
- 1
-
-
- darknet
- deep learning
- (and 3 more)
-
Real-Time Object Detection using YOLOv3 wrapper
smartee replied to smartee's topic in AutoIt Example Scripts
@argumentum Hello, thanks for giving it a go. Yes, do you have the Microsoft Visual C++ 2015-2019 Redistributable (x64) installed? You can download here - https://aka.ms/vs/16/release/vc_redist.x64.exe -
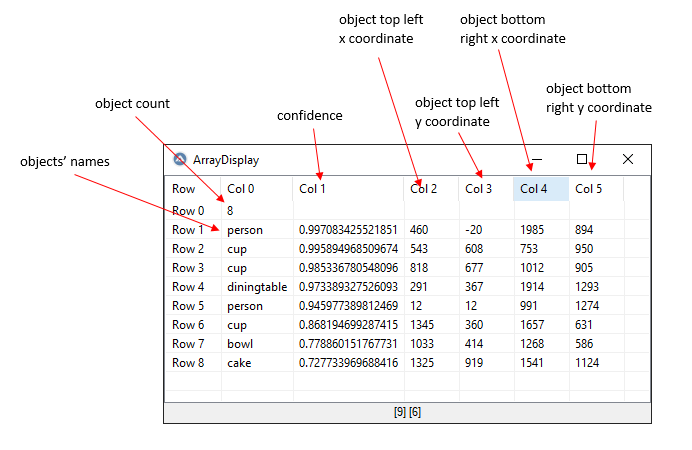
Hi guys, here is a small dll wrapper I made geared at making YOLOv3 (Joseph Redmon, Ali Farhadi) more accessible to AutoIt users. Homepage of YOLO: https://pjreddie.com/darknet/yolo/ Technical overview: You only look once (YOLO) is a state-of-the-art, real-time object detection system. On a Pascal Titan X it processes images at 30 FPS and has a mAP of 57.9% on COCO test-dev. (from https://pjreddie.com/darknet/yolo/) Screenshots: Features: This UDF currently supports recognizing objects in images passed in as a HBITMAP Below is a complete list of the functions currently available in this library: ; #CURRENT# ===================================================================================================================== ;_AutoYolo3_GetLastError ;_AutoYolo3_GetObjInHBitmap ;_AutoYolo3_GetVersion ;_AutoYolo3_SetConfig ;_AutoYolo3_YoloTest ; =============================================================================================================================== The _AutoYolo3_GetObjInHBitmap function returns a 2D Array of detected objects as illustrated below: Examples: Example1: basic_example.au3 #Region ;**** Directives created by AutoIt3Wrapper_GUI **** #AutoIt3Wrapper_UseX64=y #EndRegion ;**** Directives created by AutoIt3Wrapper_GUI **** #include <AutoYOLO3.au3> #include <GDIPlus.au3> ConsoleWrite("Using autoyolo version:" & _AutoYolo3_GetVersion() & @CRLF) _GDIPlus_Startup() $hImage = _GDIPlus_ImageLoadFromFile(@ScriptDir&"\people-2557408_1920.jpg") Local $hHBITMAP = _GDIPlus_BitmapCreateHBITMAPFromBitmap($hImage, 0x00000000) Local $aRes = _AutoYolo3_GetObjInHBitmap($hHBITMAP) _ArrayDisplay($aRes) _GDIPlus_ImageDispose($hImage) _GDIPlus_Shutdown() Example 2: gui_example.au3 #Region ;**** Directives created by AutoIt3Wrapper_GUI **** #AutoIt3Wrapper_UseX64=y #AutoIt3Wrapper_AU3Check_Parameters=-w 1 -w 2 -w 3 -w 4 -w 5 #EndRegion ;**** Directives created by AutoIt3Wrapper_GUI **** #include <ButtonConstants.au3> #include <EditConstants.au3> #include <GUIConstantsEx.au3> #include <StaticConstants.au3> #include <WindowsConstants.au3> #include <AutoYOLO3.au3> #include <GDIPlus.au3> ConsoleWrite("Using autoyolo version:" & _AutoYolo3_GetVersion() & @CRLF) _GUIExample1() Func _GUIExample1() _GDIPlus_Startup() Local $iPicW=609 Local $iPicH=385 #Region ### START Koda GUI section ### Form= GUICreate(@ScriptName&" - Object Detection with AutoIt!", 625, 506) GUISetFont(14, 400, 0, "Calibri") Local $Button1 = GUICtrlCreateButton("browse", 472, 8, 145, 33) Local $Input1 = GUICtrlCreateInput(@ScriptDir & "\scooter-5180947_1920.jpg", 8, 8, 457, 31) Local $Button2 = GUICtrlCreateButton("detect objects!", 228, 448, 169, 49) Local $Pic1 = GUICtrlCreatePic("", 8, 48, $iPicW, $iPicH, $SS_BITMAP) GUISetState(@SW_SHOW) #EndRegion ### END Koda GUI section ### Local $hImage = _LoadImage($Input1, $Pic1, 0, $iPicW,$iPicH) While 1 $nMsg = GUIGetMsg() Switch $nMsg Case $GUI_EVENT_CLOSE Exit Case $Button1 GUICtrlSetData($Input1, FileOpenDialog("Please select image", @ScriptDir, "All (*.*)")) $hImage = _LoadImage($Input1, $Pic1, $hImage, $iPicW,$iPicH) Case $Button2 GUICtrlSetState($Button2, $GUI_DISABLE) GUICtrlSetData($Button2, "working..") Local $hHBITMAP = _GDIPlus_BitmapCreateHBITMAPFromBitmap($hImage, 0x00000000) Local $aRes = _AutoYolo3_GetObjInHBitmap($hHBITMAP) ;_ArrayDisplay($aRes) If @error Then Local $iErr = @error Local $asDllErrors[6] = ["No error", "unable to use the DLL file", "unknown ""return type""", """function"" not found in the DLL file", "bad number of parameters", "bad parameter"] If $iErr < 6 Then MsgBox(32, @ScriptName, "DLL Error, " & $asDllErrors[$iErr]) Else MsgBox(32, @ScriptName, "DLL Error, " & _AutoYolo3_GetLastError()) EndIf ElseIf _AutoYolo3_GetLastError() <> "" Then MsgBox(32, @ScriptName, _AutoYolo3_GetLastError()) Else ;nice thick green boxes Local $hPen = _GDIPlus_PenCreate(0xFF00FF00, 2, 2) Local $hBrush = _GDIPlus_BrushCreateSolid(0xFF000000) Local $hFormat = _GDIPlus_StringFormatCreate() Local $hFamily = _GDIPlus_FontFamilyCreate("Calibri") Local $hFont = _GDIPlus_FontCreate($hFamily, 12, 0) Local $tLayout = _GDIPlus_RectFCreate(140, 110, 100, 20) Local $hBrushBack = _GDIPlus_BrushCreateSolid(0x7FFFFFFF) ;color format AARRGGBB (hex) $hGraphics = _GDIPlus_ImageGetGraphicsContext($hImage) _GDIPlus_GraphicsSetSmoothingMode($hGraphics, $GDIP_SMOOTHINGMODE_HIGHQUALITY) ;sets the graphics object rendering quality (antialiasing) For $i = 1 To $aRes[0][0] ; Draw a frame around the object _GDIPlus_GraphicsDrawRect($hGraphics, $aRes[$i][2], $aRes[$i][3] , ($aRes[$i][4] - $aRes[$i][2]) , ($aRes[$i][5] - $aRes[$i][3]) , $hPen) ; Label it $sLabel = $aRes[$i][0] & " " & StringLeft($aRes[$i][1], 6) $tLayout = _GDIPlus_RectFCreate($aRes[$i][2] , $aRes[$i][3] , 200, 20) $iBackLen = 0 If (StringLen($sLabel) * 8) > $iBackLen Then $iBackLen = StringLen($sLabel) * 8 EndIf _GDIPlus_GraphicsFillRect($hGraphics, $aRes[$i][2] , $aRes[$i][3], $iBackLen, 20, $hBrushBack) _GDIPlus_GraphicsDrawStringEx($hGraphics, $sLabel, $hFont, $tLayout, $hFormat, $hBrush) Next $hHBITMAP = _GDIPlus_BitmapCreateHBITMAPFromBitmap($hImage, 0x00000000) GUICtrlSendMsg($Pic1, $STM_SETIMAGE, $IMAGE_BITMAP, $hHBITMAP) _GDIPlus_PenDispose($hPen) _GDIPlus_FontDispose($hFont) _GDIPlus_FontFamilyDispose($hFamily) _GDIPlus_StringFormatDispose($hFormat) _GDIPlus_BrushDispose($hBrush) _GDIPlus_BrushDispose($hBrushBack) _GDIPlus_GraphicsDispose($hGraphics) EndIf GUICtrlSetData($Button2, "detect objects!") GUICtrlSetState($Button2, $GUI_ENABLE) EndSwitch WEnd If $hImage <> 0 Then _GDIPlus_ImageDispose($hImage) EndIf _GDIPlus_Shutdown() EndFunc ;==>_GUIExample1 Func _LoadImage($Input1, $Pic1, $hImage, $iPicW, $iPicH) If $hImage <> 0 Then _GDIPlus_ImageDispose($hImage) EndIf Local $sImagePath = GUICtrlRead($Input1) $hImage = _GDIPlus_ImageLoadFromFile($sImagePath) Local $iWidth = _GDIPlus_ImageGetWidth($hImage) Local $iHeight = _GDIPlus_ImageGetHeight($hImage) Local $sFactor = 1 If $iWidth > $iPicW Then $sFactor = $iPicW / $iWidth EndIf If $iHeight > $iPicH And ($iHeight * $sFactor) > $iPicH Then $sFactor = $iPicH / $iHeight EndIf $iHeight = $iHeight * $sFactor $iWidth = $iWidth * $sFactor $hResizedImage = _GDIPlus_ImageResize($hImage, $iWidth, $iHeight) _GDIPlus_BitmapDispose($hImage) Local $hHBITMAP = _GDIPlus_BitmapCreateHBITMAPFromBitmap($hResizedImage, 0x00000000) GUICtrlSendMsg($Pic1, $STM_SETIMAGE, $IMAGE_BITMAP, $hHBITMAP) Return $hResizedImage EndFunc ;==>_LoadImage Requirements: Windows x64, AutoIt x64 Microsoft Visual C++ 2015-2019 Redistributable (x64) - https://aka.ms/vs/16/release/vc_redist.x64.exe OpenCV binaries - https://sourceforge.net/projects/opencvlibrary/files/4.3.0/opencv-4.3.0-vc14_vc15.exe/download Quickstart: Ensure you are running Windows x64, AutoIt x64 Install Microsoft Visual C++ 2015-2019 Redistributable (x64) if not already installed - https://aka.ms/vs/16/release/vc_redist.x64.exe Create your project directory anywhere, for this example we use C:\projectdir\ Download OpenCV - https://sourceforge.net/projects/opencvlibrary/files/4.3.0/opencv-4.3.0-vc14_vc15.exe/download Unpack OpenCV anywhere and copy opencv_videoio_ffmpeg430_64.dll, opencv_world430.dll to C:\projectdir\ Download trained weights, classes, config files Weights file: Save as C:\projectdir\yolo\yolov3.weights - https://pjreddie.com/media/files/yolov3.weights Classes file: Save as C:\projectdir\yolo\yolov3.txt - https://github.com/pjreddie/darknet/blob/master/data/coco.names https://raw.githubusercontent.com/zishor/yolo-python-rtsp/master/cfg/yolov3.txt NEW Config file: Save as C:\projectdir\yolo\yolov3.cfg - https://github.com/pjreddie/darknet/blob/master/cfg/yolov3.cfg https://raw.githubusercontent.com/zishor/yolo-python-rtsp/master/cfg/yolov3.cfg NEW Unpack autoyolo1.1.zip from downloads below to your project dir So your project directory should look like: C:\projectdir\ │ autoyolo.dll │ AutoYOLO3.au3 │ basic_example.au3 │ gui_example.au3 │ opencv_videoio_ffmpeg430_64.dll │ opencv_world430.dll │ people-2557408_1920.jpg │ scooter-5180947_1920.jpg │ └───yolo yolov3.cfg yolov3.txt yolov3.weights You are done! Try running one of the examples! Download: LAST UPDATED: 06-JUN-2020 autoyolo1.1.zip 785 KB Credits: YOLOv3: An Incremental Improvement - Joseph Redmon, Ali Farhad https://pjreddie.com/yolo/ https://www.learnopencv.com/deep-learning-based-object-detection-using-yolov3-with-opencv-python-c/ zishor for alternative config and classes (https://github.com/zishor/yolo-python-rtsp) MIT License FAQ: I get error "Cannot use dll" Ensure that you are running script as x64, that you have Microsoft Visual C++ 2015-2019 Redistributable (x64) installed, and that the following files are in the @ScriptDir: autoyolo.dll, opencv_videoio_ffmpeg430_64.dll, opencv_world430.dll I get a crash when clicking detect Try using the NEW config and classes links above All feedback is welcome -smartee


- 43 replies
-
- 10
-
-
-
- darknet
- deep learning
- (and 3 more)
-
Odd results when using .ini files and loops
smartee replied to n2989's topic in AutoIt General Help and Support
The script works as expected, you are doing string comparison, IniRead returns a string on success. before doing integer comparisons convert it to an Int, try updating these lines like so Global $Start = Int(IniRead($IniFile, 'GENERAL', 'Start', '')) Global $End = Int(IniRead($IniFile, 'GENERAL', 'End', '')) hope this helps... -
Example _FFCmd usage from FF.au3 taken from http://english.documentation.ff-au3.thorsten-willert.de/ff_functions/_FFCmd.php #Include <FF.au3> _FFConnect() If _FFIsConnected() Then ; href of the current page $sHref = _FFCmd(".location.href") If Not @error Then MsgBox(64,"Current href:",$sHref) _FFOpenURL("http://ff-au3-example.thorsten-willert.de/") ; href from an image link $sHref = _FFCmd(".images[0].parentNode.href") If Not @error Then MsgBox(64,"Href of the first image-link:",$sHref) ; title of the current page $sTitle = _FFCmd( ".title") If Not @error Then MsgBox(64,"Title of the current page:",$sTitle) ; browser version $sVersion = _FFCmd("navigator.userAgent") If Not @error Then MsgBox(64,"Browser version:",$sVersion) Else MsgBox(64,"Error:","Can't conncect to FireFox") EndIf
-
hi Palmendieb, welcome to the forums, take a look at FF.au3, http://www.autoitscript.com/forum/index.php?showtopic=95595
-
Does this work? #include <File.au3> $aFileList = _FileListToArray(@ScriptDir) ; requires #include <File.au3> $hFile = FileOpen(@ScriptDir & "\myfiles.txt", $FO_UTF8_NOBOM + $FO_OVERWRITE) For $i = 1 To $aFileList[0] FileWriteLine($hFile, $aFileList[$i]) Next FileClose($hFile)
-
AutoItWinSetTitle! awesome, my time away from AutoIt is showing, time to crack open the help file and freshen up, is there any process name to hWnd function i might have missed?
-
hi aNewLyfe, this might be a bit more involved than you anticipated. A quick web search showed me: DreamScene achieves it. Mysteriously. $$$. VLC achieves it. http://www.howtogeek.com/howto/18167/set-a-video-as-your-desktop-wallpaper-with-vlc/ Maybe automate VLC or/with some command line fu? http://superuser.com/questions/678670/starting-vlc-via-command-line-to-play-a-video-as-desktop-wallpaper These guys made some headway too http://www.pouet.net/topic.php?which=7440&page=1 That last link asserts that it may not be as simple as window ordering. This is interesting. Maybe we'll see your implementation in the example scripts section one day? Good luck.
-
This uses the first match for the process, hope this gives some insight$iMyPID = @AutoItPID ConsoleWrite("+>My process ID is: " & $iMyPID & @CRLF) $hMyHWnd = __ProcessGetHWnd($iMyPID) ConsoleWrite("+>My window handle is: " & $hMyHWnd & @CRLF) $sMyWinTitle = WinGetTitle($hMyHWnd) ConsoleWrite("+>My window title is: " & $sMyWinTitle & @CRLF) WinSetTitle($hMyHWnd, "", "New Title") $sMyWinTitle = WinGetTitle($hMyHWnd) ConsoleWrite("+>My new window title is: " & $sMyWinTitle & @CRLF) ; returns the first window handle found that belongs to process, or 0 Func __ProcessGetHWnd($iPID) Local $aWin = WinList() For $i = 1 To $aWin[0][0] If $iPID = WinGetProcess($aWin[$i][1]) Then ;try building an array here instead of returning the first match Return $aWin[$i][1] EndIf Next SetError(1, @extended, 0) EndFunc ;==>__ProcessGetHWnd